
Build an Arduino BLE-Enabled Indoor Air Quality Monitor
Use an Arduino/Genuino 101 with iAQ-Core air quality and HIH-6131 temperature/humidity sensors to make an Indoor Air Quality Monitor with Bluetooth low energy (BLE) connectivity.
Like most folks, I sometimes wonder about the quality of the air I breathe. Naturally, I turned to the possibility of a project designed to measure the quality of the air in my own home.

The finished Indoor Air Quality Monitor
Indoor air quality is not a simple concept to quantify. I assumed that too much CO2 (Carbon Dioxide) didn’t seem like a good idea. Furthermore, large concentrations of VOCs (volatile organic compounds) didn’t sound too pleasant either. So, I reasoned that these would be some important measures to have available.
After further investigation, I found only a few ICs available to build such a project around. I settled on the iAQ-Core module from AMS.
As I read more about measuring indoor air quality, I began to appreciate the complexity of the issue. The volatility of many compounds (the degree to which they vaporize into the air) depends, in part, on the temperature. Also, relative humidity can be a factor for some compounds. Thus, I decided to add temperature and relative humidity sensors to the project.
Of course, I wanted to use a microcomputer with a display to read sensor output. As an additional feature, I decided to include BLE connectivity to allow remote monitoring.
Let me state up front and without qualification (as in a complete disclaimer) that this project is an experiment driven by my curiosity. I don’t really know how meaningful it is as a decision tool for anything.
Reference Material
The following links are for datasheets for components used and additional relevant material. I found these to be essential and I strongly encourage you to read through them if you are interested in the project.
- iAQ-Core IC datasheet (PDF)
- HIH-6131 datasheet (PDF)
- I2C Communication with the Honeywell HumidIcon Digital Humidity/Temperature Sensors (PDF)
- Arduino/Genuino 101 overview and specifications
- Arduino/Genuino 101 schematic (PDF)
- Volatile organic compound (Wikipedia)
- Technical Overview of Volatile Organic Compounds (USEPA)
- Indoor Air Quality (USEPA)
iAQ-Core Sensor Module
The iAQ-Core indoor air quality sensor module is the heart of the project and is used to provide CO2 and total volatile organic compounds (TVOC) equivalent predictions. The sensing range from the datasheet is as follows: 450-2000 ppm CO2 equivalents and 125-600 ppb TVOC equivalents. "Equivalents" are somewhat vague units and are not defined as well as I would have liked.
From doing a little background reading, it seems like a CO2 equivalent unit includes CO2 and other "greenhouse" gasses, apparently scaled to a property of CO2. TVOC equivalent units also appears to be a somewhat vague measure. It seems that there are a number of compounds considered to be VOCs with particular relevance to indoor air quality and these are totaled and expressed as some standardized measure.
In all fairness, I have seen the use of these "equivalent" units on several commercial indoor air monitors. Still, I would have liked to have seen a more rigorous definition.

The iAQ Core C sensor module
The device uses Micro-Electro-Mechanical Systems (MEMS) metal oxide sensor technology. It is a 3.3v device that supports an I2C interface, and it is available with either a continuous (-C) or pulsed (-P) operating mode.
Interfacing the device is relatively easy. There are no commands to send. You do not write to the device's address at all, and the datasheet cautions that having the write bit set when addressing the chip can seriously interfere with its functionality. Instead, you simply read 9 bytes from the fixed I2C address.
Within those 9 bytes, you have a status byte (0x0 = ok, 0x01 = busy, 0x10 = warming up, which takes ~5 min, and 0x80 = error), sensor resistance (ohms) and, of course, the CO2 and TVOC equivalent values. The datasheet contains more details.
HIH-6131 Humidity/Temperature Sensor
To provide measurements for temperature and relative humidity, I chose the Honeywell HIH-6131. This SMT chip has a supply voltage range of 1.8v-5.5v, making it suitable for 3.3v operation. It also uses an I2C interface and the address can even be programmed, although I had no need for that feature. The chip has some alarm features, which I also did not need for this project.
Using the chip is relatively easy and there are Arduino libraries and code samples around for your use (example here). For my specific application, I did not need a library as you can get the humidity and temperature values with only a few lines of code.
Basically, after waking the chip up, you read 4 bytes of data. The first byte includes two status bits: 00 = normal, 01 = stale data (click here for the definition of "stale data"), 10 = in command mode, 11 = not used. All other bits in the four bytes are used to convey relative humidity and temperature data that can be easily converted to RH percentage and degrees Celsius (which I converted to Fahrenheit).

HIH-6131 humidity and temperature IC
The HIH-6131 is distinguished from the HIH-6130 by a condensation-resistant hydrophobic filter that is visible in the pictures.

HIH-6131 humidity and temperature IC on a carrier board
Because it is an SMT IC, I used a small carrier board. With some careful soldering, it is not too difficult to manage and will allow you to mount header pins for easy access to the IC pins.
LCD Display
To display the sensor values, I decided to use a Grove RGB backlit LCD (available here and here). This I2C display has two particularly desirable features for the project.
First, while the LCD is 5v, the I2C I/O is 3.3v/5v compatible, making it easy to use with the Arduino 101 which has 3.3v I/O. Second, the backlight is configurable and I wanted to use that feature to communicate certain conditions. That is, green for normal and blue when a central device has connected over BLE.
The Arduino driver that I used and sample code are available here.

Grove RGB backlight LCD (2 x 16)
Arduino 101 board
I chose the Arduino 101 (USA) / Genuino 101 (outside of the USA) board for the microcomputer. This is a 3.3v board with the Intel Curie module, but also with a lot of Arduino familiarity and ease of use. Another feature is that it comes with BLE capabilities on the board and a CurieBLE library. In addition to the information links in the references section above, there is a dedicated forum for the board here.

Arduino 101 / Genuino 101
Circuit and Schematic
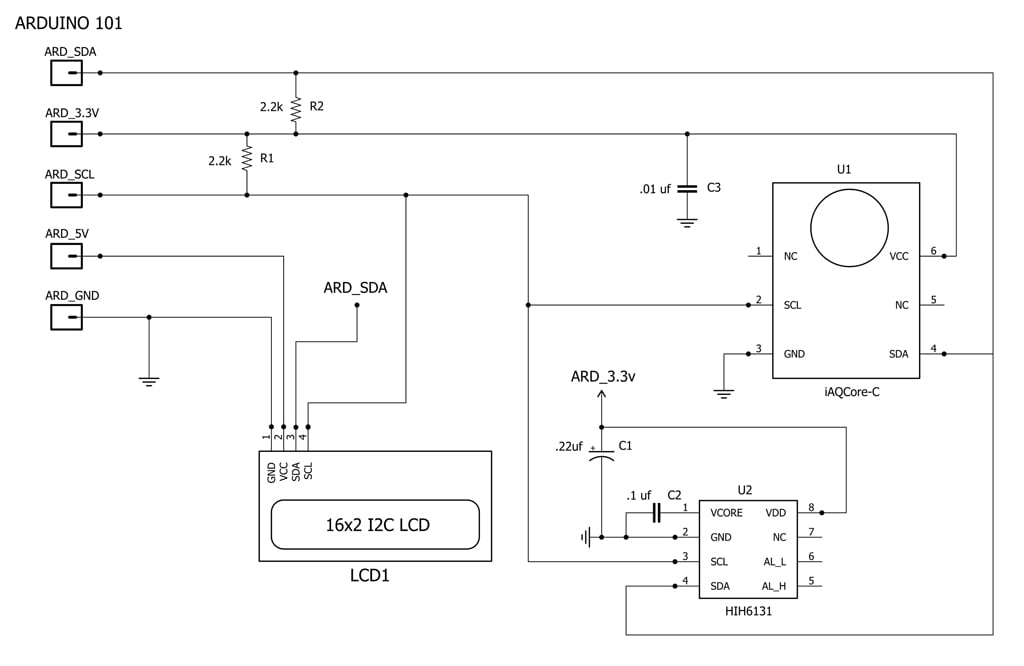
Schematic for the Indoor Air Quality Monitor. Click to enlarge.
The complete circuit schematic appears in the figure above. It is straightforward and uses relatively few parts. Both sensors are attached to the Arduino's I2C pins and I used 2.2K pull-up resistors on the I2C bus, which is powered by the 3.3v line that is available on the Arduino header. The 3.3v line also powers the sensors. The LCD I/O is also on the 3.3v I2C bus, but it is powered by the 5v line, which is also available on the Arduino header.
Add a few capacitors and the circuit is complete. Note that I used a 0.22 μF polarized capacitor for C1 because that's what I had on hand, but a (non-polarized) ceramic capacitor is the standard choice for power-supply decoupling.
| Component | Description |
|---|---|
| C1 | 0.22 μF polarized capacitor |
| C2 | 0.1 μF non-polarized capacitor |
| C3 | 0.01 μF non-polarized capacitor |
| R1,R2 | 2.2K resistor |
| U1 | iAQ-Core-C sensor module |
| U2 | HIH-6131 sensor |
| LCD1 | RGB LCD 2 X 16 (see text) |
| Case | see text |
| Extension | see text |
| Miscellaneous | circuit board, headers, sockets, jumpers |
The iAQ-Core-C sensor module is available through several online suppliers including Mouser. The HIH-6131 sensor is also available from online sources including Digi-Key. I used a convenient case to enclose the project, and I also used this extension for the case.
From the picture of the finished project (at the beginning of the article), you can see how I mounted the sensors so that they are exposed to circulating air. And to allow for easy removal, I connected the sensor pins using sockets instead of direct soldering. In retrospect, I probably should have placed the HIH-6131 in the front of the case as it runs a few degrees (F) high (as far as I can tell) likely because of heat generated from the Arduino 101 board that sits below.
Operation and BLE testing
When you power up the air quality monitor, using either USB or through the Arduino external power connection (see specifications link), the display will light in a few seconds with a green backlight. From left to right and top to bottom, the diplay will show sensor output for: RH, Temperature (F), CO2 equivalent, and TVOC equivalent values.
As mentioned, normally, the iAQ Core chip takes a few minutes to warm up. During this time, you will see a warm-up code instead of the values. Similarly, if other errors occur with either sensor, the appropriate error code will be displayed instead of a value.
If you exhale close to either sensor, you should see a jump in the RH value as well as the CO2 equivalent value. If you place the monitor in various home environments, like the kitchen when cooking, you will get an idea of the range of values.
Note also that iAQ values outside of the specified sensing range can be displayed, as is mentioned in the datasheet, and I preserved that characteristic in the software. The LCD values will refresh every two seconds, and that rate can be changed in the program code.
An easy way to test the BLE connectivity is to use nRF Connect for mobile (previously called nRF Master Control Panel). This free software is an impressive tool. Install it on your device (I used one with an Android OS), run it, and scan for BLE devices. If you have powered up the monitor you should see it in the list.

Screenshot of the nRF Connect Scan—note the "AirQuali" device
Tap on "CONNECT" and you will see the list of all of the monitor's variables that are being transmitted. Notice also that the LCD backlight has changed to blue, denoting a connection.

Screenshot showing the monitor's six transmitted characteristics
Next, tap on each of the six triple downward arrows (the first one is circled). You will see the same list of characteristics, but now you will see their values and they will update every couple of seconds.

Screenshot showing the monitor's six transmitted characteristics and their values
Those values are the sensor values that are being transmitted by the monitor. In order, they are: iAQ Core status, iAQ Core CO2, iAQ Core TVOC, HIH status, HIH RH, and HIH temperature.
If you examine the program code, you will see where these variables are transmitted, as well as their type. For example, the second value, which is circled in red, is 0xc2, 0x01, 0x00, 0x00. This value is for the CO2 measure which is a 16-bit integer. The first two bytes of the value represent this integer in "LSB, MSB" format. That is, the integer value is 0x01c2, which is decimal 450, which was the CO2 reading on the LCD at the time of the screenshot.
The TVOC variable is a long integer (32 bits), and RH and temperature are floating-point values—you could translate those as well.
Examination of the code will also reveal the assignment of a universally unique identifier (UUID) for each characteristic. These are generated using random numbers and were the product of using an online generator.
The nRF Connect app does not replace a custom app for the monitor which you could write for your device, but it is a very easy way to see what is going on and to verify the BLE functionality.
Code
Below, you can download the complete Arduino code for the Indoor Air Quality Monitor. It is straightforward and should not be too difficult for you to customize, if you are so inclined.
For reference, this is the setup I used to write the code:
- Windows 7, 64 bit
- Arduino 1.6.7
- Intel Curie Board 1.0.6 (as installed through the Arduino Board Manager)
- Samsung Galaxy Notepad Pro 12.2 (as a central BLE device)
Closing Thoughts
This has been an interesting, rewarding, and very educational project for me. I am, in fact, impressed by the sophistication of the sensors as well as the relative ease of the implementation.
Hopefully, you will also find it interesting. If you do build one, or something similar, please let us know how it went for you.
Give this project a try for yourself! Get the BOM.


Brother don’t mind anything for asking this silly question!!So,what am gonna do with my air quality!Is that a reliable thing that wch ppl can use it eco friendly!Ur idea is too good and your project idea really blown my mind away! But, the thing always said by my teacher,“If you’re innovating something let it be useful to the people”.Dont think am saying this isn’t useful..thou if you make this project in step ahead wch can be req.to the day to day life of ppl..witnessing usefulness…that will be more appreciable!This is a suggestion bro don’t take it wrong 😊 anyway your hardwork didn’t let you down! Congrats 😊
Project is nice, however I’m curious whats BOM and total cost of parts used in this solution? 😊
Altogether it might be ridiculously expensive for this learning project. Only if those are laying around for free somewhere in the Uni lab 😊
Thanks