Facebook
 Google
 GitHub
 Linkedin
My Experience with the Zephyr RTOS—A Hands-On Review
Robert recently tried the Zephyr RTOS and contributed back to the project in the form of a sensor driver for the MTCH9010 liquid leak detector. In this article, he shares his thoughts.
There has recently been a surge of interest for the Real Time Operating System (RTOS) known as Zephyr. Quoting the Zephyr Project directly: “[Zephyr is] an open source collaborative effort uniting developers and users in building a best-in-class small, scalable, real-time operating system (RTOS) optimized for resource-constrained devices, across multiple architectures.”
In simple terms, the objective of the Zephyr Project is to create a vendor agnostic RTOS that works across different chip vendors, CPU architectures and feature sets. That is a very ambitious goal – from my firsthand experience at Microchip, the challenge of keeping something working across the multiple devices that we make is tricky enough, let alone an entire RTOS.
I recently had some time to experiment with Zephyr to get an idea of how it all works, and contribute back to the community in the form of a new driver for the MTCH9010 Liquid Leak Detector. This article outlines my experience and opinion of running through Zephyr.
Setup
One of the biggest roadblocks for new users is getting everything set up. Zephyr provides a well-documented series of setup instructions, but even still, there are a lot of moving pieces. Getting it set up at home was straightforward, with no major obstacles, but the same couldn’t be said for my work computer.
Due to internal security policies, installing Zephyr in Windows was a game of working around the Endpoint protection and troubleshooting when something broke. Without getting into specifics, all I will say is that it was quite a process and having knowledge of Zephyr’s workings was crucial.
Once installed, Zephyr runs inside of a Python Virtual Environment and is invoked from the command line.
The Zephyr Project uses a tool called West as their all-in-one toolchain solution, with West calling the individual executables and/or scripts behind the scenes for you. One thing I had to get used to with West was building from the command line. This might be the norm for some users, but I was used to the world of IDEs, and it took some getting used to. However, after a while, running West commands becomes second nature. I should note that there is talk of creating an official Zephyr IDE within the community, and that there are ways to get Zephyr integrated into VS Code or IAR Embedded Workbench.
Zephyr can also be developed on Mac OS and Linux. I haven’t tried Mac OS, but I can say with absolute confidence that Linux was by far the smoothest setup experience, with the only hiccup being an out-of-date Python version in my Ubuntu installation. This wasn’t that surprising, considering Zephyr is backed by the Linux Foundation, but it’s a remarkable night and day experience.
If you plan to contribute to the Zephyr project, I highly recommend using a Linux machine for contributions. Beyond the easier setup, Zephyr’s automated style checkers and other tools are designed to run in Linux and have limited support in Windows. I’ve had some luck with Windows Subsystem for Linux (WSL), but there are some workarounds you’ll need for everything to work.
Getting Started
While the official setup instructions for Zephyr cover getting started with the blinky sample, I wanted my first “real” Zephyr application to be something non-trivial. For this, I chose the HTTP Server Sample (samples/net/sockets/http_server). The default webpage the microcontroller serves also allows the connected device to get real time statistics and to blink an LED on the board. I built the sample for the SAM E54 Xplained Pro evaluation kit and it worked almost immediately, barring some minor networking adjustments for my setup.
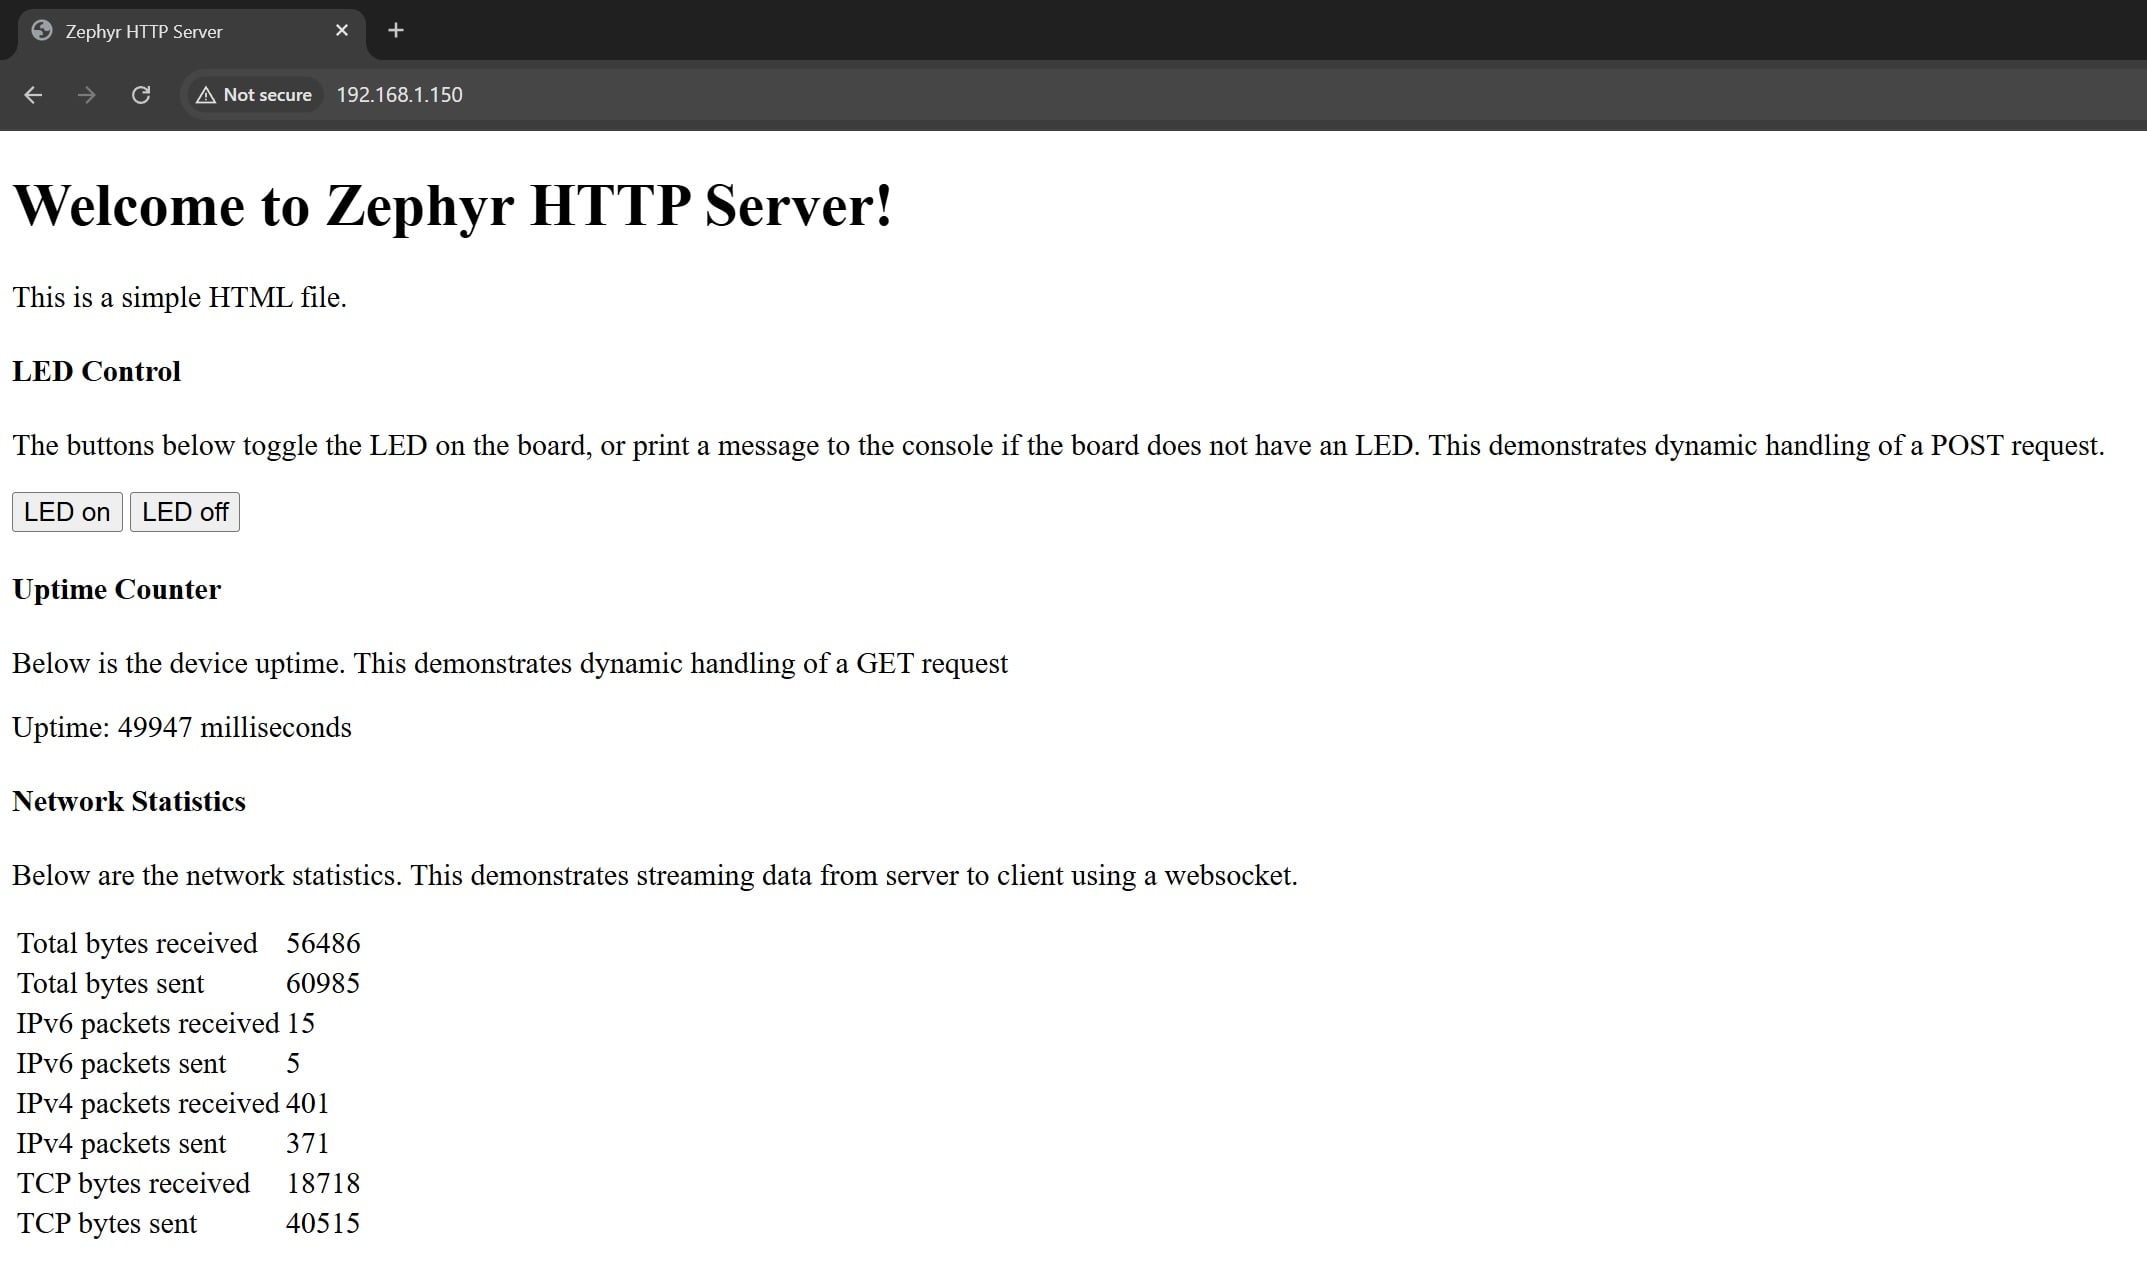
Figure 1. Out-of-the-box webpage of the HTTP Server Sample. (Click on image to enlarge)
Since it worked so effortlessly, I then decided to try to modify the webserver to include other sub-elements like CSS, images and other HTML elements. This was a good way to figure out how Zephyr works at a deeper level.
Parts of Zephyr
Zephyr has three main parts – hardware definitions in Devicetree, software configuration through Kconfig and user code to put it together.
Devicetree
Devicetree is a YAML-based language for defining how hardware is connected. Devicetree defines the System on Chip (SoC), hardware peripherals, the development board and connected shields or utilized I/O. Zephyr uses different file extensions to denote the different layers of Devicetree and then flattens them at compile time. Consider this top-level overlay file (*.overlay) from my MTCH9010 test project:
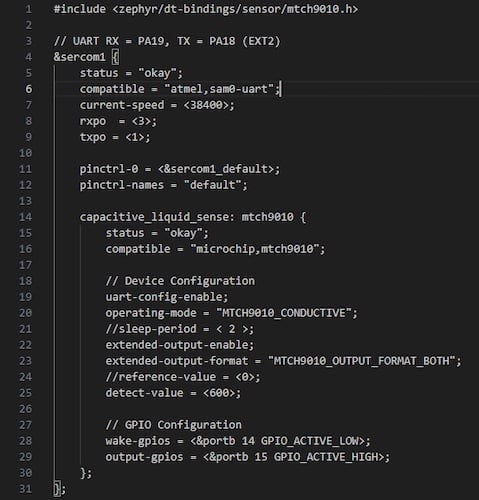
Figure 2. Devicetree snippet from my MTCH9010 test project for the SAM L21 XPLAINED PRO (ATSAML21-XPRO-B).
This snippet does the following: enable SERCOM1, use the “atmel, sam0-uart” driver, set SERCOM1 to a baud rate of 38400 and set the location of RX and TX signals for the I/O. Then, the MTCH9010 driver is nested inside the definition to specify that it uses this SERCOM for communication. The parameters for operating mode, detect value and etc. are all parameters that specify how to configure this instance of the sensor.
KConfig
KConfig is a GUI based tool that allows users to set up (mostly) software options. KConfig is intended for more global parameters, like enabling the network interface, the size of the stack and the feature set. KConfig is accessed through West by performing the command, west build -t menuconfig
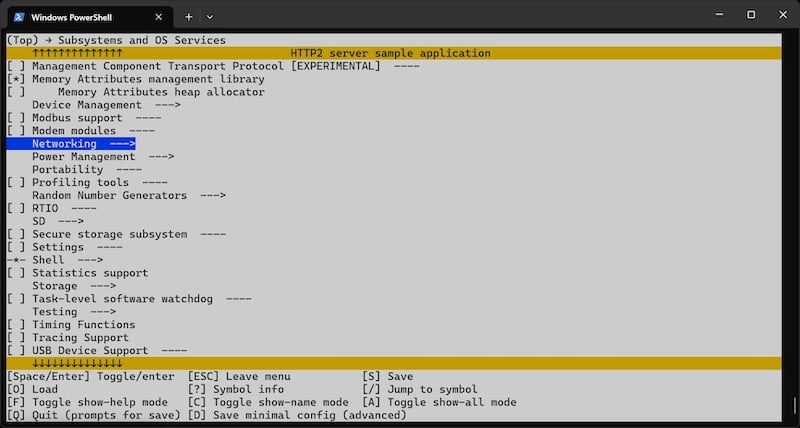
Figure 3. The interface of KConfig
KConfig settings can also be changed manually by adding or editing the .conf files in the project. Often the KConfig system will depend on the Devicetree configuration. For example, let’s assume I want to configure the MTCH9010. KConfig will not show options to configure the MTCH9010 until it has been added to Devicetree and enabled. This is to avoid cluttering the UI with elements that are irrelevant to the current project. And, like Devicetree, KConfig is also layered, with defines going down to the SoC level. These lower level defines are used as part of the CMake build system to include the correct files at compile time.
User Code for the Web Server
After some trial and error, I eventually figured out how to add my own web assets to the project. First, add the desired resource file to the compile directory. In the past, when I’ve had to include a static file in a project, I would write out the item in an array like this:

Figure 4. Manually added webpages
If large files are included like this, any changes made later will require a non-trivial amount of effort. In addition, there is no data compression to optimize memory usage or network bandwidth. Adding compression would make it both difficult to write and practically unmaintainable in the long term. However, Zephyr uses a clever trick by using the pre-compiler script to convert each file into a gzip compressed include file (*.gz.inc) that can be included directly. A snippet from the CMake build script is shown below:
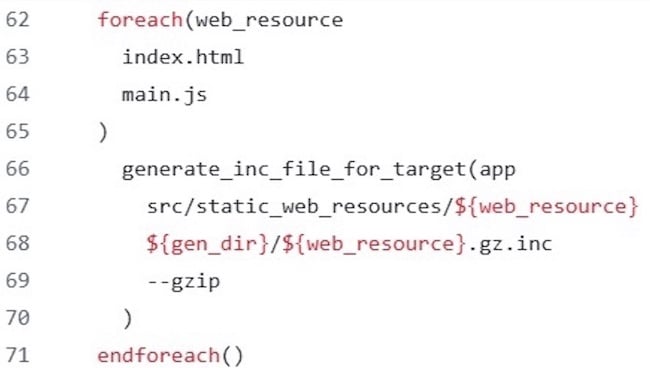
Figure 5. A snippet of CMakeLists.txt from the http_server sample project (Apache 2.0)
Since the compressed resource files are generated automatically, it is trivial to change the file. Next, in the project, the arrays are loaded by including the compressed file. Each file will also need a matching resource structure and an HTTP_RESOURCE_DEFINE to match. The snippet below shows these parts for the index page.
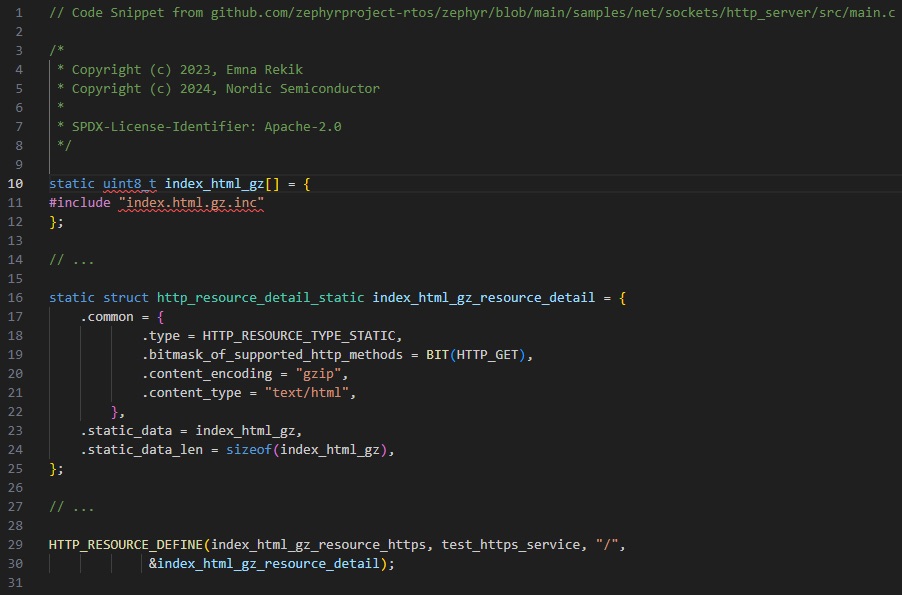
Figure 6. Code snippets from http_server/src/main.c . (Click on image to enlarge)
And, just like that, a customized, fully operational web server is up and running, in less than an afternoon.
What do I think?
I must give kudos to the Zephyr Project and its community, for creating such a polished system. I think the biggest drawback of Zephyr is in the complexity—setting up, building and adding new library/device support are non-trivial tasks. But Zephyr really shines in complex applications, where that investment in time and resources will pay off in the long run.
In terms of future device support, I think Zephyr has a bright future. Microchip, along with many other semiconductor manufacturers, are paid members of the Zephyr Project and actively contribute new device support, features and bug fixes back to the community. This is part of Microchip’s pivot towards enhancing 3rd party tooling support.
So, while I think there are a few pain points in Zephyr, and room for improvement here and there, Zephyr proves that it is possible to create cross-device, cross-vendor and cross-architecture specific applications. I think this functionality is what will continue to drive interest in the project, and personally, I find that pretty cool.
Featured image used courtesy of The Zephyr Project
All other images used courtesy of Microchip.
Related Content