 Facebook
 Google
 GitHub
 Linkedin
Simple Home Automation with a Remotely Accessed Raspberry Pi: An Investigation into Dataplicity
AAC writer Johnathan Powell investigated Dataplicity, a program that allows remote access to and control of Raspberry Pis. Here are his conclusions.
AAC writer Johnathan Powell investigated Dataplicity, a program that allows remote access to and control of Raspberry Pis. Check out his resulting experiments.
If you have ever worked with a Raspberry Pi, you have likely reached the point where you have wondered if the price and size of such a computer is really worth the massive number of cords and peripherals needed to use it.
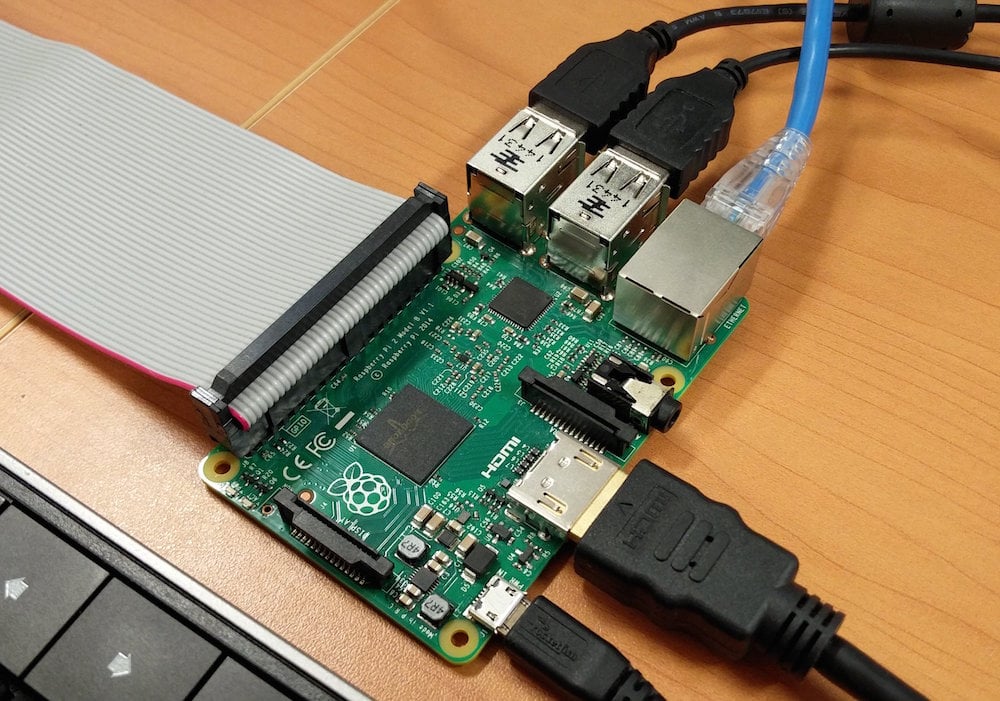
With all the needed peripherals, a simple Raspberry Pi project can quickly get out of hand.
Generally speaking, to use a Pi effectively, you are going to need an HDMI monitor, a USB keyboard and mouse, power cords for the monitor and the Pi itself, the cable to connect to the monitor, potentially a USB hub to connect additional devices, and either an ethernet cable or a USB Wi-Fi adapter to get internet.
What you hoped would be a lightweight, compact computer has quickly become a bird's nest of cords, cables, and input devices inside which even the Pi, itself, can quickly become lost.
And this is all before you even try to connect anything to the GPIO.
Other Solutions
There are many guides and kits to help you enclose your Pi and most of its assisting hardware in a portable case, which does make things simpler (and is pretty awesome). But these also push up costs. In my experience, where the Pi really comes into its own is when you run it headless, connected to a network, with no monitor or direct input devices, and accessed by means of SSH or another similar setup.
SSH, however, brings with it a whole new set of issues. Setting it up is easy enough, and then you are set to log in from any computer connected to the same local network. Setting the Pi to a static IP address so it can be reached in the same place every time takes another few steps, but the process is usually not too bad. If you want to access your Pi via the Internet, from outside your local network, however, it gets trickier.
If you're lucky, forwarding the correct ports is enough. It is, however, another step, and sometimes it is more complicated than that. In some cases, you may be in a position where you do not have administrator access to your network, and can't forward the correct ports. Personally, my problem was that my ISP charged extra for a static external IP address, meaning that my setup would work for several weeks and then randomly (and without warning) break when my external IP changed. Whatever the reason, SSH sometimes just isn't enough.
To help me solve some of these issues, I decided to investigate Dataplicity, a web-based service designed to allow remote access to my Raspberry Pi unit.
Setting up Dataplicity
Herein lies the beauty of Dataplicity. Just go to their website and set up a free account. There are paid accounts with more features, but the free one is enough to get started.
Install your operating system as normal, then connect to a monitor and keyboard long enough to connect to the network. Now run a single command provided to you by Dataplicity and you are done. That's it. You can now log into Dataplicity from any web browser or from the app on your phone and be connected to a terminal session on your Pi.

Running the install script from within Raspbian

A remote shell on our Pi, by way of Dataplicity.com
Now that you are set up, you can access this shell any time, from anywhere, either using a web browser or the free iOS/Android app, so long as your Pi is connected to the internet. That means that you can even take it with you on the go, so long as you can either add the Wi-Fi network in advance or else connect to the new network with ethernet.
As a side note, if you are concerned about running random scripts on your Pi (which is not a terrible thing to be concerned about), you can find the setup script that is run by the command in its entirety on their site.
Pi-Based Projects with Dataplicity
Recently, I spent a weekend setting up a Pi to stream to the projector in our living room. Using the Pi, I can now stream media from my Plex server or games from my desktop computer upstairs. It's a pretty seamless system, but you still occasionally need to access the terminal on the Pi to make changes. I've been doing this with an SSH client from my phone, but decided to give Dataplicity a try with my existing setup. Within a few minutes, I was done. Simple enough—I can now control our entertainment system from anywhere. So far so good.
Eager to see what else I could do, I took another Pi (I have a few lying around) and rigged it up with a few sensors, namely temperature and motion. I then threw together a quick program to read the value of the temperature sensor to the terminal and to calculate the time since motion was last detected. I accessed the Pi with Dataplicity, ran the script, and had the beginnings of a home automation or security system.

By running a script from our remote shell, we can get current readings from the sensors on our Pi, seen here in the Android app
The only downside is that, while I can access it at any time, monitoring it consists of staring at an open terminal on my phone or computer. Not very elegant.
Hosting a Website from Your Pi
For that real polished look, we turn to another feature of Dataplicity: Wormhole.
Once your Pi is set up and running, a single click activates Wormhole, giving you a fixed URL at which you can reach your Pi. Combine it with a web hosting platform like NGINX (Dataplicity provides links and instructions to install) and you are set to host an HTML site from your Pi which can be accessed from anywhere, at any time, to monitor and control whatever you have connected to the Pi.

While it isn't pretty, a few minutes of HTML have given us a real-time feed from our sensors, accessible from any web browser
You'll likely want to add some security before you connect too much to it (again, there are instructions provided by Dataplicity and NGINX), but already we have pulled together a significant setup, thanks to the Raspberry Pi and Dataplicity.
In Conclusion
Dataplicity is not without its challenges. You still need to be capable with the bash terminal and setting up a website, in particular, will require a much broader set of programming skills. All the same, it removes many of the obstacles that may otherwise prevent you from doing some really cool stuff and helps you to take advantage of many of the Pi's capabilities.
In addition to controlling my entertainment system and checking the temperature in my house, I also experimented with controlling a strand of addressable RGB LEDs, streaming video from a connected camera, and even considered connecting a servo to remotely make adjustments to my thermostat. Another project for another day.
So if you've ever found yourself and your trusty Pi tangled in a mess of cords, been frustrated trying to set up port forwarding, or have wondered what to do with that Pi that is just gathering dust in your desk, maybe Dataplicity is worth a try.
Related Content


“Personally, my problem was that my ISP charged extra for a static external IP address, meaning that my setup would work for several weeks and then randomly (and without warning) break when my external IP changed. Whatever the reason, SSH sometimes just isn’t enough.”
I really can’t believe that you didn’t know how to setup a free dynamic DNS account. You set a account there and create a simples bash script to periodically (do you know crontab?) acess (with curl) an internet server (there are many of them) that returns your current IP and store it to a file. Next the script compares it to the previous known IP. If the IP is the same it stops there. If different, the scripts just calls an URL (using curl or wget) previously provided by the dynamic DNS service, and you’re done: your new IP is automaticcaly bonded to your usual URL. I’ve set my Raspberry to do this three years ago and never needed to tweak this again. The script writes to a log too and I can see that all the changes in IP were immediattely discovered. This is easier and safer than installing a third party APP like this. This solution should be used only for those who cantora or who font know how to do the DDNS thing.
Will webmin work on top of this? So much easier than a terminal prompt.