 Facebook
 Google
 GitHub
 Linkedin
Teardown Tuesday: Samsung’s SmartThings Smart Home Hub and IoT Water Leak Sensor
In this teardown, we open up Samsung's SmartThings Hub and a Water Leak Sensor to see what we can find.
In this teardown, we open up Samsung's SmartThings Hub and a Water Leak Sensor to see what we can find.
Samsung's SmartThings is a line of smart home products designed to work together. The SmartThings Hub is a device intended to connect various IoT sensors for home monitoring, security, etc.
Between the professional packaging material, the manner in which it was packaged, and all the other goodies included in the Hub's shipping box, I'm confident that this is another high-quality-built device from Samsung.

The SmartThings Hub arrived in a very professional looking package... not a flimsy generic box.

All the goodies that came in the Hub's box.
This SmartThings Hub is designed to serve as the brain for all your smart home needs and devices. And when using the SmartThings app, or when connecting the hub to Amazon's Alexa, you can teach your house how to react whether you're awake, asleep, away from your house (like on vacation!), or when you're arriving back home. Some of the advertised specifications of this magical hub include:
Power:
- In-wall power adapter (100-240VAC to 5VDC 2 A)
- 10 hours of backup power via four AA batteries
Communications:
- ZigBee
- Z-Wave
- Bluetooth
- IP-accessible devices
Compatible smart device brands:
- Honeywell
- Philips Hue
- Kwikset
Now on to the teardown!
External Design
There are only two exceptions to the device's clean design: the two USB ports. Although they appear to be connected to the ARM processor—meaning they aren't simply "dumb" power ports—the Quick-Start Guide doesn't address their intended purpose.
I imagine that not too many people would use this SmartThings Hub as a USB hub. It might make sense to simply remove these two ports from the design in an effort to make this device a cleaner and simpler hub.

The very clean and simple exterior design.
Designed for Easy Disassembly
The hub's bottom side easily slides out to expose the battery compartment and the battery compartment's plastic housing is almost as easily removed by unscrewing five screws. While only four screws are clearly visible in the image below, the fifth screw is covered by the top label.
The battery compartment is easily accessed.
Once the five screws are removed, the hub's sole PCB is exposed—no additional screws are used for securing the PCB in its place. So in about 5 minutes, the PCB can be easily and completely removed from the hub's enclosure. Nice!

The PCB can be easily and quickly removed from the enclosure.
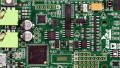
The Hub's PCB... A Simple Yet Powerful Design
PCB Top Side
Although Samsung did an admirable job in keeping the PCB design and layout rather straightforward, there's actually a lot going on here:
- Multiple wireless circuits/modules and antennas:
- ZigBee
- Bluetooth
- Z-Wave
- Four voltage regulators:
- Three of the onboard generated voltages are courtesy of the 3-channel voltage regulator.
- The remaining voltage regulator is an LDO.
- MOSFETs
- Main processor (the brain!)
- Memory (DRAM and eMMC)
- EMI countermeasures
The PCB is obviously a multi-layered board; the top and bottom layers, which are ground planes, are stitched together using vias, which also serve as one of the aforementioned EMI countermeasures. These closely-placed ground vias—which lie on the circumference of the blue-colored portion of the PCB—together with the grounded top and bottom ground planes, mimic a Faraday cage.
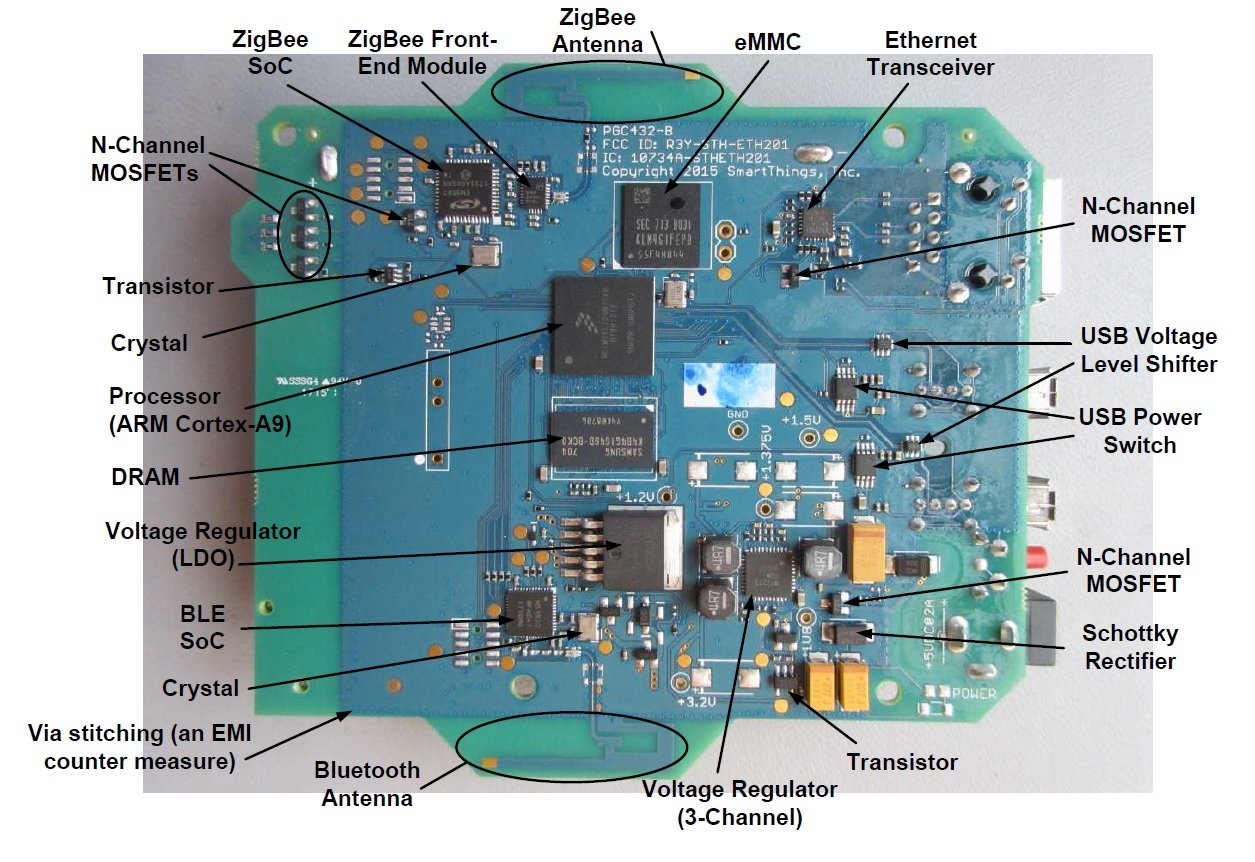
The Hub's PCB top side. Click to enlarge.
- ZigBee SoC: Part marking: EM3587
- ZigBee front-end module: Part marking: SiGe 2432L
- eMMC: Part marking: KLM4G1FEPD
- Ethernet transceiver: Part marking: KSZ8081
- USB voltage level shifter (assumed): Part marking: X42 (no datasheet could be found)
- USB power switch: Part marking: AP2511
- N-Channel MOSFET: Part marking: 72K
- Schottky diode: Part marking: B2L1
- Transistor: Part marking: 1NT
- Voltage regulator (3-channel): Part marking: RT7273
- BLE SoC: Part marking: N51822
- Voltage regulator (LDO): Part marking: SiPex 29302T5
- DRAM: Part marking: K4B4G1646D-BCK0
- Transistor: Part marking: K46
- Processor (ARM): Part marking: MCIMX6L2DVN10AB
PCB Back Side
The PCB's back side consists of the various connectors, the battery contacts, a variety of passive components, and the Z-Wave module. Other than these components, this side of the PCB is rather vacant.

The Hub's PCB back side. Click to enlarge.
- Z-Wave module: Part marking: ZM5304-U
The image below shows the Z-Wave IC that lives underneath the EMI shielding can (another EMI countermeasure).
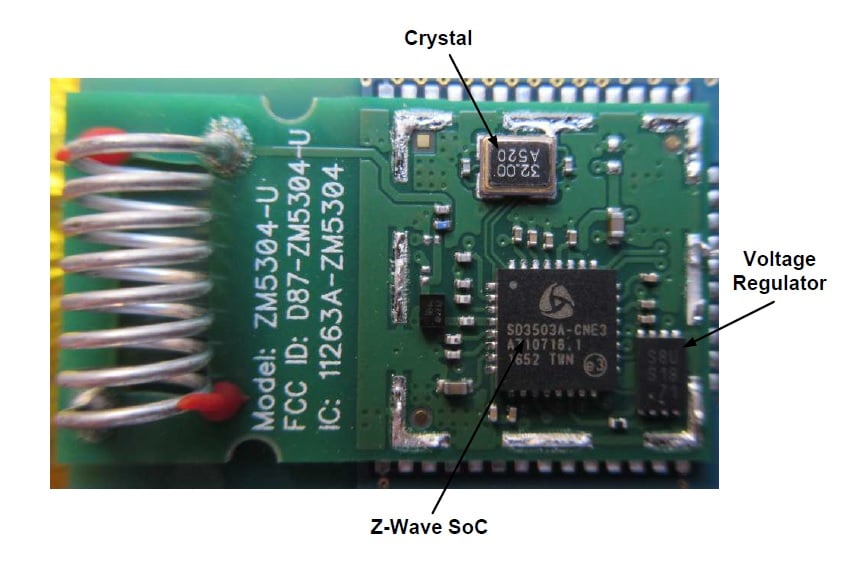
The Z-Wave Module with its EMI shielding can removed.
- Z-Wave SoC: SD3503A-CNE3
- Voltage regulator (assumed): Part marking: S8US1871 (no datasheet could be found)
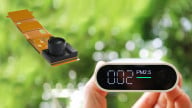
On to the Water Leak Sensor
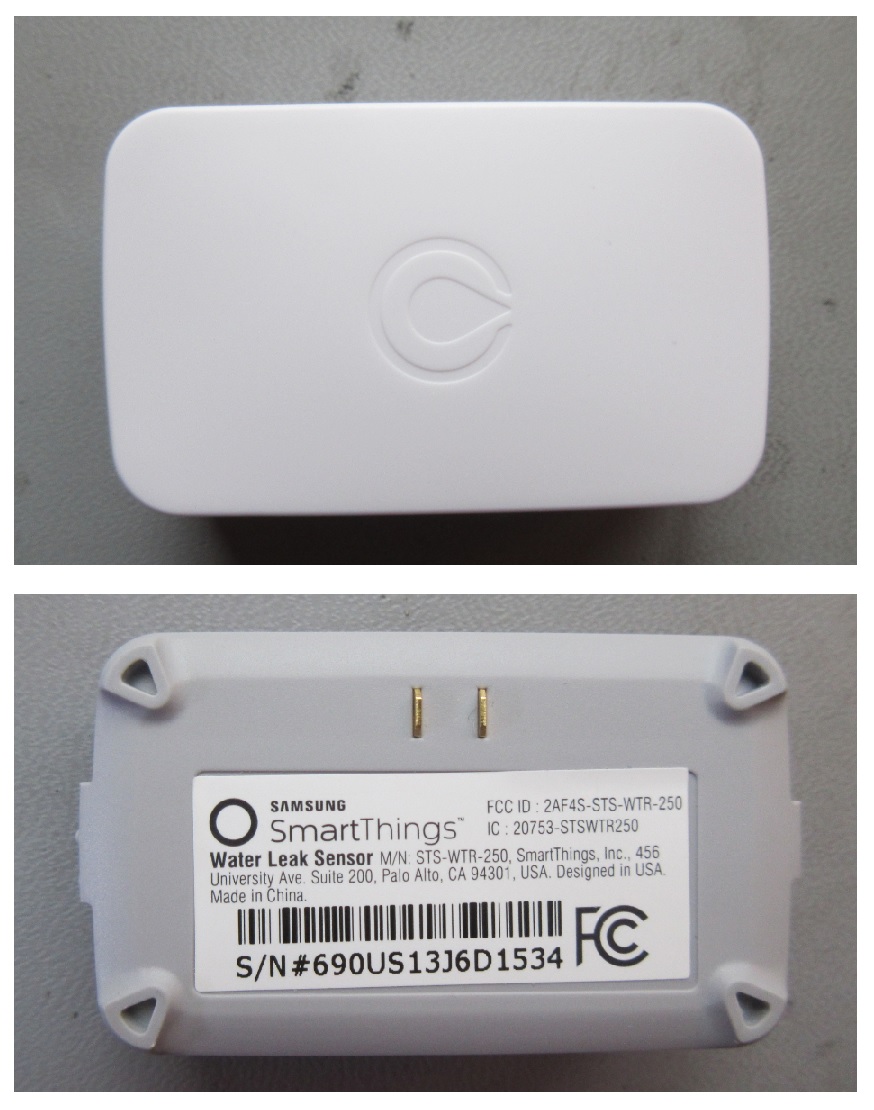
The SmartThings Water Leak Sensor comes in a professional-looking, clean, small—yet sturdy—enclosure. For quick access, it has no screws holding it together; it can easily be popped-open after depressing the tabs on its sides.

The Water Leak Sensor
After inspecting the PCB's ICs, I was surprised to see a temperature sensor. I wouldn't have imagined that this water leak sensor requires temperature readings.
As far as the circuitry used for detecting water, the exact design approach escapes me. A few resistors are in series with the water-detecting contacts, and some transistors/MOSFETs are also used in the design. But exactly how it all works together, as a system, is not entirely clear to me. I imagine the resistance is being measured between the two water detecting contacts, but this is just a guess.

The Water Leak Sensor's components
- ZigBee SoC: Part marking: EM3585
- ZigBee front-end module: Part marking: SiGe 2432L
- Temperature sensor: Part marking: Si705
- BJT transistors/MOSFETs: Part markings:
- 1AM
- 2AR (no datasheet could be found)
Conclusion
Both the SmartThings Hub and the Water Leak Sensor look impressive regarding their advertised functionality and there visually observed simple, yet powerful, designs.
Have you had a chance to use either of these devices? Can you shed some light on the water sensor design? If so, let's us know in the comments below.
Next Teardown: Depstech HD Wi-Fi Inspection Camera/Endoscope


Water detection works by comparing pipe temp with ambient temp - like a rise on rise fire detector. flowing water is cooler than ambient.
hope that helps
Two Comments;
1. Sad to see non-rechargeable batteries instead of Panason/Sanyo LDR NiMH batteries which, though only ~60% output current capacity of good alkaline cells, typically last for years and I have never seen leak like alkaline cells essentially always do.
2. My limited experience with the Gen 2 of the Samsung integrated SmartThings hub and router have been poor despite the money spent, just gave up on both despite the money spent.
Hopefully the hub only might work better.
Have to disagree with @YorkshireDave.
Can’t see how this could be meant to sit on a pipe.
Looks more like it sits on the ground and the two contacts detect water.
Water leak devices are usually pretty simple things and work by assuming dry conditions give a very high resistance between the electrodes and a much reduced resistance if water (not highly pure water) completes the circuit between the electrodes.
The circuit can be as simple as connecting to the base of a BJT usually with a pull-up resistor or to the gate of a CMOS logic chip.
Got nothing to do with temperature unless you need to know if the water has frozen. Might be useful in an unheated room or whatever.