 Facebook
 Google
 GitHub
 Linkedin
Teardown Tuesday: Metal Detector!
In this Teardown Tuesday, we are going to take a look at the inner workings of a metal detector intended for security applications.
In this Teardown Tuesday, we are going to take a look at the inner workings of a metal detector intended for security applications.
Metal detectors have a wide range of uses: from security to food processing to hobbyist treasure hunting. This particular metal detector is made by “EASYNEW”, model GC-101H, and is intended for security purposes. This is a relatively cheap metal detector that can be purchased for less than $30 where some metal detectors can cost in the $100s or $1000s.
Let's find out what's inside.

The metal detector used in this teardown. Image courtesy of DHgate.
Opening it up!

The screws holding together the metal detector
Opening this metal detector is very simple. Six coarse-threaded Phillips head screws keep everything together. Keeping the battery door on is a machine screw.
Once the six screws were removed, the metal detector was easily opened.
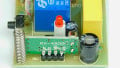
Circuit Board

The PCB in the metal detector
The metal detector uses a two-sided PCB with green solder mask. Silkscreen is absent from both sides of the PCB. The board is mixed (SMD and through-hole) construction with all of the components on the top of the PCB.
Power Supply

The 9v battery that powers the detector
Powering this metal detector is a typical 9v battery. The device draws 5mA when turned on, 70mA during an alert in vibration mode, and 33mA during an alert in audio mode. Depending on the frequency of alerts and battery chemistry, an on-time of up to 240 hours can be achieved.

The 7805 linear voltage regulator
To provide a more stable voltage to the electronics, a 5v linear regulator is used. This device uses a 7805 voltage regulator in an SOT-223 package.
Search Coil

The search coil
In order to detect metallic objects, the metal detector relies on a large loop of wire. There is a multi-turn potentiometer to adjust the sensitivity of the metal detector.

The sensitivity adjustment potentiometer
User IOs

The user interface LEDs
In order to alert the user to the presence of metal, this detector employees a whole slew of UI. Packed in this metal detector is a loud buzzer, a green power LED, an orange low-battery LED, a red alert LED, and a vibration motor.

The 2300kHz speaker
To alert the presence of metal a buzzer can be used. This buzzer has the part number TMB12A05 printed on it. This buzzer emits a 2300kHz tone at 85db. This buzzer is powered by 5v and can draw up to 30mA.
Conclusion

The metal detector PCB
This metal detector is a relatively basic model. For example, there are far more complicated metal detectors that rely on Very Low-Frequency transmitters, GPS systems, and the ability to discriminate different types of metals. At less than $30, though, it does detect metal well and works for its intended application.
Thanks for checking out this Teardown Tuesday! Stop by next week for another teardown!
Next Teardown: Bluetooth Bathroom Scale


A 2300 kHz tone??? R U sure about that?
Oh and I think you’ll find that the trimmer is a damping resistor to TUNE the coil, rather than to adjust it’s sensitivity.
I agree - the trimmer is to null the oscillator and coil. The speaker would be in Hz. A simple teardown, but show the circuit, with the active parts, and the heart of the detector - it’s oscillator !!