 Facebook
 Google
 GitHub
 Linkedin
Teardown Tuesday: Gas Leak Detector
In this Teardown Tuesday we are going to take a look at the insides of a gas leakage detector. This device is designed to detect the presence of halogen gases.
In this Teardown Tuesday, we take a look inside a gas leak detector!
This detector is designed to detect the presence of halogen gases such as CFCs, HCFCs, HFCs, Ethylene Oxide gas, and SF-6. This detector is a fairly low cost one at around $40.

The gas leak detector. Image courtesy of Amazon
The detection method used to detect the presence of halogen gases is pretty interesting. In the simplest terms, this detector generates a high voltage which is then applied to a pair of electrodes. One of the electrodes is pointed to promote the formation of a corona. The current going to the electrodes is then monitored. If a change in current is observed, that indicates the presence of a halogen gas. The US patent “US4609875 A” goes into more detail about this method.
Circuit Board
.jpg)
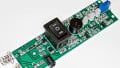
The component side of the PCB
Inside of this gas leak detector is a single circuit board. The board is a two-layer PCB with green solder mask and white silkscreen on both sides. This board contains both surface-mount and through-hole components on a single side.
.jpg)
The isolation routing
There is some isolation routing to separate the high-voltage transformer from the rest of the electronics. Unlike some of our previous teardowns, nearly all of the components are populated.
Power Supply
.jpg)
The low-voltage switching power supply
This leakage detector uses 2 ‘C’ sized batteries as its power source. To ensure the power coming from the batteries is stable, the batteries are run through a switching power supply. The switching power supply is controlled by U4, a voltage regulator in a SOT-23-5 package. The output of the power supply is 5 volts.

The low-voltage switching power supply
The switching power supplies are the only components of this PCB that appear to heat up. Located in the middle of the image above is the TIP41 transistor. Below and to the right is the low-voltage switching power supply.
.jpg)
The high-voltage power supply
To generate the corona, the voltage needs to be much higher. To produce a high voltage, this device uses a chopping circuit. To switch the input voltage a TIP41 transistor is used. The transistor is switched at around 2kHz. The switched DC voltage then goes through the primary of the transformer.
Due to the turns ratio of the transformer, a high voltage is on the output. This high voltage is then half-wave rectified by diode D4. Below is a capture of the voltage from the collector to the emitter.

The switching frequency of chopping transistor
Due to the extremely low output current of the transformer, the voltage dips when a multimeter with a 10M ohm input impedance is placed across the high-voltage terminals. Because the output capacitor of this circuit is rated at 1000V, it would be safe to assume that the voltage generated is in the range of 100s of volts.
User Interface
.jpg)
The six buttons for user control
To control the various settings of this leak detector, there is a six-button membrane switch assembly on the front of the detector. Additionally, this assembly has translucent windows for the LED indicators. The switch assembly is connected to the main circuit board using a five-position ribbon cable with a 0.1” (2.54mm) pitch.
.jpg)
The bi-color LEDs
To indicate the strength of the concentration of halogen gases, there are seven through-hole LEDs. These LEDs are bi-color red and green LEDs. These LEDs are driven by individual transistors and are current limited through100-ohm resistor array.
.jpg)
The LED driving circuitry
To emit audible chirps based on the on the concentration of gases present, a speaker is used. This is a traditional electromagnetic speaker that has markings stating it is 0.5W with an impedance of 8 ohms. The two-position plug is connected to the "bell" connector on the PCB.
.jpg)
The speaker
To drive the speaker, a HWD4861 audio amplifier is used. This amplifier, made by Chengdu Sino Microelectronics System Co., Ltd, CSMSC, is intended for portable consumer products, toys, and games. It is capable of driving loads up to 1.1W. In this case, though, the speaker is only 0.5W.
.jpg)
The audio amplifier
Detector
.jpg)
The detection nozzle
As part of the detection method, a corona needs to be generated. To generate this, a special nozzle is used. The nozzle has an internal electrode with a sharp point to aide in the generation of the corona. This gas leak detector came with a spare nozzle, as they are only expected to last for 50 hours of operation.
.jpg)
The nozzle during corona generation
Microcontroller
.jpg)
The ATmega microcontroller
Controlling everything in this gas leak detector is a is a Microchip ATmega48P in a 32-pin quad flat package (32-TQFP).
There are minimal passives attached to the microcontroller. For example, there is no external oscillator, indicating the internal oscillator is used. Located on the right side of the PCB is a seven-position unpopulated connector, J4, that used for the initial programming.
.jpg)
The programming header
Conclusion
There are a lot of interesting electronics in this detector. For the price, it's pretty interesting inside, although the build quality definitely isn’t ‘industrial grade’. Thanks for taking a look at this week’s Teardown Tuesday. Stop by next week for another teardown!
Next Teardown: Bluetooth-Enabled Cordless Barcode Scanner


Did you test it to see how well it functioned? Read some bad reviews on it.