Facebook
 Google
 GitHub
 Linkedin
The IoT Beaglebone Beagle Treat-Feeder
The Beaglebone Treat-Feeder is the prototype for a great pet-feeding device! Keep track of your pet's diet while you stuff your face!
The Beaglebone Treat-Feeder is the prototype for a great pet-feeding device! Keep track of your pet's diet while you stuff your face!
BOM
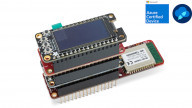
- Seeed Studio's Beaglebone Green Wireless Google IoT Kit
- Grove Cape
- Grove PIR Sensor
- Grove Pushbutton
- Grove OLED Display
- 1N4001 Diode
- 2N3904 Transistor
- 5v Relay
- Solenoid
- 12V Power Supply
- 220Ω Resistor
Why?
Lately, I've been out of the house more than usual so I've been feeling a little guilty about my pets being home alone. To ensure their health and wellness, I attempted to build a Beaglebone Beagle-Feeding device. My skillset, however, lacks in the mechanical engineering department so it turned out to be more of a treat dispenser, since this prototype couldn't handle much food.
Nevertheless, your pet doesn't have to be alone, either! This model includes an OLED display that asks your pet if they're hungry. All you have to do is send them away to pet boarding school to learn to read English, and they'll be on their way to home automation!

The components!
How?
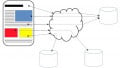
Seeed Studio's Beaglebone Green Wireless Google IoT Kit comes with a handy "Grove Cape" for easy connection between our components and the Beaglebone. The Grove Cape connects—without any extra components—to the included Grove mini-PCBs, such as the PIR sensor, pushbutton, and OLED display. This allows the project to come together quickly and easily.

The Seeed Studio IoT kit!
Before moving forward with our program and circuitry, we have to make sure our board is updated and includes everything we need to run our program. We will be using Python within the included Cloud 9 IDE. We just need to execute a few commands within Cloud 9's terminal in the following order:
apt-get update
apt-get upgrade
apt-get install links
links http://www.google.com/accounts/DisplayUnlockCaptcha
apt-get install libssl-dev tcltls swaks
Okay, let's jump right in and plug the PIR sensor into GPIO 115, the pushbutton into GPIO 117, and the OLED into any of the I2C connectors. You will need to place the PIR sensor at the front of the device, and locate the OLED display for easy reading. The pushbutton should be placed underneath an elevated platform.
When the PIR detects motion it will print "Are you hungry?" on the OLED display. If your pet determines that it is, in fact, hungry and steps onto the platform, the pushbutton engages and a solenoid is triggered to release food into the bowl. Then the OLED prints "Enjoy, Hal!" and an email is sent to your account informing you of your pet's eating habits.
While the Grove connections work great for most of our project, we do not have a signal capable of driving a solenoid. Instead, we will create a custom relay circuit and connect it to GPIO 51. Though we could have used a transistor to directly actuate the solenoid, I didn't have one with an adequate collector-current rating, so instead the transistor drives a relay coil, and the relay controls the solenoid.

The included Grove Cape makes for easy connections
In general, NPN transistors need a base-to-emitter voltage of at least 0.6V to leave the cutoff region and allow current to flow from collector to emitter. The resistor is used to limit the current flowing into the transistor's base (too much current could cause damage).
With the transistor out of cutoff, the 5V supply connected to the relay coil has a path to ground through the collector and emitter of the BJT. The diode protects the transistor from dangerous voltage spikes that occur when a transistor interrupts current flowing through an inductor.
When current flows through the relay coil, the relay's switch contact moves from the normally open terminal to the normally closed terminal. This allows current from the 12V power supply to flow through the solenoid's coil, and this in turn causes the plunger to move.

Created using Scheme-It. Click to enlarge
The plunger, of course, will be attached to some sort of device that allows food to fall into your pet's dish. Seconds later, you should receive an email notification that your pet is chomping away! For more information on sending and receiving emails, please visit https://easyengine.io/tutorials/mail/swaks-smtp-test-tool/.
Everybody will have their own random materials for making the feeder contraption, so you'll have to get creative. Like I said, this is just a prototype. The Beagle Feeder can be greatly improved with a better feeding mechanism controlled by a servo motor, or even with a webcam that lets you check in on your pets to be sure they really are eating! The possibilities are endless.

My poor mechanical design
import mraa

import time

import pyupm_grove as grove

from subprocess import call


#import oled display module

import pyupm_i2clcd as upmLCD


#parameter 1 means that we are using I2C_2 , and 0x3c is the address of OLED Display

myLCD = upmLCD.SSD1327(1, 0x3c)


pir = mraa.Gpio(73)

pir.dir(mraa.DIR_IN)


button = mraa.Gpio(71)


relay = mraa.Pwm(62)

relay.period_us(700)

relay.enable(True)


myLCD.setGrayLevel(12)

def setup():
  # Nothing to do here
  pass

while True:

    x = pir.read()

    y = button.read()


    print x

    print y


    if (x == 1):

	    myLCD.setCursor(3, 3)

	    myLCD.write("Are you")

	    myLCD.setCursor(5, 3)

	    myLCD.write("Hungry?")

	    #time.sleep(2)

    elif (y == 1):

        relay.write(1)

        myLCD.setCursor(3, 3)

        myLCD.write("Enjoy,   ")

        myLCD.setCursor(5, 3)

        myLCD.write(" Hal!   ")

        #call("swaks -4 --server smtp.gmail.com:587 --from your@email.com --to receiving@email.com -tls --auth LOGIN --auth-user youremailusername@email.com --auth-password your-password --header \"Subject:  Hal got himself a snack!\" --body \"He loves his snacks\"",shell=True)

        time.sleep(2)

        relay.write(0)

        time.sleep(15)

    else :

	    relay.write(0)

	    #myLCD.clear()

	    #time.sleep(2)

	    myLCD.setCursor(3, 3)

	    myLCD.write("          ")

	    myLCD.setCursor(5, 3)

	    myLCD.write("        ")

	    #myLCD.clear()
Give this project a try for yourself! Get the BOM.
Other MIT-i Projects:
- The Cat-Apult! (an Arduino-controlled servo for makers)
- The Launchpad-Based Laser Tripwire Alarm! (a Launchpad security system)
- The Arduino UNIVERSAL Remote Control! (an IR receiver for your entire house)
- The Crop Duster Buster! (a clap-controlled odor-management system)
- The Traffic Light Controller! (an Arduino delay statement lesson)
- The Dancing Ghostbusters Toaster! (a lesson on solenoids and inductive loads)
- The Raspberry Pi Object Detection Cat Toy! (a lesson on the RPi GPIO)
- The Zambroombi! (an object-avoidance robot)
- The Holiday Season Analog Alarm! (a gift-defending system)
Related Content