Facebook
 Google
 GitHub
 Linkedin
The Crop Duster Buster! A Launchpad-Controlled Clapper
The Crop Duster Buster is sure to keep your pet's toot smell away!
The Crop Duster Buster is sure to keep your pet's toot smell away!
Don't you hate when you're sitting with your loved one and they toot without warning? While you can't train your dog, Buster, to hold it in—you can create a device that will help supply fresh air to your personal space with the clap of a hand! (Okay, so two claps but you get the idea!)

Olive's reaction to the Crop Duster Buster!
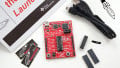
BOM:
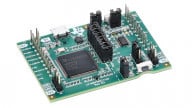
- Texas Instrument's Launchpad
- Energia Software
- Electret Microphone
- 2N3904 NPN Transistor x2
- SPDT 5v Coil Relay
- 330R Resistor x2
- 1k Resistor x2
- 10k Resistor x2
- 100k Resistor
- 100nF Capacitor x2
- 1N4007 Diode
- LEDs x2
- Pushbutton
- A Pet or Loved One

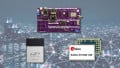
CDB schematic. Click to enlarge.
Why?
While I was sitting there peacefully watching my Sunday cartoons, I heard a strange noise emitted from beside me. Moments later I smelled what it was. My first instinct was to nudge my cat, Olive, away from me and after doing so I realized that it didn't do the trick. I had to leave the room! That's where I drew the line. Nobody interrupts my television, and I certainly don't watch TV without my cat by my side.
With some basic components that were lying around the house, I was able to create the "Crop Duster Buster." Never again would I have to worry about the smell of my cat's toots.
How?
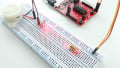
Thanks to the original article, I was able to pull this project together rather quickly. The first step was to create the microphone preamplifier. A very basic preamp is all we need for this project, and we can get adequate results with the BJT-based circuit shown in the schematic. But if you're looking to do any serious audio work, you'll want to use a solid op-amp based circuit (the MAX4465 is an op-amp that is optimized for microphone preamp applications).
The preamp circuit, combined with the analog-to-digital converter within the Launchpad, allows us to convert sound into digital data ready for some simple signal processing. We will need to program the Launchpad to detect voltage peaks corresponding to the claps. We can use the following code to collect ADC data for analysis; looking at some data will help us come up with an effective detection scheme.
void setup()
{
Serial.begin(9600);
}

void loop()
{
  int sensorValue = analogRead(A0);
  // print out the value you read:
  Serial.println(sensorValue);
}
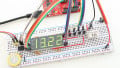
Within our program, we tell the Launchpad to look for two claps within 500ms of each other and above an adjustable threshold. A pushbutton allows us to set the threshold to one of three predefined values. The yellow LED gets brighter as sensitivity increases. When the Launchpad detects the two-clap pattern, it can perform whatever task we choose; in this project, it actuates a relay, which in turn powers a fan.
To turn on the fan, we just need a resistor, a BJT, a relay, and a flyback diode. An LED is included to notify us when the fan is on. (I used a 330Ω resistor for R7, which leads to LED forward current of maybe 30mA; be sure to use higher resistance if your LED can't handle that much current.) When the Launchpad detects two claps within 500ms of each other, it turns on the transistor so that current can flow through the LED and (more importantly) through the relay coil.
By the way, if the preamp circuit seems a bit much for you, or the smell is getting out of control, you can use a module that includes a microphone and a preamp.
Breakdown:
- The preamp circuit converts audible sound into an electrical signal with adequate amplitude for processing with the Launchpad.
- The Launchpad's ADC converts that electrical signal into digital data.
- We tell the Launchpad to look for two claps within a predefined time interval.
- When it detects those claps, it sends a logic-high signal to the driver circuit, activating the relay and powering the fan.
Considering that the relay is just acting as an on/off switch, you can control anything around your house with this device, such as a stereo, television, or lamp! But remember, household voltage is dangerous. If you're not thoroughly familiar with the relevant safety procedures and techniques, use an alternative approach, such as this relay-controlled AC outlet.
Now the possibilities really are endless. Dive deeper, find your inner maker, and adapt this program and circuit to your needs. Remember to leave comments and show us pictures/videos of what you've done!
Other MIT-i Innovations:
- The Cat-Apult! (an Arduino-controlled servo for makers)
- The Launchpad-Based Laser Tripwire Alarm! (a Launchpad security system)
- The Arduino UNIVERSAL Remote Control! (an IR receiver for your entire house)
Give this project a try for yourself! Get the BOM.