 Facebook
 Google
 GitHub
 Linkedin
Better Know Your Programming Languages: An Introduction to Python
This article will give you a brief introduction to the Python programming language.
Python is a widely-used programming language because of its simplicity and clarity. It's also experiencing growing interest because of its use with Raspberry Pi and its general-purpose philosophy. In this article, we will cover materials needed to use Python.
Python programming language began at the end of 1982 when Guido van Rossum entered the team developing the ABC language. After the termination of the ABC project, he joined the Amoeba OS team while he worked on a simple project on his free time. Python is the result of the work he performed in his spare time. The agenda of this programming language was flexible and general-purpose language.
Python is simple to use, easy to read, and contains multiple programming diagrams like object-oriented, functional, and parallel programming. Also, it is supported by vast groups who have created a variety of open-source libraries centering on Python. A brief list of these third-party libraries include:
1. NumPy: Used for scientific programming such as matrix calculations
2. NLTK: A toolkit for language processing for Python
3. PySerial: Gives the ability to use serial communication
4. PyGame: Helps to build games
5. PyBrain: Helps to build artificial intelligence
Differences between Python and C
Unlike C, Python is a general-purpose programming language and can be used to build anything from a web UI to visual applications. It's also a dynamic language that can manage memory automatically. On the other hand, since Python's interpreting level is higher than C, it cannot compete with C in running speed.
However, developing a program using Python may save a lot of time and resources because it is much simpler than C.
In Python, like PHP and Perl, it’s not necessary to define the types of variables. There is no type definition in Python while C needs to know variable types.
For example, in C, defining an integer variable looks like this:
int a=4;The above line says that “a” is a variable in memory and the size of an integer. However, in Python, we can just declare a variable without mentioning its type:
a=1The type of variable is dynamic in Python and can change during run-time. The above code only states that “a” is referencing a part of the memory. The above code is interpreted like this:
1. A part of memory with the size of an integer is created, because Python knows that “1” is an integer.
2. Python saves the name of “a” in another part of the memory.
3. A link is created that says “a” is referencing to “1”.
As I mentioned above Python can manage memory by itself, unlike C. In Python, every variable has a reference number that states the total amount referencing it. After each declaration, Python increases the reference number. After removing it, it decreases the references number. Finally, after the reference number of a variable becomes zero, Python will eliminate the variable from the memory by itself.
This technique is called Garbage Collection. By importing sys module and using getrefcount() function, we can find out how many variables are referenced by an object. The code is shown below:
import sys
a = 1
sys.getrefcount(1)
760

a = 2
sys.getrefcount(1)
759
sys.getrefcount(2)
96

b = a
sys.getrefcount(2)
97
Working with Lists in Python
Working with arrays is very simple in Python. The type of list is the most flexible pre-ready object in Python. A list object can be defined by using [ ] and can have members regardless of their type. For example, the below code defines a list with everything:
L = [15, 3.14, 'string', [1, 2]]With this list architecture, matrix implementation is very easy. Here's an example:
L = [[1, 2, 3],
 [4, 5, 6],
 [7, 8, 9]]
As stated above, by assigning a variable to another variable, Python simply adds a reference to the memory. This behavior is comparable to using pointers in C. For example, we could copy a list like this:
L1 = [1, 2, 3]
L2 = L1
If we change an element value in the L2 list, that element will be changed in the L1 list, too. This is because L2 is nothing but a pointer to the L1 list's memory address.
We can avoid this by making a copy of the L1 list and then assigning it to L2 like this:
L2 = L1[:]As you can see, working with lists in Python is very easy and, like Matlab, we can access all list elements by using [:]. Another useful thing in Python is dict object. A dict object is like a map and has a key and value. A dict object can be defined as below:
d = {1:'One', 2:'Two', 3:'Three'}For more introduction, some important syntax templates are brought down here. This is how you can define a conditional command:
if percent == 100:
    print('100 %')
elif percent >= 75:
    print('75-100 %')
elif percent >= 50:
    print('50-75 %')
elif percent >= 25:
    print('25-50 %')
else:
    print('less than 25 %')
This is how you can define a "for" loop:
for target in object:
    statements
This is how you can define a "while" loop:
while condition :
    statements
Another important difference is that in Python we don’t need to use {} as an indication of a block. Python will interpret blocks according to their indentation. As can be seen in Figure 1, lines with the same indentation are assumed to be the same block; that is, all statements with the same distance to the right hand side belong to the same block.
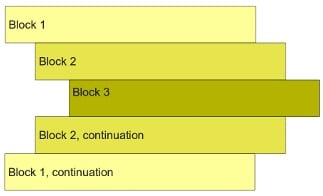
Figure 1. Python clock indentation. Image source: http://www.python-course.eu.
Working with Python in Raspberry Pi
The number of designers utilizing Raspberry Pi in advanced projects is increasing rapidly. Many use Raspbian OS for their Raspberry Pi because of its efficiency.
In Raspbian, we can benefit from Python's strengths by using the pre-installed RPi.GPIO library. In the following parts, we will examine using Python in Raspbian. Frst, we need to import the RPi.GPIO library like this:
import RPi.GPIO as GPIOCalling Raspberry Pi pins in GPIO library can be done in two ways.
The first way is the BOARD option, which means that we can call pins according to their number printed on the Raspberry Pi. This numbering won’t change between Raspberry Pi models.
The second option is BCM. By using BCM, we can call pins according to their number assigned for every Raspberry Pi. For example, Raspberry Pi 2 model B pinout is shown in Figure 2:

Figure 2. Raspberry Pi 2 Model B pinout. Image courtesy of Raspberry Pi.
As you can see in the connector, pin 3 is assigned to GPIO2. If we want to use this pin in the BOARD option, we should call it Pin3. To use the BCM option, we need to call it GPIO2. By using the following codes we can set the pin modes:
#set up GPIO using BCM numbering
GPIO.setmode(GPIO.BCM)
#setup GPIO using Board numbering
GPIO.setmode(GPIO.BOARD)
After setting the pin modes, we can set their direction and also, if needed, set a pull-up or pull-down resistor for them. The following codes will do that:
GPIO.setup(23, GPIO.IN, pull_up_down = GPIO.PUD_DOWN)
GPIO.setup(24, GPIO.IN, pull_up_down = GPIO.PUD_UP)
One important thing is to clean the GPIO mode before leaving the program. If we don’t clean the GPIO, it will stay at its latest value. The GPIO.cleanup() will do that for us.
Coding for Raspberry Pi with Python is very simple and helpful because you can write an application quickly and without a lot of specialized knowledge. For example, by using the below code, we can simply define an interrupt on a pin and set a callback:
GPIO.add_interrupt_callback(7, do_something, debounce_timeout_ms=100)Development Resources
CodeSkulptor presents a very good environment which you can use to run Python scripts on the web. This is a free tool!
When you launch the program, you are treated to a very useful example case that shows you how to run a simple GUI on the web using Python and the “simplegui” library.
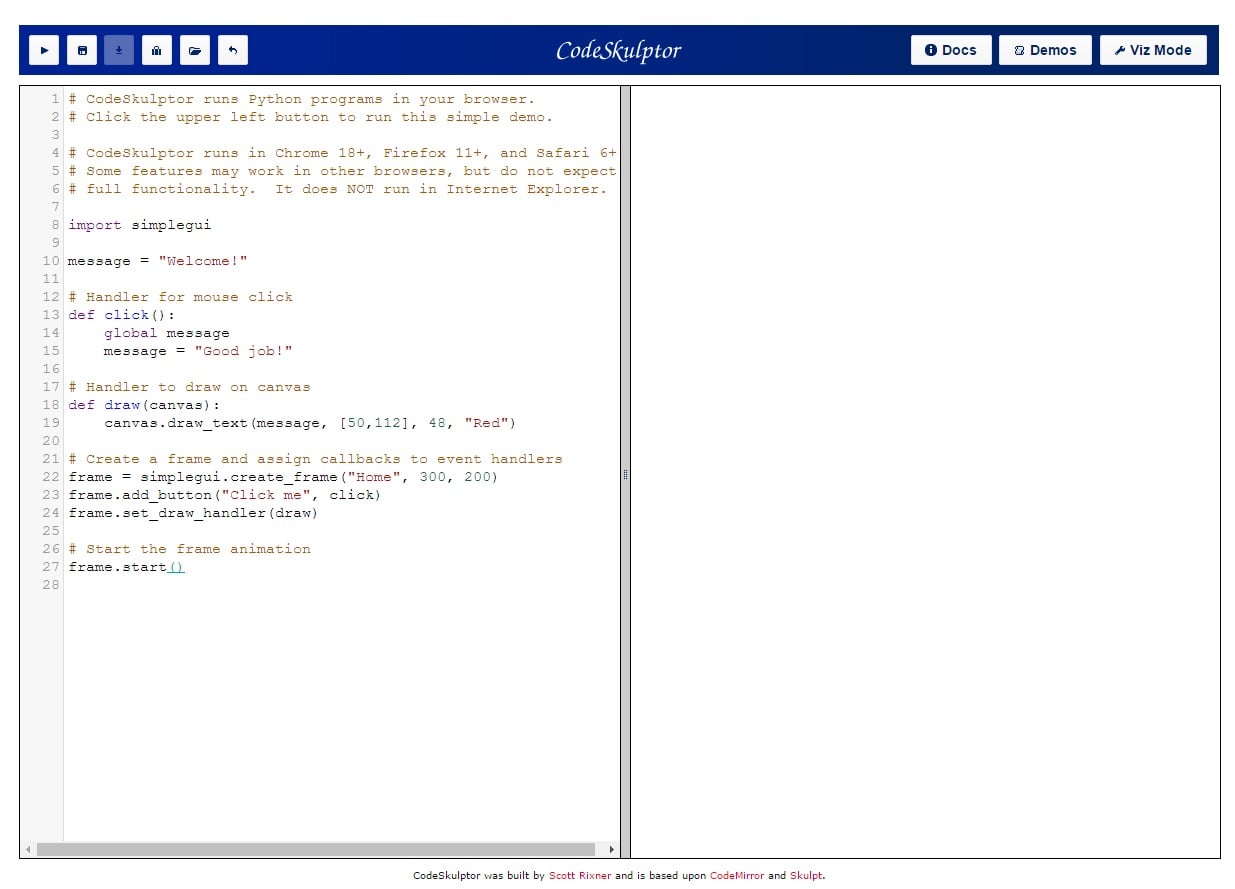
Figure 3. The example. Image courtesy of Codeskulptor.
As you can see in Figure 3, an example which runs a simple GUI is presented. By running it, we can see the power of Python and its flexibility for running everywhere, even in web applications. The result of the example picture is shown in Figure 4.
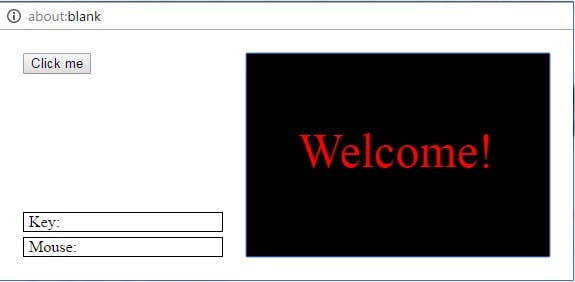
Figure 4. Running the Codeskulptor example
You can access the demo section here to view other contributions.
Conclusion
In this brief introduction to Python, we examined some differences between Python and C and drew some examples of syntax to create a better understanding of Python. We then briefly learned how to build an application using the GPIO library for Raspberry Pi and, finally, we got familiar with Codeskulptor and its environment.
This is just a quick overview of some aspects of Python. If you'd like to see more articles on programming languages, let us know in the comments below!
Related Content


Thanks for the overview, Python is a language i hope to learn in he future. it should be beneficial for going into computer networking.
Thanks. We will cover more of this language as a project in the future.
I tried studying Python from a YT video but when it reached the Walrus Operator, my mind stopped working. BTW, I usually program in REXX. I an just leery of indentation as grouping. I like a freestyle approach that REXX allows. Next I looked at Julia and discovered this : https://docs.julialang.org/en/v1/manual/noteworthy-differences/ . It looks a lot like works in progress and that is a mind[redacted]. I just hate unlearning when one feature is revised or unalived. My ultimate goal is Forth. Everything on my own terms.