Facebook
 Google
 GitHub
 Linkedin
Building a DIY Probe Station
This how-to guide outlines everything you'll need to build a basic probe station on a budget.
The electrical characterization of semiconductor devices requires stable, precise probing of features that are often too small for standard multimeter or oscilloscope probes. Probe stations are valuable and versatile systems used for reliable electrical measurements. However, some of these systems are expensive and may have features you don't need.
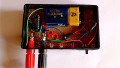
At Ossila, we have recently designed a complete probe station (Figure 1) that comes with everything required for simple electrical characterization.
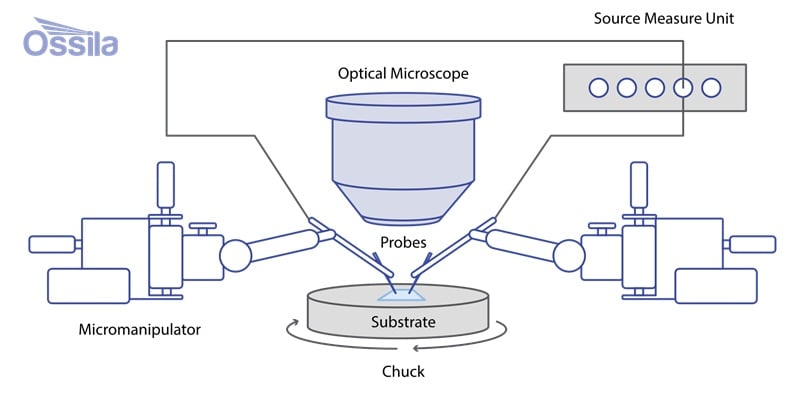
Figure 1. Ossila probe station.
If you need a more specific or complex system, however, many components can be purchased individually for integration into a custom or DIY setup. Building your own probe station can also be a cost-effective alternative for those working with a limited budget. Your probe station should satisfy a few basic requirements:
- Easy setup, customizability, and maintenance.
- Stable and reliable placement of samples and probing equipment.
- Reliable probe positioning to micron-level resolution, typically using a micromanipulator.
In this article, we'll walk through the requirements and best practices for building a budget-friendly probe station.
What is a Probe Station?
A probe station is a facility or setup that can precisely and stably land electrical probes onto microscopic pads for long enough to perform a measurement. Take a simple I-V sweep, for example. An I-V sweep can take a few seconds to a few minutes to complete, depending on the voltage step rate and range. Therefore, it is important that the system is mechanically stable. At a minimum, probe stations require:
- A place to put your sample (stage or platform).
- A place to put your prober (platen).
- Probers (micromanipulators).
- A microscope.
- A suitable electrical measurement instrument.
While the components are straightforward, what really makes the probe station so useful is how all these elements fit, align, and work together. It is not as simple as putting a sample down on a bench and starting to probe. Some other things to consider include:
- Navigational ease.
- Optimized mount points.
- Appropriate magnification.
- Compatible measurement instrument.
Let's go over each of these.
Navigational Ease
The key goal of any probe station is to accurately and reliably land probes onto the pads or electrodes of a device under test (DUT). When designing a probe station, there are two options: fix your probes in place and move the DUT, or move the probes towards a fixed DUT. Moving the DUT becomes inconvenient if using multiple probes, such as when measuring an I-V curve.
The more versatile option is to fix the DUT and move the probes. You must consider the required movement resolution—in other words, how accurate your probe placement needs to be. This depends on factors like the size of your electrical pads, the density of devices on your sample, and the size of your probe tips.
Positioning adjustments must be smooth and easy to do. Jumpy probe movement leads to inconsistent probe placement. You will also need to determine whether you need automated probe movement, or if manual will suffice. Automation increases cost and complexity. Manual stages are sufficient for most DIY systems.
Optimized Mount Points
Carefully consider the alignment of your sample and your probers. How accurate this positioning needs to be relies largely on the available travel range of your stages or micromanipulators. You should consider the optimal X, Y, and Z locations for every component in every experiment you might do. It's worth spending some time thinking about this and checking as you build each stage.
Appropriate Magnification
You will need an optical system that allows you to see the pad on your device and the probes to position them. The magnification you need should be determined by the size of your sample. There is no need for a high-end research microscope here, unless your work specifically requires it.
Compatible Measurement Instrument
Select an appropriate measurement system—such as a source measure unit (SMU), digital multimeter (DMM), or oscilloscope—based on the electrical measurements you intend to perform. You need to make sure that your measurement system is compatible with the micromanipulators or probers you are using, or that you have the appropriate adapters if needed.
Probe Positioners and Micromanipulators
Achieving micro-precision probe placement is one of the most challenging parts of building a probe station. You will rely on your probe positioner to accurately line up your probe with the landing pads. Plus, it's useful if your probers have smooth movement and friendly ergonomics built in.
You can buy micromanipulators off-the-shelf which are already assembled, calibrated, and tested, saving you considerable time and effort. If you are building your own probe positioner, it may take significant thought and effort to develop the right system.
The basic requirement for a probe positioner is that it can move in micron-level increments along three axes: X and Y motion for fine probe location over the pad, and Z motion to bring the probe tip into contact with the pad. These probers also need to hold the probe tips reliably and stably, for consistent measurement.
To build your own probe positioner, you'll need to combine off-the-shelf optical translation stages with 3D printed components to hold your probe. You can readily buy translation stages with a varied range of XYZ movements. Though some offer automated movement, these are more expensive. For a standard probe station, manual linear XYZ translation stages like the one shown in Figure 2 should be sufficient.
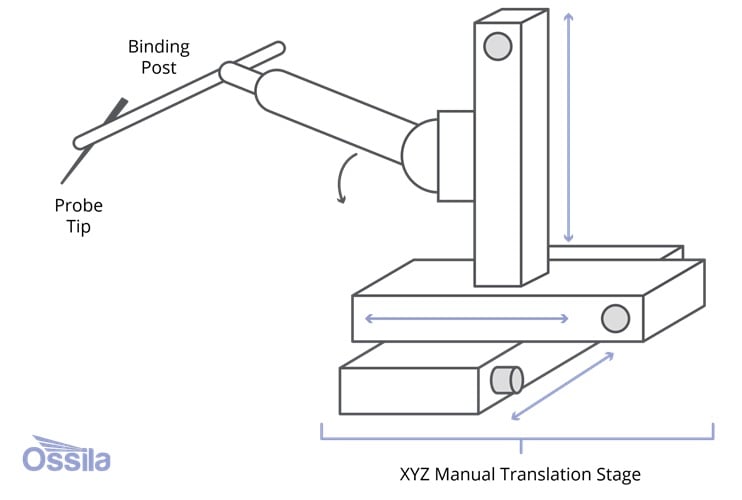
Figure 2. Probe positioner.
You'll also need to include a “binding post” to clamp the probe tip in place. You can buy these from any generic electronics supplier. Just make sure it has appropriate cable attachments.
Of all the components of a probe station, building your own probers will be the most difficult part. It will require significant time and effort to build, test, and integrate DIY probers into a larger system.
Probe Tips
Unless you need specific probe tips for your experiment, you don't need to get specialist tungsten or BeCu tips. These tips are precise and very robust, but in many cases simpler probe tips will suffice. For simple measurements, you could even use a sewing needle. Most ultra-fine tipped sewing needles are practical and inexpensive alternatives to traditional probe tips.
How to Position Your Probers
Though it seems easy in principle, positioning your probers requires some forethought and spatial reasoning. Before building, the first question you should ask yourself is this: Do you want your probes to be fixed or movable? The answer will depend on the applications of your probe station. This leads to a second question: Will you need to reposition your probers for testing different DUTs?
If all your measurements are on identical devices, fixing the micromanipulators permanently should be fine. If you want moveable probers, they will need temporary locking mechanisms to fix them in place so that they can't move during experiments. Unsteady probers will add noise to your measurements and potentially damage your samples.
Some micromanipulators, including Ossila's, have strong magnets built into their base. They can be moved when needed but won't be knocked out of place during an experiment. If you are using magnetic micromanipulators, choose a platen made of ferromagnetic material. That way, your probers will remain fixed during a measurement without needing additional power or vacuum.
A Place to Put Your DUT
Fixed-DUT placement stations need a stable platform or surface at the right height. You should also consider the electrical properties of this surface. In particular, ask yourself whether you need the stage to be grounded or electrically insulated. Note that for simple top-side measurements, you can insulate by positioning the sample on top of a glass microscope slide.
For ease of usability, stages with X-Y adjustment can be helpful for sample positioning. Additionally, some Z movement can make sample loading easier. However, neither of these are strictly necessary.
A Microscope
A microscope is essential for accurate sample positioning. However, it doesn't need to be a high-specification microscope. If high-resolution images are useful in your research, you can buy a microscope camera with higher resolution. The only thing to watch out for is that it must have sufficient working distance, allowing you enough space to manipulate probes between the camera and stage.
You will also need an adjustable-height stand for positioning and focusing on the microscope. Figure 3 provides an example of a probe station with a suitable microscope and stand.

Figure 3. The probe station's microscope should support sufficient working distance for probe manipulation.
Building the Probe Station
The key to a successful probe station lies in the careful alignment and assembly of its components. Ensuring that your components align may require some trial and error. It might be useful to start with one element, such as the sample stage or prober stage, and then build the rest of your probe station around it.
Things to consider include:
- Ensure that the prober stage and sample stage are aligned so that your positioners can navigate to your sample easily. Check your dimensions before ordering.
- You need to mount your microscope camera above your sample. Choose a camera with an appropriate focal length to make this comfortable to use and adjust. If you're using a digital microscope, you'll also need a monitor to display this output.
- Make sure you have appropriate grounding and shielding in place for any experiments you are conducting.
Table 1 illustrates what you'll need to build a probe station from scratch versus using off-the-shelf components.
Table 1. Build summary and component list.
|
|
Using Off-the-Shelf Components | Building From Scratch |
| You Will Need |
2x micromanipulators |
2x XYZ translational stages |
| Microscope | Microscope | |
| Monitor | Monitor | |
| Height-adjustable arm | Height-adjustable arm | |
| Platens and stage | Platens and stage | |
| Probe tips | Sewing needles | |
|
|
3D printer filament | |
|
|
Binding posts | |
| Estimated Build Cost | $2,500–$3,000 | $500–$1,500 |
| Estimated Build Time | 1 day (excluding shipping time) | 2 to 6 weeks |
If you're building everything from scratch, you will also need access to a 3D printer. Even if you're using off-the-shelf-components, you may find that 3D printing customized spacers, brackets, platforms, or other essential interconnecting components drastically speeds up and simplifies construction.
Issues to Expect
If you build your own system, keep in mind that delayed shipping of individual components may prolong setup time. Also, pre-built systems have been quality tested and designed to reduce the impact of external vibrations and ensure electrical grounding.
If you are assembling any of your own components, you should allow extra build time for assembly, alignment, 3D printing, and re-printing. Of all the components of a probe station, building your own probers will be the most difficult part. It will require significant time and effort to build, test, and integrate DIY probers into a larger system.
Finally, there are several aspects of system integration that will take a while to figure out. These include knowing which fasteners to use with threaded sockets, ensuring stable connections, and making sure the connecting brackets and supports are the right size. All of these things take time, which you should account for when building your own system.
All images used courtesy of Ossila
Related Content