Facebook
 Google
 GitHub
 Linkedin
Understanding the Challenges of Image Signal Processing Calibration
Calibrating your image signal processor is a complex engineering task, but it's critical for digital image quality. Learn about these nuances and about the resources available to help you tackle these challenges.
Many years ago, there was intense discussion about the images that the NASA Mars Rovers Curiosity and Perseverance were returning. The primary complaint was that the images shown by NASA as part of their media significantly differed from the original images, which NASA referred to as “raw” images. Images like the one shown in Figure 1 were only partially processed—NASA had not applied any digital image signal processing functions.

Figure 1. Image taken by the Left Navigation Camera onboard NASA's Mars rover Curiosity on Sol 3940 (2023-09-06 11:23:30 UTC). Image used courtesy of NASA/JPL-Caltech
Interpreting such images is subjective without image signal processing, and seeing the same picture after it was correctly processed would be a somewhat jarring experience.
The signal processing functions must be precisely calibrated for images to consistently represent the physical world correctly, whether here or on Mars. This article discusses why image signal processing (ISP) calibration is essential, what is involved with performing ISP calibration and fine-tuning, and why third-party resources support accomplishing ISP calibration effectively.
Why Image Signal Processing Calibration is Necessary
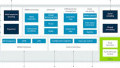
Understanding how digital images are produced helps to understand why ISP calibration is necessary for generating high-quality, accurate images. Figure 2 provides an excellent summary of the digital image capture process.

Figure 2. Steps for generating a JPEG image file. Image courtesy of Computer Vision: Algorithms and Applications by Richard Szeliski
The camera body containing optics, an aperture, and a shutter, interacts with the sensor chip. The sensor chip receives the physical image captured by the camera body. The sensor chip initially captures that light as an analog image.
Each pixel on the image sensor measures the light energy at that spot. The sensor's analog output is increased via gain—similar to the sensitivity of analog film expressed in ISO. Then, the output is converted from an analog signal to a digital signal. The result is a black-and-white RAW image, which is unusable for human and computer vision applications.
The RAW image is transformed by the ISP, to achieve an aesthetically pleasing and relatable image that can be used by humans or for applications such as computer vision. The first major task of the ISP is to demosaic the image, converting the black-and-white RAW image into a color RGB image, as shown in Figure 3.

Figure 3. Going from a black-and-white RAW image to a color image. Image courtesy of NXP
Other processing tasks may include:
- Lens shading correction
- White balance
- Color correction
- Sharpening
- Anti-aliasing
- Black level correction
- Gamma/curve
- Noise reduction
- Compression
ISP functions like those listed above can be performed in software or hardware. Software solutions are best for a throughput of about 0.5 Mpixels/second. Hardware ISPs also exist as IP blocks integrated into a system-on-a-chip (SoC) or as discrete chips. However, for the ISP to do its job, it must be calibrated for each image sensor and lens combination.
Calibration and fine-tuning are critical for digital imaging systems to provide consistent quality and accurately reflect the world they are capturing. Face recognition systems require a high-quality image of facial features to be accurate and reliable. Autonomous vehicles require detailed images that correctly capture critical elements to make safe decisions. Automated quality control systems depend on sharp, clear image captures to determine if the system should discard a part.
In each instance, poorly processed images could cost thousands of dollars in lawsuits, fines, and discarded products, making ISP calibration and fine-tuning an essential step.
What is the ISP Calibration Process?
Each image sensor, lens, and ISP combination needs characterization, tuning, and software drivers. The image sensor and lens combination must be characterized for the ISP to apply corrective transforms to the RAW image. The goal is to achieve between 70% and 80% of optimal image quality during calibration.
The ISP calibration begins with numerous (100 to 400+) images captured using different gain/shutter-speed combinations with various image targets under various lighting conditions. This process requires functional camera software to control the image sensor and/or camera module to adjust the gain, take a picture, and transfer that picture to a storage device. Attaining these images is time-consuming and best performed under the controlled conditions of a laboratory.
For example, lens shading correction (LSC) requires a series of images for each color temperature to be captured. These images contain flat, featureless surfaces that are neutral in color (although there are exceptions), with one for each color temperature and rotated at different angles.
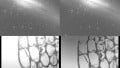
The result of calibration is a luminance correction table for all color temperatures. Figure 4 shows an initial image used for LSC calibration curves and a contour map illustrating the light fall-off at the corners of the frame. A corrective transform will be applied to the image so that the image appears the same in the corners as it does in the middle.

Figure 4. LSC calibration image (left). LSC contour map (right). Image courtesy of NXP
One key factor in the calibration process is achieving the first stage of color balance. A color balancing chart like the one shown in Figure 5 is included in images captured over various color temperatures. For the calibration software to generate an accurate calibration table, hundreds of photos are needed. From these images and the color balancing chart, the color correction matrix (CCM) is created for the digital camera (i.e., optics, aperture, sensor).

Figure 5. A ColorChecker color rendition chart used during calibration and fine-tuning. Image used courtesy of Wikimedia
The Fine-Tuning Process
More than basic calibration is required to achieve high-quality images: fine-tuning is used to achieve optimum image quality, make color adjustments (to achieve a higher level of quality than the basic calibration process), and achieve tuning of the 3A algorithms: auto white-balance, autoexposure, and autofocus (AWB/AE/AF).
These three algorithms (AWB/AE/AF) impact white balance, exposure, and focus. As an example of auto white-balance, Figure 6 shows an unbalanced JPEG image (left) and a white-balanced image shifted so that the gray surface is neutral. Note how the white portion of the flower petals in the image no longer have a grayish-blue cast.

Figure 6. A color-balanced image of a flower. Image used courtesy of Wikimedia
Exposure is best understood in terms of what happens when it goes wrong. If an image is overexposed it will appear washed out—the blacks will appear gray and the colors will look muted and lighter details will be lost in a sea of white. On the other hand, if there is insufficient light, the image is dark and underexposed.
Shutter speed and aperture determine exposure, so many digital images at different shutter speeds and apertures are used to generate the data needed to correct exposure automatically. Figure 7 shows the same image with three different exposures. Moving from left to right one can see the same image underexposed, with ideal exposure and overexposed. The auto exposure algorithm works to find the ideal exposure of every image before capture.

Figure 7. (From left to right) Underexposed, overexposed, and ideal exposure. Image courtesy of NXP
The fine-tuning portion of ISP calibration is very subjective, complicating matters. Images must be taken to find any additional gaps in quality (and quality expectations). ISP and the 3A parameters (discussed earlier) will need manual modification and may require more calibration data to address specific image scene types.
Successful fine-tuning requires an experienced engineer to know when an image looks correct and what adjustments to make to the ISP if an image looks “off.” They must also ensure that new calibration data does not result in problematic artifacts. Engineers carry out these processes in multiple iterations. This ISP fine-tuning process requires a significant amount of time and experience.
Third-Party Resources for ISP Calibration
There are definite challenges related to ISP calibration and fine-tuning. To start, ISP calibration is a time-consuming (3-6 months), tedious process that requires multiple steps. Furthermore, it requires experienced engineers familiar with the process and a significant amount of specialized hardware, including light sources, targets, light meters, etc. The cost varies from $25k for the bare minimum setup to over $100k for more advanced equipment. And beyond equipment, the process requires a room with controlled lighting (ideally, a room where all outside lighting can be blocked).
Because of such challenges, tapping expert third-party resources often makes sense for addressing the ISP calibration process. Consider this: almost no company designs and tests their own Wi-Fi/Bluetooth analog front-ends and antenna—they rely on third-party experts to either build a module or do the chip-down design and then go through FCC certification. ISP calibration is very similar. A company, such as Sony, with the necessary expertise, can build and calibrate their imaging systems, but most companies would benefit from working with expert partners to save time and money.
NXP Partners
NXP partners with a variety of companies to support our customers with ISP calibration and fine-tuning for their applications. Most of our trusted partner-companies offer complete imaging design services such as lens/sensor selection for a given application, hardware design (PCB and mechanical housing), manufacturing and test services, and software design. Additionally, our partners have demonstrated the capabilities required to address ISP calibration challenges and bring our customers' design ideas to life. For more information on NXP partners, visit NXP Partner Marketplace.