Facebook
 Google
 GitHub
 Linkedin
Arduino Interface with MATLAB
How to connect your Arduino board to MATLAB and actually control and get information on the Arduino.
We're going to create simple MATLAB m-files to talk to our Arduino board. The MATLAB Support Packages for Arduino Hardware lets you use MATLAB to communicate with your board through USB cable. The support packages are available for 32-bit and 64-bit Windows, 64-bit Mac OS and 64-bit Linux.
Installing Packages
You can easily install packages through your MATLAB.
First, start MATLAB and click the Add-Ons drop down menu. In the drop-down menu click Get Hardware Support Packages. It will start the package installer window.

Select Install from internet and then Next.

In the next window you will see all the available packages for MATLAB and Simulink. Select the Arduino package, then check all the packages displayed and click Next to continue installation. Note that this picture is showing that I am reinstalling the Arduino packages because I had previously installed them.

Next, the installer will ask you to log in to your MathWorks account. If you don’t have an account, you can create one during installation. Accept the license agreement on the next screen and continue to download the packages. Now you have to wait for MATLAB to download and install all the required packages.
Testing
Once the packages are installed, connect your Arduino board to your PC and type the following command in MATLAB command window,
>> a = arduino()
if you have more than one Arduino connected to your PC, you have to specify the board type you will be communicating with:
>> a = arduino(‘com3’, ‘uno’)
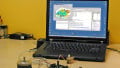
MATLAB will then attempt to communicate with your board. If successful, MATLAB will display the properties of the Arduino board connected to your PC as shown below:

This information displays the port on which your board is connected, the model of your Arduino board, and available pins and libraries available for the board.
In your workspace, you will see a variable a, which is the MATLAB Arduino object. Run the following command to clear this object.
>> clear a
This command will remove the object a from your workspace.
Wiring Diagram
Connect the cricuit as shown below to complete the following two examples:

It will look something like this:

Experiment 1: Digital I/O with MATLAB
In this example we will blink an LED with MATLAB.
Hardware to Use for MATLAB Arduino
- Arduino Uno
- 1 x 1k Ohm resistor
- USB cable for arduino
- LED
Start MATLAB and create an m-file and write the following code:
Code
% create an arduino object

a = arduino('com3', 'uno');

% start the loop to blink led for 10 seconds

for i = 1:10

    writeDigitalPin(a, 'D11', 1);

    pause(0.5);

    writeDigitalPin(a, 'D11', 0);

    pause(0.5);

end

% end communication with arduino

clear a
Make sure there is no previous Arduino object stored in MATLAB, otherwise MATLAB will display an error message. Save your file and run it. This will blink the LED for a period of 1 second.
Steps
- Start MATLAB and install Arduino Hardware Support Packages (if not already installed).
- Connect your board to the PC and test if it’s working properly with MATLAB.
- Make the circuit as shown in the circuit diagram and connect pin 11 to one end of the LED pin through resistor.
- Connect other point of the LED to the ground pin on your arduino board.
- Write your m-file and save it. Run your file and MATLAB will burn that file to your board.
- Your led will start to blink.
Video
Experiment 2: Analog control
In this example we will use a pulse-width modulated signal to change the brightness of the LED. The program calculates a brightness_step by dividing the maximum and minimum voltage supplied by the pin by the number of iterations in which we will reach maximum brightness of led.
Hardware
- Arduino Uno
- 1 x 1k Ohm resistor
- USB cable for arduino
- LED
Connect the circuit as shown above in the circuit diagram.
Code
% create an arduino object

a = arduino('com3', 'uno');

% calculate a brightness step

brightness_step = (5-0)/20;

% start a loop to brighten up the led

for i = 1:20

    writePWMVoltage(a, 'D11', i*brightness_step);

    pause(0.1)

end

% start a loop to turn off the led in steps so that it looks like

% led is fading

for i = 1:20;

    writePWMVoltage(a, 'D11', 5-i*brightness_step);

    pause(0.1)

end

% end communication with arduino

clear a
Steps
- Start MATLAB and install Arduino Hardware Support Packages (if not already installed).
- Connect your board with PC and test if it’s working properly with MATLAB.
- Make the circuit as shown in the circuit diagram, connect pin 11 to one end of the LED pin through resistor.
- Connect other point of LED to ground pin on your arduino board.
- Write your m-file and save it. Run your file and MATLAB will burn that file to your board.
- Your led will start to brighten and then dim.
Voila!
Video
Give this project a try for yourself! Get the BOM.