 Facebook
 Google
 GitHub
 Linkedin
Building an RC Robot Using a Wheelchair Base
This two-part project will begin by showing you how to create a robot base from a used electric wheelchair. Part 1 creates a simple robot platform for use with remote control. Part 2 will develop a platform for use with and Arduino.
Learn how to build an RC robot base using an electric wheelchair.
This two-part project will begin by showing you how to create a robot base from electric wheelchair parts. Part 1 will guide you through the creation of a simple robot platform for use with Radio Control. Part 2 will develop a different platform for use with Arduino.
A Note about this Project
This is the first part of a two-part project.
Part 1 is intended to take an out-of-use wheelchair to create a mobile robot platform for fun. No part of the electronics or circuitry is intended to be used in combination with any living thing. This project is not meant as a means of conveying humans (nor to provide you with a means of delivering your infant to daycare from the comfort of your couch).
Part 2 is intended to provide control to the same robot base with an Arduino Uno or similar microcontroller. This allows you to take any of the Arduino-compatible sensors available and use them to create a custom controller for your robot.
Together, the projects will give you the basic knowledge required to control a robot that can carry several hundred pounds and move at walking speed.
Parts Needed
| Part | Description | Example | Cost | Notes |
|---|---|---|---|---|
| Jumper Wires (4 required) | Female Terminal to Male Terminal Wires | Link | $2 | These are standard DuPont connectors. You can also find them by cutting apart servo extension leads. |
| Sabertooth 2x25 v2 | Dual 25A Motor Controller | Link | $125 | |
| Electric Wheelchair | Merits P101 Folding Power Chair | Link | $1400 new (<$150 used) | If more than $150, consider buying motors and batteries online. |
| RF Remote Transmitter | FlySky FS-T6 6Ch 2.4 GHz Radio Control System | Link | $53 | Any remote with mating receiver (other than AM) can be used. |
| RF Remote Receiver | FlySky FS-iA6 6Ch 2.4 GHz AFHDS | Link | $14 |
The Sabertooth 2x25 was purchased new online. The rest of the parts I have picked up at one time or another at the local Goodwill or on the used market (Craigslist).
As far as remotes go, there are separate remotes for land-based and air-based systems. Since you are building a land-based project, you should get a land-based remote. I am demonstrating this project with a customizable FlySky plane transmitter because the AM transmitter/receiver I picked up at the local Goodwill didn't work for this particular project due to EM interference.
I am familiar with electric wheelchairs because my father was incapacitated in the last years of his life and we had at one point acquired three wheelchairs similar in appearance to the one pictured in the article. All were different brands and manufactured in different years, but all were functionally identical: They have two motors, two 12v batteries, a motor controller, and a frame. As long as you have two functioning motors and batteries, any wheelchair base or powerchair base should work.

Many people who purchase electric wheelchairs for their loved ones will pay many hundreds, if not thousands, of dollars for them new. Unfortunately, there is no way for the purchasers to resell them for anything anywhere near that. Much like a diamond engagement ring, the new and used values are an order of magnitude apart. The local business that deals with them in my area will offer precisely $50 for any working used electric wheelchair.
That leaves robot enthusiasts with many inexpensive 24 VDC motors to play with, and it leaves people looking to help the disabled with an abundant supply of parts on the used market to fix broken chairs. My advice is to not haggle with someone who has recently lost a loved one and is now grappling with financial difficulties. Instead find a seller who just wants the thing gone or source the motors you need from eBay and a battery from the automotive store.
A Few Notes on Motors and Brakes
The motors I've encountered have all been 24 VDC with a manual lever that engages the motor drive gear with the wheel axle. In one position, the wheel is free to turn completely independently from the motor. In the other position, the gears are meshed and any rotation of the motor will cause the wheel to rotate.

A 24 VDC electromechanical brake is engaged by default. It is a fail-safe that prevents the motor from turning unless 24V is applied to two wires that are separate from the thick conductors that power the motor. You can remove these brakes from the far side of the motor, or for now simply tie them into the main power supply and disable them electrically.
When a user moves the joystick in their wheelchair, the control circuit disengages the electromechanical brake before sending current to the motor to make it turn. The Sabertooth 2x25 that we're using for this article cannot seperately control the brakes, but in Part 2 of this series, we'll use the Sabertooth 2x32, which can control brake lines.

Your RC Remote
Your RC remote is likely not exactly like my RC remote. They can vary a bit in their channel assignments, and newer ones are completely programmable. The remote I used had channel 3 designated as Forward/Reverse and channel 4 designated as Left/Right. Make appropriate adjustments based on the remote that you have available to you.
To determine which channels on the receiver correspond to which joysticks on the transmitter, plug servos into your receiver's channel 1, 2, 3, & 4 ports and move the controls for each channel until the servo responds. Your remote channel (my channel 3) that corresponds to the Forward/Reverse joystick should plug into the Sabertooth S1 port, and your channel (my channel 4) for the Left/Right joystick should plug into the Sabertooth S2 port.
The Sabertooth can operate in either Mixed Mode or Independent Mode:

In Mixed Mode, one channel controls both motors and the wheelchair drives like a car.

In Independent Mode, one channel controls one motor and the wheelchair drives like a tank.
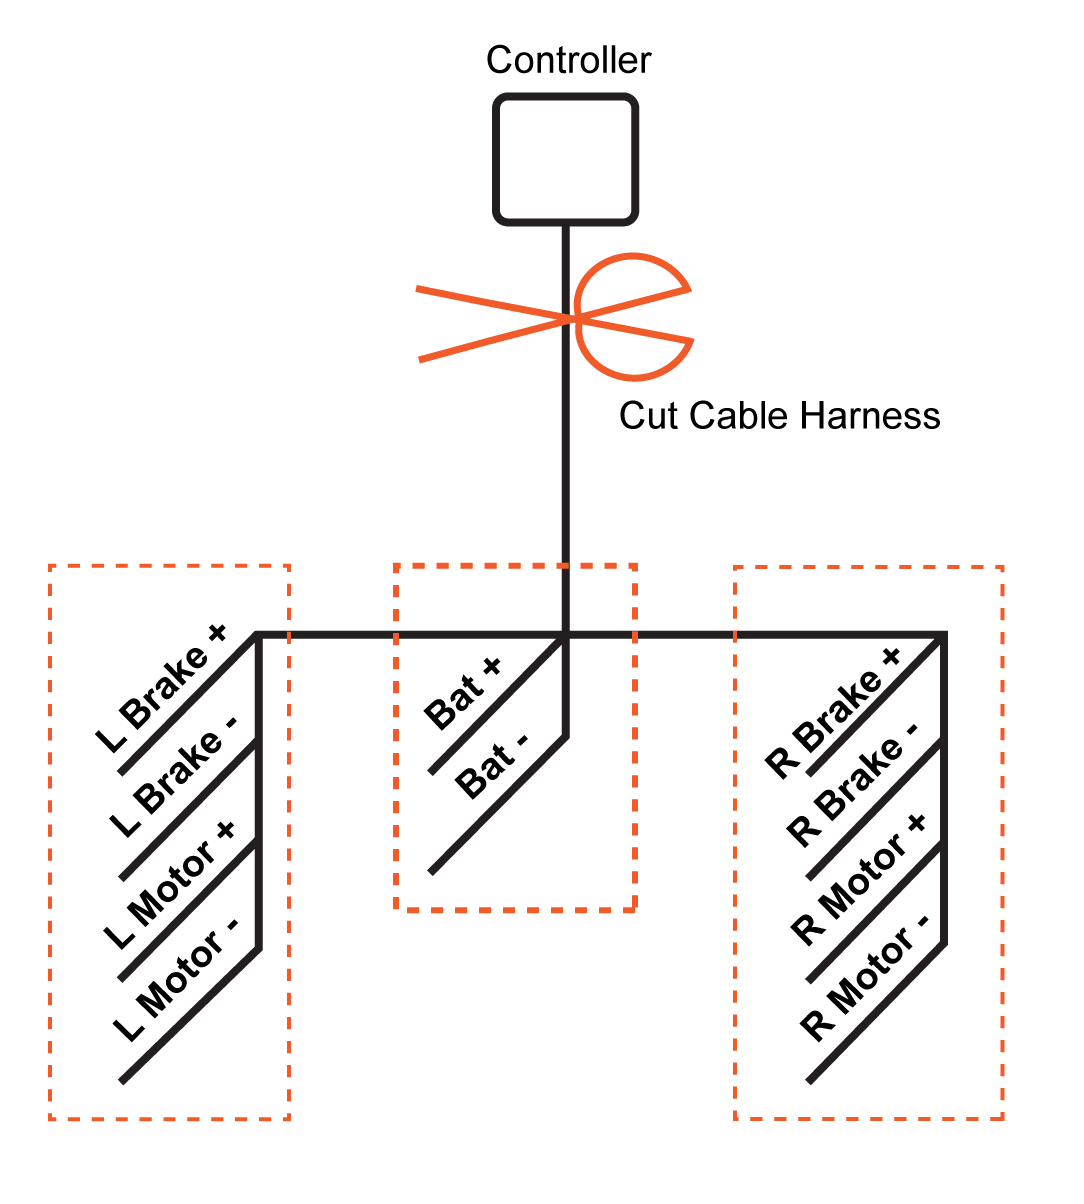
Preparing the Cable Harness
The three cable-harnesses I've seen in person on my father's chairs have been physically and functionally identical. Even if you have a cable harness different from the one shown here, the steps should be identical, as well.
- Disconnect the batteries completely from the cable harness. Mark all positive and negative connections to ensure you hook them back up correctly. Incorrect polarity will destroy your motor controllers.
- Disconnect the motors from the cable harness.
- Cut through the harness on the side closest to the joystick
- Strip the wire harness to expose approximately 3" of wires.
- Strip the insulation from the wires to expose approximately 1/4" of copper.
- Use a multimeter's continuity-check ("beep on short circuit") feature to identify and label the wires. You can save a bit of time by using an alligator clip to hold the multimeter probe to the freshly stripped wire while you touch contacts in the connectors on the harness. Heat-shrink tubing will keep labels on the wires. (*Note that there may be extra wires in the harnesses.*)

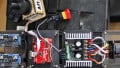
Connecting the Sabertooth 2x25 Motor Controller
The Sabertooth 2x25 motor controller is a versatile motor controller that can accept several modes of input:
- Pulse Width Modulated (PWM) signals from a microcontroller or an RC receiver
- Analog input— A 0-5VDC signal
- Simplified serial— For communication with a microcontroller or a PC (the latter would require an RS-232 level converter or a USB-to-UART bridge)
- Packetized serial— For linking multiple Sabertooths to a microcontroller or PC
We will use the PWM mode of communicating with the Sabertooth. The Sabertooth provides a 5V and reference ground that provides power to the RC receiver. On the dip-switches of the Sabertooth, turn Switch 1 off and Switches 2-6 on. This mixed-mode allows one RC channel to control forward/backward movement and a second RC channel to control left/right movement.
If you need a quick way to mount the new harness, a NEMA-17 motor mount with a cable gland seemed to fit the cable harness perfectly.

The RC receiver will have three rows of 0.1-inch male headers. One row is for ground, one is for +5VDC input, and one row of pins is for PWM signal output.
- Connect the + lines from each brake cable with the + wire from the battery. Connect those to the + line on the Sabertooth.
- Connect the - lines from each brake cable with the - wire from the battery. Connect those to the - line on the Sabertooth.
- Connect [L motor +] to Sabertooth M1A.
- Connect [L motor -] to Sabertooth M1B.
- Connect [R motor +] to Sabertooth M2A.
- Connect [R motor -] to Sabertooth M2B.

- Use a female-to-male jumper to connect the RC receiver [GND] pin to the Sabertooth 0V reference screw terminal.
- Use a female-to-male jumper to connect the RC receiver [5V line] pin to the Sabertooth 5V supply screw terminal.
- Use a female-to-male jumper to connect the RC receiver [Ch3 Signal] pin to the Sabertooth S1 input screw terminal.
- Use a female-to-male jumper to connect the RC receiver [Ch4 Signal] pin to the Sabertooth S2 input screw terminal.

STOP
Before you continue, please be aware that any failure to correctly connect the components can result in a destroyed motor controller—or an uncontrollable killer robot that is capable of severe bodily injury and capable of causing a great deal of property damage.
Double check your connections. Either tilt the wheelchair or find another way to elevate the wheels of the wheelchair so they are not in contact with the ground when the final connections are made.
- Move the switch on the motor that engages the gears between the wheel and the motor so that the wheels will not move freely.
- Connect the wire harness to the left and right motors of the wheelchair.
- Zero your joysticks and turn on your RC transmitter.
- Connect the battery to the wire harness. (This should result in a "click" from the brakes disengaging and provide power to the Sabertooth as well as your RC receiver.)
- Use the joystick on the right side of the RC transmitter to cause the wheels of the wheelchair to move. Test that forward, backward, left, and right all work correctly and smoothly.
- If everything is working correctly, go ahead and put the wheels down and play with it a bit.
Troubleshooting Thoughts
If the robot controls are not responding accordingly (e.g., the stick must be in the upper left corner for the robot to reverse), you might have simply swapped the S1 and S2 inputs on the Sabertooth.
If the robot jitters and jumps, it is possible that the receiver is experiencing interference. Move the receiver as far away from the Sabertooth and the motors as possible. AM radio receivers may be highly susceptible to interference generated by these elements.
If forward/reverse or left/right controls are incorrect, it is possible that there is a reverse switch on the transmitter that can be toggled.
Next Steps: Kill Switches
One of the reasons I chose the Sabertooth 2x25 for this project is that it stops the motors if the PWM signal is lost from an RC receiver. Many of the newer RC transmitter/receiver pairs can be programmed to stop sending PWM signals when you turn off the transmitter or venture out of range—which means that the robot should stop. Other receivers will send the last known good signal—which means your robot will run away from you. Test these conditions when the robot's wheels are off the ground.
A simple safety addition to the circuit would be an e-stop switch between the Sabertooth 5V output line and the RC receiver 5V input line. A more robust safety solution would be an e-stop switch that interrupts the battery circuit. I don't know of an affordable e-stop switch that can handle the current that the Sabertooth is capable of drawing, so perhaps a solution would be an inexpensive e-stop switch/relay combination.
On a misbehaving robot, of course, an e-stop might be a hard target to reach (what with the circular saw and lasers and all it uses to destroy other robots), so consider creating a large kick-bar to trigger the switch.
Again, in theory, disconnecting power to the RC receiver should stop it from sending signals and that should be sufficient to stop the Sabertooth from powering the motors. Please note the use of the word "should" and not "will". For a guaranteed stop, DimensionEngineering recommends packetized serial communication (page 20) or the more customizable Sabertooth 2x32, which increases the complexity of the project.
Increasing the complexity of the project is exactly what we'll do in Part 2, where we attempt to modify a wheelchair base and joystick.
Included in the download files are laser-cut patterns for circuit board holders that you can use if you like.
WheelchairCircuitBoardHolders.zip
Finally, here's a video of the base in action:
Next Article in Series: Building an RC Robot Using a Wheelchair Base—Part 2
Give this project a try for yourself! Get the BOM.


Hi. Nice project.
Maybe you could use a starter motor solenoid for the high current cut off.
in
very nice