 Facebook
 Google
 GitHub
 Linkedin
Measure Thermocouple Temperature with the MAX31855 and a PICAXE
Whether for cooking or reflow soldering, a thermocouple is often the best choice for a high temperature sensor. The MAX31855, a PICAXE-08M2, a serial LCD, and a few lines of code will do the trick.
Thermocouple Basics
There are several choices for measuring temperature: thermistors, silicon devices, and resistance temperature detectors are just three examples. One of the oldest and simplest is the thermocouple and it's also the device used in this project.
A thermocouple is simply a junction of two dissimilar metals and is based on the fact that such a metallic junction creates a voltage that varies proportionately with temperature. The higher the temperature is, the higher the voltage will be. The internet is full of descriptions of this phenomena called the Seeback effect, and so there is no need to dwell on it here.
What is important, however, is that the simplicity of a thermocouple—two wires bonded together—increases its usability in high-temperature measurements. The choice of metals affects the temperature rise to voltage increase ratio, and several different metal combinations are used to create thermocouples to exploit that characteristic. Thermocouple types are referred to by using letters of the alphabet to denote the metal combinations used. One of the most common is a "K" type thermocouple, which is the type used in this project.
A significant difficulty in the use of thermocouples is the fact that the voltage changes are very small and consequently are difficult to correctly convert to the actual temperature. In addition, it is necessary to determine not only the temperature of the medium being measured by the thermocouple, but also the ambient temperature at the place where the voltage is being read. There are solutions to both of these issues, and some of the best solutions are based on specialized integrated circuits.
The MAX31855
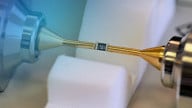
The MAX31855 integrated circuit is a product of Maxim Integrated. This little gem not only reads the voltage from the thermocouple, amplifies it, and performs analog to digital conversion, but it also provides builtin cold-junction compensation. Unfortunately for many hobbyists, the MAX31855 is only available as a surface mount device (SMD) in an SOIC-8 package. As a result, the popularity of breakout modules, such as this one from Digi-Key and this one from Adafruit, is high. The cost of such a module may be a little much for some, and if that includes you, there is another much less expensive option: buy a bare chip and solder it to a breakout (also called a converter) board. An example of such a board is shown in the photo below; click the photo for a larger image.
As you can see, the PCB is designed to accept an SOIC-8 SMD and extend its connections to pin headers in a DIP (dual inline pin) configuration.

Assembling the breakout board is not difficult if you have a decent soldering iron and moderate (or better) skills. Be sure you check the pin to pad connections on your breakout board; many are made like the one shown here, but yours could be different.
Insert the two 4-pin headers into a solderless breadboard as shown in the first picture below; one header should be on each side of the channel in the center of the breadboard. Then place the breakout board on the headers as shown, and solder all eight header pins to the PCB. (Be careful not to apply too much heat to your solderless breadboard, or better yet, use an old, sacrificial breadboard.)
Once the header pins are soldered in place, orient the MAX31855 IC as shown, and tack solder one pin (only one) to the breakout board; the photo below left shows pin 8 of the MAX31855 tacked in the correct location. Check your work, and reorient the IC if required; once you are sure every pin is aligned to the correct pad, solder the remaining seven pins. Your assembly should look like the photo below right.

The Circuit
The circuit for this project is not complex thanks to the extensive capabilities of the MAX31855 and to the use of the amazing PICAXE-08M2 microcontroller. In addition to those two integrated circuits, you need a programming circuit for the PICAXE, an appropriate IDE, a serial LCD, and a K-type thermocouple similar to this one. The schematic diagram is shown below; click on it for a larger version. In addition, you need a well filtered and regulated 3.3VDC power source such as this one; in a pinch, two alkaline single cell batteries in series will also do.

If you are using a MAX31855 module, just connect the actual IC pins as shown above, and it should work fine.
The Assembly
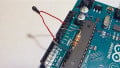
For experimentation and development purposes, construction on a solderless breadboard is recommended. Such an assembly is shown below; note that the wire colors in the photo correspond to the designations on the schematic drawing shown above. Once you are satisfied with the design and want something more permanent, you may want to build a perfboard version or design a PCB for the circuit.

The Code
The code for this project is reproduced below and is available for downloading. Although it's well commented, some additional explanation may be helpful.
- The MAX31855 is capable of using SPI (Serial Peripheral Interface) communications, but the PICAXE-08M2 is not. However, it is possible to use "bit-banging" to transfer data from the 31855 to the 08M2. Such a method for measuring the probe temperature comprises lines 36 through 41. In each of the 16 iterations, one bit of serial data is transferred into the PICAXE and stored as a word variable in location w1. Likewise, the ambient temperature is moved in lines 43 through 48 and stored in location w0.
- The use of these two word variable locations (w0 and w1) enables individual access to the 16 bits in each word. See lines 64, 72, 76, and 80, and page 10 of the MAX31855 datasheet.
- Lines 50 and 51 use logical shifts to discard unwanted bits prior to display.
- All of the serout commands are formatted to use an LCD117 serial to parallel adapter and a 4-line by 20-character LCD. If you are using a different display setup, you will need to modify the code accordingly.
- This project does not require, and the code does not support measurement of negative Celcius temperatures. If temperatures below 0°C are encountered by the thermocouple or the ambient sensor, an error message will be displayed, but no harm will be done. See lines 53-57.
- The MAX31855 also includes the ability to detect when the thermocouple is disconnected, shorted to ground, or shorted to +V. Any of the three faults conditions will result in an appropriate notification on the display. See lines 69-87.

MAX31855_PICAXE-08M2_Thermocouple.zip
The Display
On startup, a welcome screen will be displayed.

As previously described, the LCD will display both the ambient temperature and the probe temperature.

If a temperature below 0°C is encountered, an error message will be displayed. Additionally, error messages will be shown in the event that the thermocouple is disconnected, shorted to ground, or shorted to +V. Try each error to see the display; no harm will result.
What Else?
While a thermocouple thermometer is interesting and potentially useful, you might consider turning this project into a thermostat for your sous vide cooker, your smoker, or your reflow solder oven.
"But wait," you might say, "All the PICAXE I/Os are used. I can't do that."
Don't give up so quickly. You could port the design over to a PICAXE-14M2 or 20M2, or you could simply make pinC.0 of the 08M2 do double duty...if you remember how. (See note 2 on page 27 of PICAXE Manual 1.)
There's more to come in future PICAXE adventures on AAC—stay tuned!
Give this project a try for yourself! Get the BOM.


what is the use of capacitors c2 and c3? i have an error with the readings. what is the recommended values of c2 and c3. thank you..