Facebook
 Google
 GitHub
 Linkedin
Understanding and Using the SAM4S Digital-to-Analog Converter
Part Two in this three-article series explores the SAM4S DAC. We’ll look at hardware configuration, electrical characteristics, and the application programming interface.
Part Two in this three-article series explores the SAM4S DAC. We’ll look at hardware configuration, electrical characteristics, and the application programming interface.
Supporting Information
- Intro to Project Development with the Atmel SAM4S Xplained Pro
- Introduction to Digital–Analog Conversion
Required Hardware/Software
Previous Article
The DACC
The goal of this article is to make the SAM4S DACC (digital-to-analog converter controller) generate a simple triangle wave (we’ll switch to a sine wave, and incorporate direct memory access, in Part 3). By the end of this article we will have covered a variety of important details related to the DAC’s electrical characteristics, the registers that control the DAC’s operation, and the software interface provided by the Atmel Software Framework (ASF). In my opinion, the DACC section in the SAM4S datasheet and the documentation for the ASF’s DACC module are not as clear and informative as they might be. If you have had trouble with the DACC in the past, this article should expand and solidify your understanding of this handy peripheral. If you are completely new to the DACC, this will be a thorough and helpful introduction.
The Basics
The SAM4S DACC includes two identical, independent digital-to-analog channels. They offer 12-bit resolution, meaning that the value written to the DAC conversion-data register can be any number from 0 to (212 – 1), i.e., 4095. As discussed in the previous article, the DAC can operate in free-running mode, where a write to the conversion-data register initiates an update on the analog output, or in triggered mode, where updates are initiated by a rising edge on an internal or external synchronization signal. We will be using triggered mode to ensure identical intervals between updates; in the previous article we configured channel 1 of timer/counter module 0 to provide a 100 kHz square wave for triggering the DAC. Here is a scope capture of the trigger signal; it’s internally routed to the DACC, but we’re also driving it on a port pin so that we can probe it.

Both DAC channels can be updated via the SAM4S peripheral direct-memory-access controller (direct memory access is abbreviated as DMA, and this controller module is in turn abbreviated as PDC). The PDC allows us to continuously send new conversion values to the DAC with minimal CPU involvement. We’ll cover the PDC portion of this project in Part 3.
Finally, you should be aware that the DACC incorporates a first-in-first-out (FIFO) conversion-data buffer. It’s easy to forget about this buffer because you don’t interact with it directly; rather, you simply write data to the conversion-data register, and the DAC hardware does the rest. Namely, if it’s still occupied with a previous conversion, it stores data in the FIFO and then retrieves the data when the DAC becomes available for a new conversion procedure.
This FIFO is not as useful as you might think because it can store only four conversion values, but I suppose that’s better than being able to write only one value at a time. As you will see when we look at the firmware, before writing data to the conversion-data register, you have to make sure that the FIFO isn’t full by checking the TXRDY flag in the DACC Interrupt Status Register.
ASF Issues
The ASF interface for the SAM4S DACC seems to include some oversights that can lead to significant confusion, so let’s take a careful look at the DACC configuration process.
The first two steps in firing up the DACC don’t present any problems. First you reset the DACC hardware, then you choose half-word mode or full-word mode:
//begin DACC configuration by resetting the DACC hardware
dacc_reset(DACC);

//write one 16-bit value at a time, not two 16-bit values in one 32-bit word
dacc_set_transfer_mode(DACC, HALFWORD_MODE);
With half-word mode, the DACC hardware looks only at the lower 16 bits of the value that you write into the conversion-data register. With full-word mode, the hardware interprets the lower 16 bits as one value and the upper 16 bits as a second value. In any case, we’re dealing with a 12-bit DAC, so the upper 4 bits of any 16-bit conversion value are ignored (unless you’re using “tag mode”; you can read more about that on page 1124 of the SAM4S datasheet (PDF)).
Now we need to configure the DACC timing parameters, and this is where things get a bit messy. The function we use for this is dacc_set_timing(). This one function is used for a variety of Atmel microcontrollers, which means that this one function must be able to configure the timing for different DACC modules, which in turn means that the ASF includes different versions of the dacc_set_timing() function. The version that the ASF will use for a SAM4S project is the following:
uint32_t dacc_set_timing(Dacc *p_dacc,
		uint32_t ul_refresh, uint32_t ul_maxs, uint32_t ul_startup)
{
	uint32_t mr = p_dacc->DACC_MR
	& (~(DACC_MR_REFRESH_Msk | DACC_MR_STARTUP_Msk));
	mr |= DACC_MR_REFRESH(ul_refresh);
	if (ul_maxs) {
		mr |= DACC_MR_MAXS;
		} else {
		mr &= ~DACC_MR_MAXS;
	}
	mr |= (DACC_MR_STARTUP_Msk & ((ul_startup) << DACC_MR_STARTUP_Pos));

	p_dacc->DACC_MR = mr;
	return DACC_RC_OK;
}
Unfortunately, there are two problems with this function. First, it includes the ul_refresh parameter. The analog voltage generated by the DAC gradually decreases over time as a result of leakage; to maintain the proper output voltage, the DAC must be “refreshed.” This refreshing can be accomplished by simply writing the same value (or a new value, if desired) to the conversion-data register within the specified “refresh time.” However, the DAC hardware in Atmel’s XMEGA devices (maybe others as well) incorporates automatic refresh functionality. The ul_refresh parameter, which is used to set the refresh interval, reflects this automatic refresh capability. The trouble here is that the SAM4S DACC module does not have automatic refresh, and thus this is not the function that should be used with a SAM4S project.
The second problem is related to the first. In the process of attempting to configure the nonexistent automatic-refresh hardware, the above version of the dacc_set_timing() function clears bit 8 of the DACC Mode Register. And why should we care about bit 8? Here’s why, from page 1128 (PDF) of the SAM4S datasheet:

I don’t claim to know anything about the nature or effects of this mysteriously critical bit; what I do know is that I don’t ignore dire, explicit warnings contained in datasheets published by reputable IC manufacturers. Thus, I refuse to have anything to do with a dacc_set_timing() function that dares to clear bit 8 of the DACC Mode Register.
Fortunately, the remedy to this irksome situation is fairly simple: First, modify two ASF files such that the SAM4E version of dacc_set_timing() is used also for a SAM4S project. The SAM4E DACC lacks automatic refresh, and as far as I can tell there are no significant differences between the SAM4E DACC and the SAM4S DACC. Second, remove the portion of dacc_set_timing() that causes bit 8 to be cleared. I’ll use Diffchecker to help clarify the modifications. Here are the changes for the first file, “dacc.c” (the original version is on the left, and my modified version is on the right):


And here are the changes for the second file, “dacc.h”:

Before we move on, let’s talk about how we will refresh the DAC, since we don’t have automatic refresh. Page 1181 (PDF) of the SAM4S datasheet tells us that the refresh interval for “8-bit accuracy” is 24 µs:

It seems to me that 8-bit accuracy is rather low for a 12-bit DAC, so I would rather use a shorter refresh interval—maybe 10 µs? Our goal in this project is continuous waveform generation, so we can enforce this minimum interval between DAC updates by maintaining a sample rate greater than or equal to 100 kHz.
The DAC Clock
When you generate a new project in Atmel Studio, the default clock configuration (found in “conf_clock.h”) gives you a master clock (MCK) frequency of 120 MHz. The frequency of the peripheral clock is equal to that of MCK, and the frequency of the clock that drives the DAC circuitry (referred to as the “DAC clock”) is the peripheral-clock frequency divided by two. Thus, the default configuration leaves us with fDAC_clock = 60 MHz. Unfortunately, the maximum DAC-clock frequency is 50 MHz:

To remedy this, I modified “conf_clock.h” as follows:
// ===== PLL0 (A) Options   (Fpll = (Fclk * PLL_mul) / PLL_div)
// Use mul and div effective values here.
#define CONFIG_PLL0_SOURCE          PLL_SRC_MAINCK_XTAL
#define CONFIG_PLL0_MUL             16	//previously this was 20
#define CONFIG_PLL0_DIV             1
This results in fMCK = 96 MHz and, consequently, fDAC_clock = 48 MHz.
Startup Time
As part of configuring the DACC, we need to specify how many DAC-clock ticks are needed to provide the required startup time. We’re in no hurry here, so we’ll use the maximum value:

\[startup\ clock\ ticks=\frac{40\ \mu s}{\frac{1}{48\ MHz}}=\ 1920\]
Thus, we use decimal 30 as the third argument in our call to dacc_set_timing(). (The second parameter for this function is used to enable or disable maximum-speed mode; you can read more about that on page 1125 (PDF) of the datasheet.)

Finally, We Can Use the DAC
Here is all the DACC configuration code:
//enable peripheral clock for DACC
pmc_enable_periph_clk(ID_DACC);

//begin DACC configuration by resetting the DACC hardware
dacc_reset(DACC);

//write one 16-bit value at a time, not two 16-bit values in one 32-bit word
dacc_set_transfer_mode(DACC, HALFWORD_MODE);

//refer to the article for details
dacc_set_timing(DACC, MAXSPEED_MODE_DISABLED, STARTUP_TIME_1920_TICKS);

//select channel 0
dacc_set_channel_selection(DACC, DACC_CHANNEL0);

/*Choose the TIO output from timer/counter channel 1 as the trigger.
Note that "channel 1" in this case refers only to channel 1 of timer/counter
module 0, not channel 1 of timer/counter module 1. Also, the datasheet
specifies only "TIO output" as the trigger source, without clarifying whether
this refers to TIOA or TIOB or both. With a little experimentation I determined
that only TIOA will trigger the DAC, not TIOB.*/
dacc_set_trigger(DACC, TC_CHANNEL1_TIO);

//enable DACC channel 0
dacc_enable_channel(DACC, DACC_CHANNEL0);
And here is the code we use to generate a triangle wave that starts at zero, increases to the DAC’s maximum voltage (corresponding to a conversion value of 4095), decreases to zero, increases to maximum, and so forth.
n = 0;

while (1)
{
	//check the TXRDY flag
	if ( (dacc_get_interrupt_status(DACC) & TXRDY) == false) {
		continue; }

	//write the conversion value
	dacc_write_conversion_data(DACC, n);

	if (Increase_or_Decrease == INCREASE)
	{
		if (n == 4095) {
			Increase_or_Decrease = DECREASE; }
		else {
			n++; }
	}

	else
	{
		if (n == 0) {
			Increase_or_Decrease = INCREASE; }
		else {
			n--; }
	}
}
You can probe the DAC waveform using terminal 10 in the row of through-holes labeled “SPARE/ALTERNATE SIGNALS.” The potentiometer to the left of these through-holes allows you to adjust the DAC’s reference voltage; I set mine to 2.4 V.
Results and Conclusion
You can use the following link to download the source and project files:
Here is a scope capture of the DAC waveform:

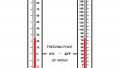
Why are the minimum and maximum at 0.42 V and 2.0 V instead of 0 V and 2.4 V? The answer is found in the DAC electrical characteristics:

This little detail, easily overlooked, informs us that the DAC’s output range is somewhat limited. With a reference voltage of 2.4 V, the theoretical range is 0.4 V to 2 V, which is consistent with our measurements.
This next scope capture confirms that updates to the DAC output voltage are synchronized with the trigger signal (I increased the increment to 350 counts instead of 1 count to make the transitions more obvious):

The DAC hardware needs 25 DAC-clock cycles to update the output. Thus, the interval between a rising edge on the trigger signal and a change in the DAC voltage should be 25/fDAC_clock = 521 ns, which is consistent with what we see on the scope.
Now that the DAC is operational and properly triggered by the sample-rate signal from the timer/counter module, we are ready for Part 3, in which we will generate conversion values for a sinusoid and feed these values to the DAC using the PDC.
Next Article in Series: Digital-to-Analog Conversion with the SAM4S Peripheral DMA Controller
Give this project a try for yourself! Get the BOM.