 Facebook
 Google
 GitHub
 Linkedin
Use a Keypad with Your Arduino
Keypads allow users to input data while a program is running. This tutorial shows you how to connect a twelve-button keypad to an Arduino and how to use the library Keypad.h.
Keypads allow users to input data while a program is running. This tutorial shows you how to connect a twelve-button keypad to an Arduino and how to use the library Keypad.h.
A keypad is often needed to provide input to an Arduino system, and membrane-type keypads are an economical solution for many applications. They are quite thin and can easily be mounted wherever they are needed.
In this tutorial, we demonstrate how to use a 12-button numeric keypad, similar to what you might find on a telephone. A 12-button keypad has three columns and four row. Pressing a button will short one of the row outputs to one of the column outputs. From this information, the Arduino can determine which button was pressed. For example, when key 1 is pressed, column 1 and row 1 are shorted. The Arduino will detect that and input a 1 to the program.
How the rows and column are arranged inside the keypad is shown in the figure below.

Experiment
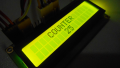
For this experiment, we demonstrate the “keypad.h” Arduino library. When a user presses a button on the keypad, the program will display the value the serial monitor.
Hardware Required·
- Arduino Mega 2560
- 3x4 hex keypad
- jumpers (optional)
- breadboard (optional)
- long pin connectors
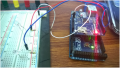
Wiring Diagram
Connect the keypad to the Arduino as shown below.

Code
/* the tutorial code for 3x4 Matrix Keypad with Arduino is as
This code prints the key pressed on the keypad to the serial port*/

#include "Keypad.h"

const byte Rows= 4; //number of rows on the keypad i.e. 4
const byte Cols= 3; //number of columns on the keypad i,e, 3

//we will definne the key map as on the key pad:

char keymap[Rows][Cols]=
{
{'1', '2', '3'},
{'4', '5', '6'},
{'7', '8', '9'},
{'*', '0', '#'}
};

//  a char array is defined as it can be seen on the above


//keypad connections to the arduino terminals is given as:

byte rPins[Rows]= {A6,A5,A4,A3}; //Rows 0 to 3
byte cPins[Cols]= {A2,A1,A0}; //Columns 0 to 2

// command for library forkeypad
//initializes an instance of the Keypad class
Keypad kpd= Keypad(makeKeymap(keymap), rPins, cPins, Rows, Cols);

void setup()
{
     Serial.begin(9600);  // initializing serail monitor
}

//If key is pressed, this key is stored in 'keypressed' variable
//If key is not equal to 'NO_KEY', then this key is printed out
void loop()
{
     char keypressed = kpd.getKey();
     if (keypressed != NO_KEY)
     {
          Serial.println(keypressed);
     }
}
Conclusion
This is a very simple example, but I think you can see how easy it is to get keypad input to your Arduino program. You can use this type of input for many different projects, including:
- Door lock
- Input PWM
- Alarm clock
- Security lock
Video
Give this project a try for yourself! Get the BOM.


The arduino program provided does not verify in my ide. Please help!!