 Facebook
 Google
 GitHub
 Linkedin
An Intro to Labview and Graphical Programming Languages
LabVIEW is a graphical language targeted for equipment monitoring and control. Not using statements, it is programmed using graphic controls. Here's a great intro to this fantastic language.
Upgrade your lab environment.
Introduction to Graphical Programming Languages and LabVIEW
Graphical programming languages provide a different method of coding. Instead of the high level statements in procedural languages, like C and Object-Oriented languages like C++ or Java, graphical languages are coded by selecting objects, connecting them, and adding functionality.
High level languages allow developers to design programs by focusing on the tasks required. The programs are developed using the statements provided and must be compiled and linked, producing an executable file of machine level code. When executed, the code is stepped through and directs the processor to perform operations; the data is accessed or stored in memory as needed.
Graphical languages usually are developed using a graphical interface, where elements are selected and the underlying sections, where functionality is added. The details are dependent on the language.
LabVIEW is a product of National Instruments (NI). It requires licenses, although student and trial packages are available. You can learn more about LabVIEW at the LabVIEW Maker Hub. A student edition was used for this article. Files created have a file type of *.vi. Installed, LabVIEW presents an integrated development, test and run environment.
LabVIEW was designed to support a laboratory environment and is targeted to applications to control and monitor equipment. To support this effort, NI has a wide selection of hardware interfaces and meters to enable LabVIEW programs to monitor and control electronic equipment. Signals from the hardware interfaces can be read directly by the program and the data acted upon. There are also simulation controls, file read/write and circuit controls. Knowing the engineering behind the process to be controlled and measured is as important as knowing LabVIEW. The website allaboutcircuits.com has several projects using LabVIEW; be sure to check them out.
LabVIEW is used to test various equipment, like RF modules to verify the RF output power is within specifications. An RF power meter, like the one shown below is needed to interface to the RF modules.

The NI True RMS Power Meter
The meter provides measurements that can be read by the program, which compares the measured power to the specification. Output can be files or any of the visual displays and graphs included in the controls menu. Although this article only introduces LabVIEW, it is robust enough to control an entire test lab or control multiple systems.
In addition to the LabVIEW Maker Hub, NI provides support for LabVIEW via courses, tutorials and certification programs. Users groups are located in various locations where users meet and share information. Help and documentation can be accessed from within the program.
Coding in LabVIEW
When you bring up a new project, two windows open, a Front Panel and the Block Diagram.
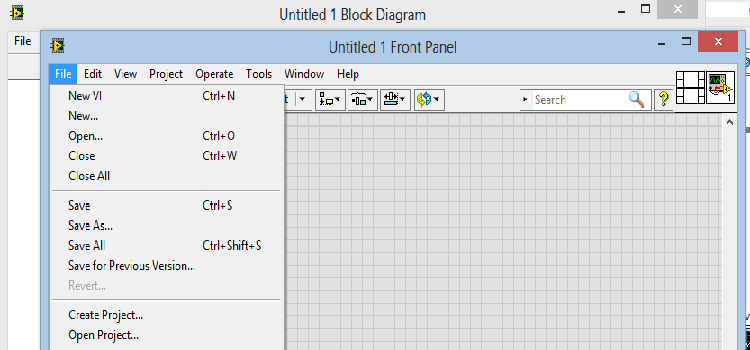
The Front Panel window provides tools menus and all the controls needed for the application. Programming is done by selecting functional controls in the Front Panel window; if appropriate, a corresponding block is added to the Block Diagram.

In addition to functional controls like signal generators, buttons, displays and graphs, decorative controls that only affect the Front Panel are also provided. These allow similar controls to be visually grouped together and have the Front Panel to look similar to real equipment or be as detailed as desired.
The Block Diagram is where the inputs and outputs of the various controls are wired together. The program can be run, aborted, and paused from either the Front Panel or the Block Diagram. The Block Diagram also provides troubleshooting aids. The light bulb will highlight the execution path as the program runs. LabVIEW also allows stepping through or over code and stop/watch points can be set.

Coding Differences
An example of the differences between languages using statements and a graphical language like LabVIEW can be illustrated by a comparison of how repetitive actions are controlled.
In a language like C++, a For Loop will execute a given set of statements a specific number of times. A typical For Loop may look like the code block below. This loop outputs to the statements to the screen the number of times provided by index. All integer variables like i and index have had to be declared and the standard I/O header files included:
for ( i= 0; i > index; i++) {
   cout << "This is within a For Loop \n";
   cout << "an example for you \n";
}
If index is 3, the statements within the loop will be output to the screen 3 times.
A LabVIEW For Loop is shown below.

The loop is put in place, and all the elements to be repeated, referred to as 'code' in the LabVIEW documentation, are placed within the loop. The Index is set to the number of iterations needed. The code within the for loop executes the required number of times. Many times, for testing and sampling, the code may need to run continuously until a condition is reached. In C++, a While Loop would be used to run the code within the While Loop until the condition is false:
while (condition) {
   statements;
}
If a Stop push button has been interfaced so that the state of the Stop button is stored in a variable Run_State, the loop might be:
while (Run_State) {
    // continue running
}
In LabVIEW, a while loop with a Stop Button control is shown below, the iteration and stop control are shown in the lower corners.

Code within the loop will run continuously until the stop button is pressed to exit the loop. To be functional, the loop stop control must be wired to a Boolean type of control (like a push button or on/off switch). The Boolean control is part of the Front Panel; when in run mode, if clicked by the user, it will cause the loop to exit.
NI provides an example Generate and Display program that uses a While Loop with Stop Button control:


Almost all the controls in LabVIEW can be configured allowing each project to be tailored to specialized requirements. In the Generate and Display Block Diagram, the Waveform and Simulate Signal controls are configurable, just right click on the block to bring up the menus and Palettes.


A program is started by clicking the Run arrow key, available when the code is good and able to run.

The Run arrow shows as broken if there are wiring problems. Connectivity issues show in real time with a hint about the issue. Run will not be functional until all wires are connected correctly.
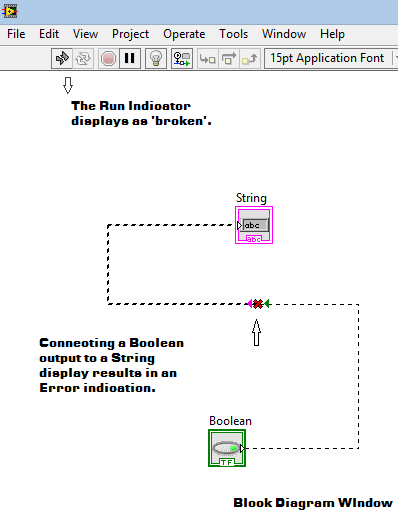
Some controls have functionality incorporated and just need to be wired to be useful. An example is the Boolean Push Button control. Shown below, the Push Button is selected from the Controls menu to be added to the Front Panel; it is also included in the Block Diagram automatically.


The control can be configured via the configuration menu shown below. The Push Button can be set to visually reflect the state ( green on; red off) and the type of response.

The Run arrow is available so the program will run. While Running, clicking the button on/off will change the visual representation of the control green or red. To do anything useful, the control has be to wired to other equipment or circuits.

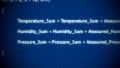
The Generate and Display example, having the Front Panel and Block Diagram shown previously, shows how easy it is to modify a LabVIEW program. It's easy to change controls, loops and wiring within LabVIEW. To write the measurements in the example to a file, just select the Write to Measurement File control, wire it to the signal, configure the file, as shown below:

Measurement files have the default file type *.lvm.

LabVIEW provides many options to write files:

Similarly, Read File or Read Data controls are available to read data from files or live data.
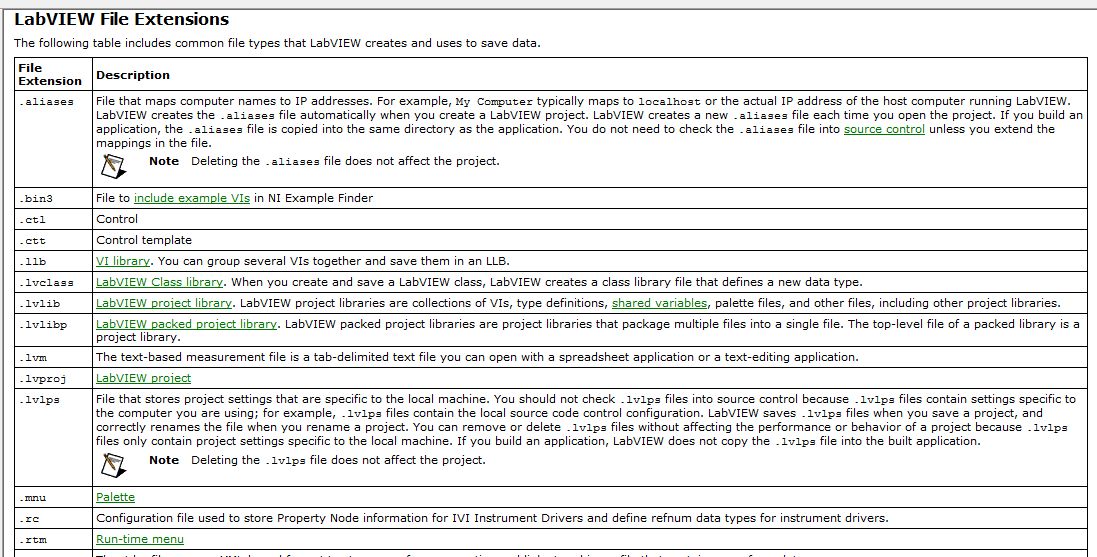
There are many types of files within LabVIEW:
Summary
With all the options to read, write, compare and control data, LabVIEW is a flexible tool that makes it easy to test, monitor and control equipment. Because it is a graphical language, no statements or syntax rules are needed to program in LabVIEW. Errors in programming and connectivity are also reported visually. Selecting and configuring the controls provided, wiring them together and running the program can all be done from LabVIEW windows. Hardware interfaces provided by NI enable LabVIEW to be integrated to monitor and control equipment easily. The LabVIEW Maker Hub and allaboutcircuits.com have many examples and projects for LabVIEW.
Related Content


Interesting, thank you. has anyone had experience of using LabView Home bundle:
https://digilentinc.com/Products/Detail.cfm?NavPath=2,66,1457&Prod=LABVIEW-HE
Looks like good value at $49.
I’m trying to fix a telephone with no less than 4 circuit boards help.