Facebook
 Google
 GitHub
 Linkedin
Building Series-Parallel Resistor Circuits
Once again, when building battery/resistor circuits, the student or hobbyist is faced with several different modes of construction. Perhaps the most popular is the solderless breadboard: a platform for constructing temporary circuits by plugging components and wires into a grid of interconnected points.
A breadboard appears to be nothing but a plastic frame with hundreds of small holes in it. Underneath each hole, though, is a spring clip which connects to other spring clips beneath other holes. The connection pattern between holes is simple and uniform:

Series - Parallel Circuit Construction on a Solderless Breadboard
Suppose we wanted to construct the following series-parallel combination circuit on a breadboard:
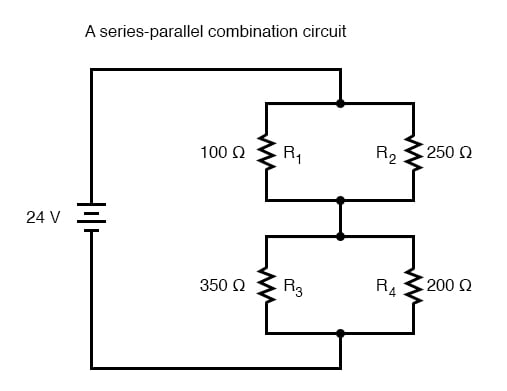
The recommended way to do so on a breadboard would be to arrange the resistors in approximately the same pattern as seen in the schematic, for ease of relation to the schematic. If 24 volts is required and we only have 6-volt batteries available, four may be connected in series to achieve the same effect:

This is by no means the only way to connect these four resistors together to form the circuit shown in the schematic. Consider this alternative layout:

Series - Parallel Circuit Construction on a Terminal Strip
If greater permanence is desired without resorting to soldering or wire-wrapping, one could choose to construct this circuit on a terminal strip (also called a barrier strip, or terminal block). In this method, components and wires are secured by mechanical tension underneath screws or heavy clips attached to small metal bars. The metal bars, in turn, are mounted on a nonconducting body to keep them electrically isolated from each other.
Building a circuit with components secured to a terminal strip isn’t as easy as plugging components into a breadboard, principally because the components cannot be physically arranged to resemble the schematic layout. Instead, the builder must understand how to “bend” the schematic’s representation into the real-world layout of the strip. Consider one example of how the same four-resistor circuit could be built on a terminal strip:

Another terminal strip layout, simpler to understand and relate to the schematic, involves anchoring parallel resistors (R1//R2 and R3//R4) to the same two terminal points on the strip like this:

Construction of More Complex Circuits in a Terminal Strip
Building more complex circuits on a terminal strip involves the same spatial-reasoning skills, but of course requires greater care and planning. Take for instance this complex circuit, represented in schematic form:
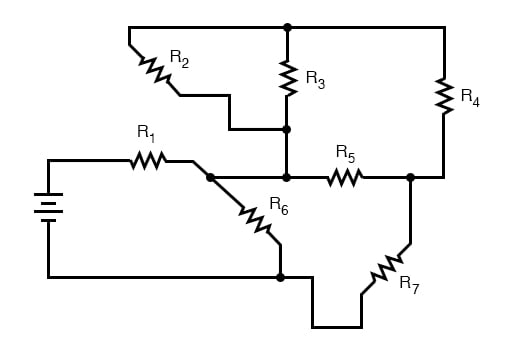
The terminal strip used in the prior example barely has enough terminals to mount all seven resistors required for this circuit! It will be a challenge to determine all the necessary wire connections between resistors, but with patience it can be done. First, begin by installing and labeling all resistors on the strip.
The original schematic diagram will be shown next to the terminal strip circuit for reference:

Next, begin connecting components together wire by wire as shown in the schematic. Over-draw connecting lines in the schematic to indicate completion in the real circuit. Watch this sequence of illustrations as each individual wire is identified in the schematic, then added to the real circuit:


Although there are minor variations possible with this terminal strip circuit, the choice of connections shown in this example sequence is both electrically accurate (electrically identical to the schematic diagram) and carries the additional benefit of not burdening any one screw terminal on the strip with more than two wire ends, a good practice in any terminal strip circuit.
Variant Wire Connections for Circuit Construction in a Terminal Strip
An example of a “variant” wire connection might be the very last wire added (step 11), which I placed between the left terminal of R2 and the left terminal of R3. This last wire completed the parallel connection between R2 and R3 in the circuit. However, I could have placed this wire instead between the left terminal of R2 and the right terminal of R1, since the right terminal of R1 is already connected to the left terminal of R3 (having been placed there in step 9) and so is electrically common with that one point.
Doing this, though, would have resulted in three wires secured to the right terminal of R1 instead of two, which is a faux pax in terminal strip etiquette. Would the circuit have worked this way? Certainly! It’s just that more than two wires secured at a single terminal makes for a “messy” connection: one that is aesthetically unpleasant and may place undue stress on the screw terminal.
Another variation would be to reverse the terminal connections for resistor R7. As shown in the last diagram, the voltage polarity across R7 is negative on the left and positive on the right (- , +), whereas all the other resistor polarities are positive on the left and negative on the right (+ , -):

While this poses no electrical problem, it might cause confusion for anyone measuring resistor voltage drops with a voltmeter, especially an analog voltmeter which will “peg” downscale when subjected to a voltage of the wrong polarity. For the sake of consistency, it might be wise to arrange all wire connections so that all resistor voltage drop polarities are the same, like this:

Though electrons do not care about such consistency in component layout, people do. This illustrates an important aspect of any engineering endeavor: the human factor. Whenever a design may be modified for easier comprehension and/or easier maintenance—with no sacrifice of functional performance—it should be done.
REVIEW:
- Circuits built on terminal strips can be difficult to lay out, but when built they are robust enough to be considered permanent, yet easy to modify.
- It is bad practice to secure more than two wire ends and/or component leads under a single terminal screw or clip on a terminal strip. Try to arrange connecting wires so as to avoid this condition.
- Whenever possible, build your circuits with clarity and ease of understanding in mind. Even though component and wiring layout is usually of little consequence in DC circuit function, it matters significantly for the sake of the person who has to modify or troubleshoot it late r.