Facebook
 Google
 GitHub
 Linkedin
Intro to the Arduino XBee Shield
The XBee Shield provides an interface to the XBee which adds wireless communication to an Arduino project.
The XBee Shield provides an interface to the XBee which adds wireless communication to an Arduino project.
The XBee Shield is a great interface between the Arduino and the XBee, which is a wireless communication module. The XBee Shield helps to reduce the clutter and hassle of having the XBee connected via a cable. The module communicates at distances of 100 feet indoors and 300 feet outdoors. The communication protocol for the XBee is a modified ZigBee and the XBee Shield works with Series 1, Series 2, standard, and Pro versions of the XBee module.
Features
The shape design is standard to the shape of an Arduino so it docks easily and holds the XBee without it protruding off of the side. The data in and data out pins can be configured to connect to the UART pins and other pins.
There is an open area on one end for prototyping and your own development projects, as well as 99 holes in a 9x11 grid, evenly spaced at 0.1 inches apart. The XBee Shield has LEDs for visual indication of syncing, power, and data transfer.

Image courtesy of SparkFun
The power to the XBee Shield is supplied at 5V from the Arduino and then output at 3.3V by the shield to the XBee module. The XBee Shield takes care of voltage level shifting on the data in and data out pins either with a diode shifter or MOSFET shifter depending on the version of the XBee Shield used, the MOSFET shifter is more efficient. The reset button for the Arduino is connected to a button on the XBee Shield.

The XBee Shield 2. Image courtesy of Amazon.
Setup Information and Tips
To connect everything, first connect the XBee module into the XBee Shield where labeled, the dock the XBee Shield onto the Arduino. Plug the Arduino USB connector into the computer and the XBee in, as well.
There should be a switch which has an XBee mode and a USB mode on the shield. Turn it to the USB mode so that the computer can communicate with the module.

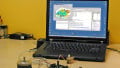
X-CTU is a free software that is provided by the makers of the XBee and is used to configure and manage XBees. The first screen that comes up when using X-CTU is the one below, to add a new device click on the plus button in the top left-hand corner.
Select the correct COM port for where your XBee is plugged into your computer and adjust any of the settings like baud rate, parity, or flow control.

Once all of those settings have been set, the computer will connect with your XBee and it should appear on the left side panel of X-CTU. X-CTU also has a command line for communication with your XBee, on the main screen there should be a command line image if you click on it then the console log will be displayed where you can type words are other data and it will be translated into Hex and sent to another XBee if you have configured two.
XBee Applications
The XBee can be the basis of many interesting projects. Here are some ideas to get you started.
- Wireless text-to-speech device: With two XBees, type a command line to one XBee, which will send it to another XBee which will then speak through a speaker
- Wireless light detection bar graph: With an XBee and a light sensor, have the bar graph display how bright it is in another room
- Disco ball controller: With two XBees, control a disco ball revolution speed
- “Walkie talkies”: With two XBees, communicate wirelessly through the command line
- Data transfer: With an XBee, collect data such as GPS or temperature and send it to the command line or another output device
The original XBee Shield has been deprecated and the Arduino website recommends getting the current Wireless SD Shield. A lot of the same features mentioned above are still available but it can also work with other modules besides the XBee and has a microSD slot. The Wireless SD Shield has the same range, 100 feet indoors and up to 300 feet outside depending on obstacles and obstructions.
There are different switch settings which affect how the XBee communicates with the microcontroller communication. The RX, DIN, and DOUT pins can be connected in different ways depending on your application.
The Arduino XBee Shield is a valuable piece of hardware that connects the Arduino board to another very useful piece of hardware, the XBee, which can make communication easier and more efficient.
Related Content