 Facebook
 Google
 GitHub
 Linkedin
Build an Audio Detector
Detect audio with an electret microphone and a TI CC3200 Wifi microcontroller. This handy project will allow you to set up an audio detection device that can be used to catch your roommate stealing things from the fridge or send you an alert if the noise in your room goes above a certain threshold.
Detect audio with an electret microphone and a TI CC3200 Wifi microcontroller.
Recommended Level
Intermediate
Requirements
- CC3200 Demo board
- Updated to latest firmware for Energia support, directions here.
- Energia - Arduino IDE Clone from TI
- Use in article: v. 0101E00016
- Electret Microphone
- Used in article: BOB-09964
- *This board requires modification to work with CC3200
- Used in article: BOB-09964
- Jumper wires
- Device capable of running Python with a UDP server
- Used in this article: Windows 8 PC with Python 2.7
Hardware Setup
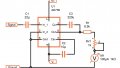
Modifying the microphone
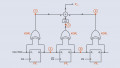
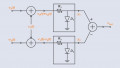
Unfortunately the CC3200 can only read voltages up to 1.45V on the ADC pins. Since we'll be powering the microphone from 3.3V, we need to modify the circuit to output a voltage of 1.45/2 = 0.725V when no sound is present. Resistors R2 and R3 in the schematic for a voltage divider that sets the bias point. To change it to 0.725V, we can calculate a new resistor based on the common voltage divider equation. This works out to changing the resistor R3 to 2.82k. The closest 1% value is 2.8k, and the closest 5% value is 3k. I would recommend using a 2.8k resistor if you can find one. The value isn't extremely critical if you don't have many resistors lying around, you just may introduce distortion in the signal if the bias is too far low or high in voltage.
Connecting the wires
CC3200 pinout here.
| CC3200 | BOB-09964 |
|---|---|
| Pin 1 -- 3v3 Power | VCC |
| Pin 22 -- GND | GND |
| Pin 23 -- ADC_CH0 | AVD |

Testing the connection
The code below implements sampling the input from the microphone. It calculates a moving average of the RMS value from the microphone. It then prints a bar graph to the serial terminal indicating how much audio energy there is.
- Download the following zip file and unpack to a directory.
- Open the sketch in Energia.
- File>Open>audio_RMS_print.ino
- Make sure to select the correct board in Tools>Board>Launchpad w/ CC3200 80MHz.
- Program the board.
- File>Upload or the arrow button
- You should see the bar graph in a terminal move depending on the audio. *Note: The built-in terminal doesn't handle the '/r' to display the graph. I recommend Tera Term instead.

Transmitting over WiFi
The following code adds WiFi capability to the audio detector.
- Download the following zip file and unpack to a directory.
- Open the sketch in Energia.
- File>Open>audio_RMS_print.ino
- Make sure to select the correct board in Tools>Board>Launchpad w/ CC3200 80MHz.
- Modify the network constants below
- Program the board.
- File>Upload or the arrow button.
- The CC3200 will now transmit over UDP every time a new average is measured.
/*network settings*/
char ssid[] = "yourSSID";                     //SSID of network
char password[] = "yourpassword";             //password for wireless network
char UDP_server_IP[] = "yourserverpassword";  //IP address of UDP server to send data to
int UDP_server_port = 9999;
Setting up a Python UDP Server
The following code starts a UDP server at the specified IP address and port. It expects two bytes sent with every UDP packet. It converts the two bytes to an int16 number and converts it to a bar graph displayed on the console. Executing this script while the CC3200 is running the code above will display a bar graph when audio is playing near the microphone.

import SocketServer
import struct
import sys

class MyUDPHandler(SocketServer.BaseRequestHandler):
    def handle(self):
        data = self.request[0].strip()
        socket = self.request[1]
        try:
            moving_average = struct.unpack('h',data)[0]
            bar_chart = moving_average
            print "\r                         \r",
            while bar_chart > 0:
                sys.stdout.write('#')
                bar_chart = bar_chart - 200
        except:
            pass

if __name__ == "__main__":
    server = SocketServer.UDPServer((HOST, PORT), MyUDPHandler)
    server.serve_forever()
Adding email notifications
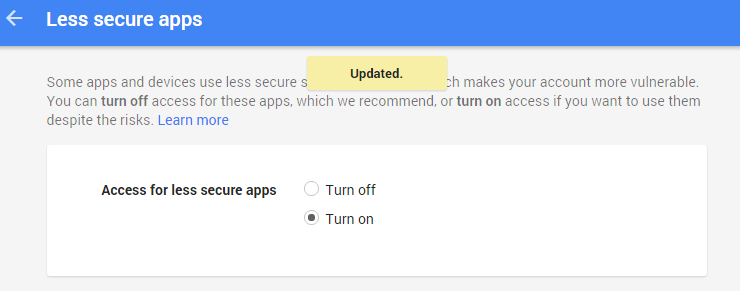
- Make sure you have a Gmail account that allows "Less secure apps" to communicate.
- Adjust the "EMAIL_THRESHOLD" to the audio energy you want to send an email at.
- Add your username and password to the variables at the top of the file.
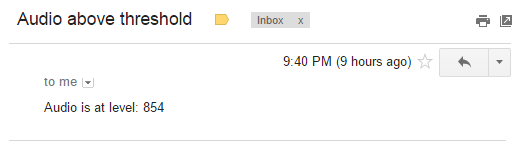
- Execute the script. You should see the following when the threshold is reached. If you want to keep sending emails forever, remove the variable "already_sent_once".

- Email in the inbox:
import SocketServer
import struct
import sys
import smtplib
from email.mime.text import MIMEText

HOST, PORT = "yourip", 9999
EMAIL_THRESHOLD = 600
email_address = "youremail"
password = "yourpass"
already_sent_once = 0
moving_average = 0
class MyUDPHandler(SocketServer.BaseRequestHandler):
    def handle(self):
        global already_sent_once,moving_average
        data = self.request[0].strip()
        socket = self.request[1]
        try:
            moving_average = struct.unpack('h',data)[0]
            bar_chart = moving_average
            print "\r                         \r",
            while bar_chart > 0:
                sys.stdout.write('#')
                bar_chart = bar_chart - 200
        except:
            pass
        if moving_average > EMAIL_THRESHOLD and already_sent_once == 0:
            already_sent_once = 1
            print "Sending email, audio above threshold: " + str(moving_average)
            msg = MIMEText("Audio is at level: " + str(moving_average))
            msg['Subject'] = 'Audio above threshold'
            msg['From'] = email_address
            msg['To'] = email_address
            s = smtplib.SMTP('smtp.gmail.com:587')
            s.ehlo()
            s.starttls()
            s.login(email_address,password)
            s.sendmail(email_address, email_address, msg.as_string())
            s.quit()

if __name__ == "__main__":
    server = SocketServer.UDPServer((HOST, PORT), MyUDPHandler)
    server.serve_forever()
Video
Give this project a try for yourself! Get the BOM.


Dont you have any audio streaming demo? Stream audio from PC to CC3200 launchxl (within AudioBoosterpack etc.) Thanks for your attention
Hi. I’m new to the hardware side of things. Can you explain how you added the resistor or resistors to the Electret Microphone? Have you any pictures or resources I could follow? I’m trying to get this example up and running. Any help would be greatly appreciated. Thanks
Hi Travis, it seems like there is no 2.8k resistor between P23 and Mic on your diagram. Could you double check it?
By the way, if I use this MEMS Mic (https://www.sparkfun.com/products/9868), should I still use 2.8K resistor to lower the voltage?