 Facebook
 Google
 GitHub
 Linkedin
Build Your Own LED Saber—Assembly and Hilt Construction
In the final installment, we build our light-blade and assemble the electronics into the hilt.
In the final installment of the LED saber series, we build our light-blade and assemble the electronics into the hilt.
Welcome back to the fourth and final part of the LED saber series!
To catch up, here are parts one through three for your reading enjoyment:
- Part 1: Introduction, Components, and Safety
- Part 2: Power and Audio
- Part 3: Firmware, Controller, and Bench Testing

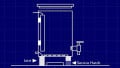
LED Saber Mark I blueprints
In this article, we'll finally assemble all of the pieces and house the electronics in the hilt.

First assembly of the electronics and unpainted PVC hilt. Good enough to swing around!
We're almost there! All our electronics are done and we just need to wire up the LED strip and put everything into a "case". We can't leave it scattered on the bench!
This is where the construction changes focus—now we need to set up the physical arrangement of the pieces. There is no single "right" way to assemble your blade so use your own initiative and skills. Some people have glue guns, others have 3D printers and lathes. We only really care that the blade is hardy enough to take some abuse.
For my part, I spent hours staring at the modules, trying to figure out the optimal layout. I took the hilt apart and put it back together again every day for a week. It became a kind of meditation.
Testing the LED Strip
By now, you’re probably impatient to see some LEDs light up, so let's do a quick test of the strip.
Plug the LED strip into the socket coming from the DC/DC converter. Plug the controller module into the matching servo connectors on the converter.
Check for shorts and continuity with a meter. Double check. Triple check. If you didn’t get an IP65 silicone-coated strip, be careful that nothing shorts on the exposed tracks or components during the test.

Plug the battery in, twist the knob for ignition (or bump it hard enough), and exactly half of your LED strip should light in sequence along with the ignition noise.
That should give you a warm glow.
No, really, the LED strip will get warm, even hot to the touch if you have the LEDs on long enough. None of the other components should heat up.
Play with the controls for a bit and change the colors. You know you want to. Be very gentle.
If that works, then the electronics are done. Good job! It’s just a matter of physically assembling everything into a “case” so we can swing it around.
Disassemble the Original Strip
Locate where the strips are joined and cut away at the silicone until the pads are revealed. Then desolder.

WS2812b LEDs have a reputation for being a little heat-sensitive, so don't apply the iron for more than 5 seconds, and then allow ample time for cooling down before you begin desoldering again. Work on the outer connections first, while teasing the two strips apart, and then desolder the center tab and it should fall apart nicely.
Assemble the Blade
We’re going to feed both half-strips from the one input so they will be “mirrored” as a pair.

You may ask: Why don’t we just fold the strip at the half-way mark? We don't fold the strip because that would create a mechanical weak point of likely failure in a high-current path—and we’re trying to avoid that.
Also, by mirroring, we reduce the processing load on the Arduino when it comes time to update all the LEDs; 72 is already quite a lot (just consider the memory for the pixel buffer), and we’d like to have the ability to support longer blades in the future.

I had a handy 600mm length of 6mm x 1mm flat carbon fibre spar that I used as a ‘backbone’ for the LED strips (obtainable from RC hobby shops), but that was probably overkill. If you have something suitably long and thin and stiff, it does make consistent positioning easier. It also gives the blade some durability if, say, your polycarbonate tube is slow in arriving
Assemble the Blade Tube
If your LED strip came with double-sided adhesive tape, use that to stick them onto your “spine” (or just each other) back-to-back. If they don't have tape, find some or use barge glue (AKA contact cement for shoes).
Leave 1-2cm of space at the end of the spine, so the LED strips stop just short of the end. You don’t want those 20 amp rails poking out. (That’s called a ‘cattle prod’.) Some transparent tape, silicone, or heatshrink over the ends is a very good idea.
The opposing 5V and GND rails are aligned with each other because we flipped the strip. Don't let them touch!

Don't let those solder tabs short on each other (or anything else) or poke out.
Now we want something to wrap the LEDs with that will (a) diffuse the light, (b) keep the strip in the center of the tube, and (c) protect the LEDs somewhat from the rough-and-tumble life of a lightsaber.
Fortunately, the perfect material for this turns out to be the cheapest ... the thin foam ‘packing sheet’ material you can find at stationery shops, at post offices, or in that parcel you just got from eBay.

You might need some transparent tape to start the rolling process (or a friend to help out). You want just enough packing material to create a fairly snug fit inside the polycarbonate tube without using so much that you tear it trying to shove it in; a 9-10cm length of material was good for me.
I also wrapped the foam roll in waxed "baking paper" to make sliding it in much easier. If you use this method, use enough paper to create an end to pull the paper out again while leaving the foam behind in the tube.

Since I didn’t have a blade tip, I infused some clear silicone into the top centimeter of foam and plugged up the end of the tube that way. (This is to stop the entire contents flying out of the blade when you swing the saber hard.) That looks terrible up close, but like various other imperfections, it can't compete with the blinding light of an ignited blade.
Assemble the Hilt
The only part I’ll really dictate here is the 20mm (3/4”) PVC compression pipe coupler which has two screw-on ends with rubber O-rings in them. (We only use one end, so you end up with a spare set.)
You’re supposed to insert 20mm pipe in these rubber O-rings. And by the way, 20mm pipe is actually 25mm in outer diameter. (Don't ask. But it ends up perfect for our blade.) The screw-end tightens the rubber around the tube.

It takes ten seconds to unscrew the end and remove the blade. But when it’s clamped in by that fat rubber ring, the blade tube isn’t going anywhere. These connectors are rated to 150psi for pressure pipes.
Even better, it’s got room for 8-10cm of blade tube inside it. I wrapped the very end of the blade tube in several layers of electrical tape so that it fit snugly in dead-center of the coupler tube; thus, it is effectively clamped at two points inside the hilt. That’s optimal.

The end of the tube (i.e., the right-hand side in this image) was later wrapped in a layer of tape to hold it dead center. The blade hasn't moved a millimeter since.
It may seem wasteful to use 100mm of hilt just to contain the end of the blade tube, but remember we have real-world physics to cope with. The diameter of the tube is 25mm and, for mechanical reasons, our optimal leverage distance is 3-4 times that.
Now you can see why the switch and knob for my Shoto are down toward the pommel end. If they were up toward the top of the hilt (as with the fictional sabers from the galaxy far, far away), they would interfere with the end of the tube. The middle of the hilt is where you need to put your hands, so I used that section for the battery. After that, you’re running out of options for locating the control hardware. But if you are prepared to build up a structure on the outside of this coupler (or find innovative other ways to handle the situation), then you could certainly put the controller elsewhere.
Don’t try gluing the polycarbonate tube to a PVC coupling unless you really know your adhesives. It’s not likely to work and, if the glue breaks during use, you will get to see your blade fly off into the distance and rip the guts out of your saber on the way. Also, the coupling is likely to crack from the leverage forces.
When making “cases” for electronics out of PVC pipe, the main limiting factors are your own imagination and your fat fingers. It doesn’t matter how much space is inside the case if you can’t get to it. The longer and slimmer your pipe, the harder it is to install anything useful inside it.

I know of two main ways of getting around the problem of slim space:
- Segment your pipe into multiple shorter (more accessible) sections and find clever ways of securing the sections together so you can take them apart again. You could use control knobs which also act as bolts or un-cemented joints that are all below where the hilt will experience mechanical forces. On my saber, for example, my pommel end-cap is just press-fit, but it’s not going anywhere.
- Use the “carrier insert” method where you have a second smaller pipe that the parts are assembled onto (with holes and ports chopped in the ‘carrier’ as needed, since it’s hidden). Then slide the carrier insert inside the outer pipe.

A 'carrier' I started making but later abandoned.
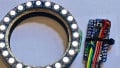
If you’ve got a normal round speaker, it’s best to place it in the pommel where you can cut out speaker holes and where power wires don’t have to get past it.
Depending on how complicated you made things for yourself, getting everything inside may take the patience of a Jedi.

But, eventually, you'll figure it all out. Take your time. Don't force it.
Make It Pretty
PVC pipe is a wonder-material for use with electronics. It’s an insulator, RF-transparent, easy to work with hand tools, cheap and plentiful, and comes in standard sizes and grades from electrical conduit to mains pressure pipes. It's also non-toxic, easy to thermoform with boiling water, lightweight, sandable, and paintable. Did I mention it's cheap?

Some spray-paint and time will turn PVC into second-hand Empire parts.

Remember NOT to paint anywhere you intend to cement pieces together, so stop short before the ends with some masking/electrical tape. Also don’t paint the insides of the fittings.
With my hilt, I cemented all the PVC parts together from where I was going to hold it up to the compression coupler. Solvent cement effectively turns PVC pieces into one solid piece of pressure pipe, so the entire “upper” part of my hilt—everything between hand and blade—became a single, high-strength piece that has survived everything it has been thrown at.
My pommel (containing all the electronics) pops off easily to reveal the space that contains the battery. Thus, you don't want to swing this thing while gripping it down toward the pommel; this is not a major concern with my saber because the knob and switch and greeble discourage me from holding it there.

You may even find yourself making other hilts as your skills improve. The power harness is likely to stay behind, but it should be easy to relocate the primary electronics.
And Then...
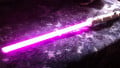
With patience and care, you will complete your saber to the point that it can leave the bench. That's the moment this project really "comes alive".
When you can finally swing it around, when the saber can respond to your movements, you will experience the fruits of your labor.
I'd love to see your reactions—or those of your friends— when you first light your saber up, so please place links to YouTube videos in the comments!
Of course, there's a great deal of room for improvements and enhancements. You can create upgrades to the audio system, blade clash effects, alternate sound fonts, or finding the lost rotary steps. But if I fixed everything for you, what would you all have to do?
Let me know what you dream up by leaving a comment below!
May the Force be with you.


I think those LEDs are only meant to have a viewing angle of like 120 so that’s 60 degrees missing on each side. Does the foam diffuser fox that? How much light do you reckon it cuts out?
I was really hoping for a REAL light saber.
I was really hoping for a REAL light saber.