 Facebook
 Google
 GitHub
 Linkedin
How to Build a Raspberry Pi Camera
In part 8 of the "Building Raspberry Pi Controller" series, readers will learn how to attach a camera board to a Raspberry Pi and write Python code for photo imaging projects.
In part 8 of the "Building Raspberry Pi Controller" series, readers will learn how to attach a camera board to a Raspberry Pi and write Python code for photo imaging projects.
Digital cameras have become common devices found on such electronic products as smartphones and tablets. With a push of a button, we're able to capture memorable moments, sporting events, and awesome maker projects to share with family and friends.
In the past, to build a basic digital camera required an extensive amount of photography knowledge and electronics. Today, building a digital camera is easy as a Raspberry Pi, a camera board, and a small amount of Python code.
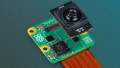
In this project, you will learn how to build a Raspberry Pi camera (Pi Camera). The components to build the Pi Camera are provided in the Parts Lists. The Pi Camera basic components, provided in a block diagram, are shown in Figure 1.
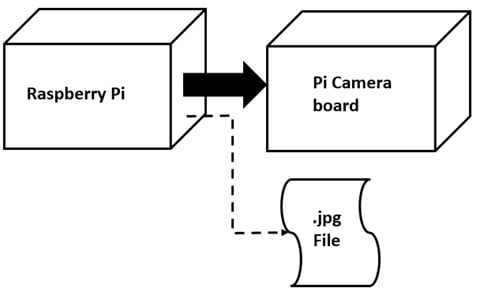
Figure 1: The Pi Camera block diagram
Parts List
- Raspberry Pi (B, B+, Pi2 or the Pi 3)
- Raspberry Pi Camera Board v2 - 8 megapixels
- Adjustable Pi Camera Mount
- Toy telescope kit
- Tripod
- Third Hand
Before we discuss the construction details of the Pi Camera, let's review digital camera basics.
Digital Camera Basics
The technology behind the digital camera is quite interesting because of a small integrated sensor circuit called an image detector. Unlike an ordinary 35mm camera, digital cameras have no photographic film for storing the object's image. The typical digital camera can capture a target object and record it as an image using digital technology.
The small integrated sensor known as a Charged Coupled Device or CCD captures an object's reflected light rays and converts them into numerous pixels or picture elements. The pixels are converted into binary data and stored inside of the camera's memory. Figure 2 summarizes the conversion process:

Figure 2: The image detector object-to-picture conversion process
Today's digital camera image detectors have been improved by using CMOS (Complementary Metal Oxide Semiconductor) image sensors.
The advantage a CMOS image sensor has over CCD technology is their low power consumption during the object-to-picture conversion process. CCD's generally require more power than CMOS image sensors. For example, a 5 megapixel CMOS image sensor could typically consume 200 to 400mW. With most handheld electronics using batteries, this reduction in power is very important to the consumer. Another advantage of CMOS is the low learning curve to using it. CCDs require additional circuit support from external components like ADCs and analog ICs. Also, complex timing signals to provide proper operational sequences for pixel to picture conversion are required as well. A CMOS sensor can integrate so much signal-processing circuitry that the chip can simply output digital image data. Now that we have a basic understanding of digital cameras, CCDs, and CMOS image sensors, let's configure our Raspberry Pi for camera operating mode.
Pi Camera Configuration
For the Raspberry Pi to be able to work as a camera, its imaging feature needs to be enabled. Luckily, the Raspberry Pi has a variety of features and functions that can be enabled using the computer's configuration tool.
To obtain the Raspberry Pi's configuration tool, open an LXTerminal window session and type the following Linux command after the "$" prompt:
sudo raspi-config
Figure 3 shows an LXTerminal window session with the Linux sudo raspi-config command displayed on the screen:

Figure 3: Opening the Raspberry Pi configuration tool using the sudo raspi-config linux command
After typing the configuration tool command and hitting the enter key, a new window will appear on the monitor's screen as shown next. Using the down arrow on your keyboard, select the "Enable Camera" option:

Figure 4: Turning on the Raspberry Pi camera feature inside the configuration tool
With the selection made, the configuration tool will ask if you want the option to enable:

Figure 5: Enabling the Raspberry Pi Camera inside the configuration tool
The final step in saving the camera feature is to reboot the Raspberry Pi:

Figure 6: Saving the camera feature by rebooting the Raspberry Pi
Your Raspberry Pi camera feature is ready. Congratulations! You can now build your Pi Camera.
The following section will provide the construction notes for building and testing your Pi Camera.
Building the Pi Camera
Now that the camera feature is enabled on your Raspberry Pi, let's attach the camera module to it. Basically, the camera module is easy to attach to the Raspberry Pi.
On the Pi, there are two connectors: one for an LCD and the other the camera module. You will insert the camera module's flat ribbon cable into the the tiny connector labeled CSI (CAMERA) as shown in the next figure.

Figure 7: The camera's flat ribbon cable inserted into the onboard connector
With the camera module attached to the Raspberry Pi, you can test the device electrical connection. Type the following Linux command to take a simple picture within the LXTerminal window.
raspistill -o image.jpg
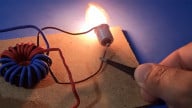
The picture named "image.jpg" will be stored in your Raspberry Pi's home/pi directory. Here's an example of a picture that was taken with my Raspberry Pi.

Figure 8: A slayer exciter circuit picture captured with my Raspberry Pi
If you have an image stored within your Raspberry Pi's home/pi directory, great! If not, check the ribbon cable connection and repeat the test.
To enhance on the mounting feature for the Pi Camera, the camera can be attached to a mount. The Adafruit Pi Camera mount is used to support the imaging sensor as shown in Figure 9:

Figure 9: The camera is attached to the mount using four fasteners
Four fasteners are used to attach the camera to the mount. The adjustment of the camera's angle can be changed by repositioning the stand to the appropriate slots.
The next phase of the build requires attaching the camera module and mount assembly to a tripod or a supporting stand structure.
Since a tripod was not on hand, I decided to use my Third Hand. I carefully, attached the camera mount assembly to the Third Hand using one of the alligator clips. Next, I placed the Third Hand on top of the Raspberry Pi to give the camera proper viewing angle height.

Figure 10: The author's homebrew tripod built using Third Hand
Using the raspistill Linux command, I was able to take a picture of my PIC microcontroller-SNAP LED flasher project.
Figure 11: PIC microcontroller -SNAP circuit LED flasher project captured by the author's Pi Camera
To improve the appearance of the Pi Camera, I decided to insert the imaging module inside of a toy telescope kit (because I had a Poly-Optics kit made by Galt Toys laying around in my lab). Again, we are simply using the telescope as a convenient housing for the camera. If you actually want optical magnification, you need to have the camera properly positioned relative to the telescope's focal length.
The concept of this new Pi Camera design is shown next.

Figure 12: A Pi Camera version 2: The camera module inserted inside of a toy telescope
Using the concept drawing in Figure 12, you can insert the camera module inside of the toy telescope. Place the module as close to the lens as possible. For reference, the following image shows the assembly of my camera module inside of the toy telescope.

Figure 13: The author's camera module inserted inside of the toy telescope. Notice the location and orientation of the module to the toy telescope's lens.
With the camera module inserted inside of the toy telescope, a tripod, Third Hand, or a Panavise can be used to mount the imaging device to the proper viewing height. You may need to make minor adjustments to your mounting assembly to assure that you're taking best picture possible with Pi Camera.

Figure 14: The author's new Pi Camera built using a toy telescope. The Panavise helps to support the new camera.
Next, the Python code.
The Pi Camera Python Code
Although the Pi Camera can take effective pictures using the raspistill command, a small camera script can be created using Python. Before the camera script can be coded, the picamera library needs to be installed on the Raspberry Pi. The first step in adding the picamera library is to get a Raspbian update using the following Linux command of:
sudo apt-get update

Figure 15: Updating the Raspbian operating system
Once, the update is completed, you may install the Raspberry Pi picamera library using the Linux command of:
sudo apt-get install python-picamera python3-picamera

Figure 16: Installing the picamera library
After several minutes, the installation process is completed.

Figure 17: The picamera library installed
With the picamera library installed onto your Raspberry Pi, the camera script can be written using Python.
As shown in Listing 1, the Pi Camera code is quite simple and short in scripting length.
Open the LXTerminal editor by typing the Linux command after "$" prompt:sudo nano. Type the code shown in Listing 1 and save the file as sim_camera.py. The file can also be downloaded to your notebook computer or desktop PC by clicking the code button shown below as well.
Place an object in front of your Pi Camera and type the Linux command sudo python sim_camera.py into the LXTerminal window. You should see the object's image on the monitor's screen briefly. Look into your Raspberry Pi's home/pi directory for the picture under the "foo.jpg" filename.
The picture I've taken with my Pi Camera is shown in Figure 18:

Figure 18: The author's PIC microcontroller-SNAP LED flasher circuit taken with the Pi Camera
To show the Pi Camera in action, I provided a small video clip below:
You now have a working Raspberry Pi camera. Good work! Next time, we'll build a BrickPi robot using a Raspberry Pi!
Listing 1. PiCamera Python Code

#***************************************
#* PiCamera                            *
#* Don Wilcher                         *
#* July 1, 2016                        *
#*                                     *
#* PiCamera                            *
#* will take a picture and store it in *
#* your Python Home Directory file.    *
#*                                     *
#***************************************


# Include Python libraries
from time import sleep
from picamera import PiCamera

# Setup of Camera attributes
camera = PiCamera()
camera.resolution = (1024, 768)
camera.start_preview()
#Camera warm-up time
sleep(2)
# Capture image named 'foo.jpg'
camera.capture('foo.jpg')
# Picture has been taken
print('picture taken')
Give this project a try for yourself! Get the BOM.


Recently I found this pi-camera at http://www.w11stop.com/raspberry-pi-camera-board . Thank u for this article, pi-camera python code is very helpful for me 😊
thanks very interesting, I want to know the drow programme used for figure 7?