Facebook
 Google
 GitHub
 Linkedin
The Kilo Lamp: An Interactive Lamp Controller
This project brief provides the instructions for building a weight-sensitive LED lamp with an Arduino Uno and a handful of commercially available parts.
The Kilo Lamp is an interactive lamp controller built using an Arduino Uno shield. It also contains a load cell, a load cell amplifier, and a MOSFET that drives an LED using a pulse-width modulated (PWM) signal. The brightness of the LED is determined by how much weight is placed on the lamp. When the load reaches 5 kg, the lamp achieves 100% brightness. Figure 1 shows the fully assembled Kilo Lamp shield.
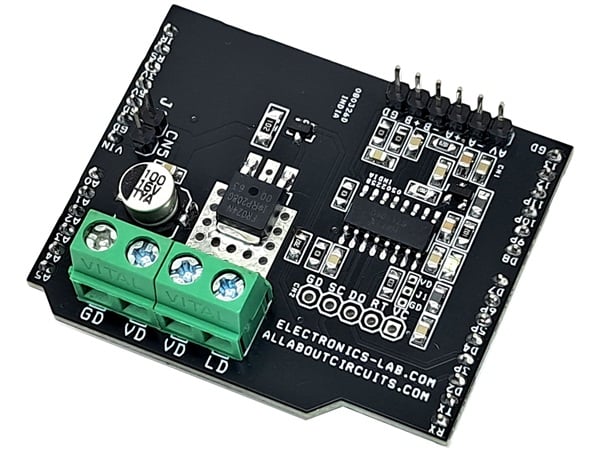
Figure 1. The Kilo Lamp shield.
Specs and Operation
- Supply: 12 V DC.
- Onboard Load Cell Amplifier: HX711.
- Onboard MOSFET: PWM LED Driver.
- Load Current: Up to 1 A.
- PCB Dimensions: 51.44 x 41.75 mm.
The load cell sends an analog signal to the HX711 load cell amplifier. The HX711 acts as an analog-to-digital converter (ADC) and outputs a digital signal. This signal is read by the Arduino Uno, which processes the weight data and generates a corresponding PWM signal. The PWM signal is then fed into a MOSFET, which drives the LED and adjusts its brightness according to the PWM duty cycle, directly proportional to the applied weight. In simple terms, the greater the weight, the higher the light intensity.
Schematic and Bill of Materials
Figure 2 provides the schematic for this project. You can view a higher-resolution version of the schematic by clicking on the image.
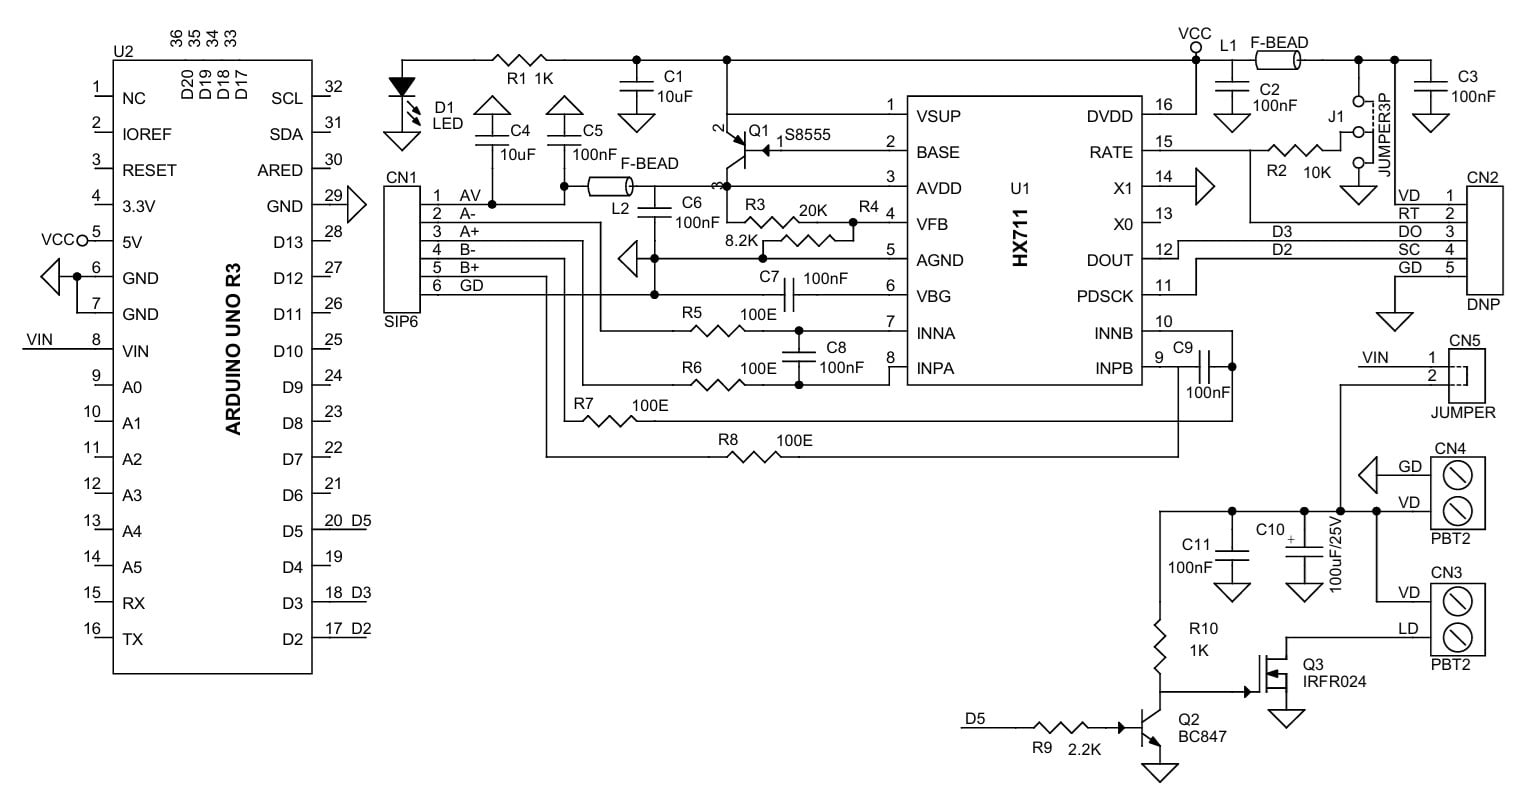
Figure 2. [click to enlarge] Schematic for the Kilo Lamp.
The bill of materials for the Kilo Lamp is shown in Table 1.
Table 1. BOM for the Kilo Lamp.
| REF. | DESC. | QNTY. | MANUFACTURER | SUPPLIER | SUPPLIER PART NO. |
|
CN1 |
6 PIN MALE HEADER PITCH 2.54mm |
1 |
WURTH |
DIGIKEY |
732-5319-ND |
|
CN2 |
DNP |
1 |
|
|
|
|
CN3,CN4 |
2 PIN SCREW TERMINAL PITCH 2.54mm |
2 |
PHOENIX |
DIGIKEY |
277-1247-ND |
|
CN5 |
2 PIN MALE HEADER PITCH 2.54mm |
1 |
WURTH |
DIGIKEY |
732-5315-ND |
|
C1,C4 |
10uF/25V CERAMIC SMD SIZE 0805 |
2 |
YAGEO/MURATA |
DIGIKEY |
|
|
C2,C3,C5,C6,C7,C8,C9,C11 |
100nF/25V CERAMIC SMD SIZE 0805 |
8 |
YAGEO/MURATA |
DIGIKEY |
|
|
C10 |
100uF/25V |
1 |
WURTH |
DIGIKEY |
732-8438-1-ND |
|
D1 |
LED RED SMD SIZE 0805 |
1 |
OSRAM |
DIGIKEY |
475-1278-1-ND |
|
J1 |
JUMPER SOLDER TYPE |
1 |
|
|
|
|
L1,L2 |
FERRITE-BEAD 600-OHM SMD SIZE 0805 |
2 |
LAIRD |
DIGIKEY |
240-2390-1-ND |
|
Q1 |
S8550 BJT-PNP SMD SOT23-3 |
1 |
UMW |
DIGIKEY |
4518-S8550CT-ND |
|
Q2 |
BC847 |
1 |
NEXPERIA |
DIGIKEY |
1727-2924-2-ND |
|
Q3 |
IRFR024 DPACK |
1 |
VISHAY |
DIGIKEY |
IRFR024-ND |
|
R1 |
1K 5% SMD SIZE 0805 |
1 |
YAGEO/MURATA |
DIGIKEY |
|
|
R2 |
10K 5% SMD SIZE 0805 |
1 |
YAGEO/MURATA |
DIGIKEY |
|
|
R3 |
20K 1% SMD SIZE 0805 |
1 |
YAGEO/MURATA |
DIGIKEY |
|
|
R4 |
8.2K 1% SMD SIZE 0805 |
1 |
YAGEO/MURATA |
DIGIKEY |
|
|
R5,R6,R7,R8 |
100E 5% SMD SIZE 0805 |
4 |
YAGEO/MURATA |
DIGIKEY |
|
|
R9 |
2.2K 5% SMD SIZE 0805 |
1 |
YAGEO/MURATA |
DIGIKEY |
|
|
U1 |
HX711 |
1 |
AVIA SEMICON |
https://www.lcsc.com/ |
C6705483 |
|
U2 |
ARDUINO UNO R3 |
1 |
ARDUINO |
DIGIKEY |
|
|
SHUNT FOR CN5/JUMPER |
SHUNT |
1 |
SULLINS CONNECT |
DIGIKEY |
S9001-ND |
|
R10 |
1K 5% SMD SIZE 1206 |
1 |
YAGEO/MURATA |
DIGIKEY |
|
|
N/A |
LOAD CELL (TAL220) |
1 |
SPARKFUN |
DIGIKEY |
1568-13329-ND |
Wiring Instructions
To wire up the Kilo Lamp, consult the diagram in Figure 3 and the information below it.
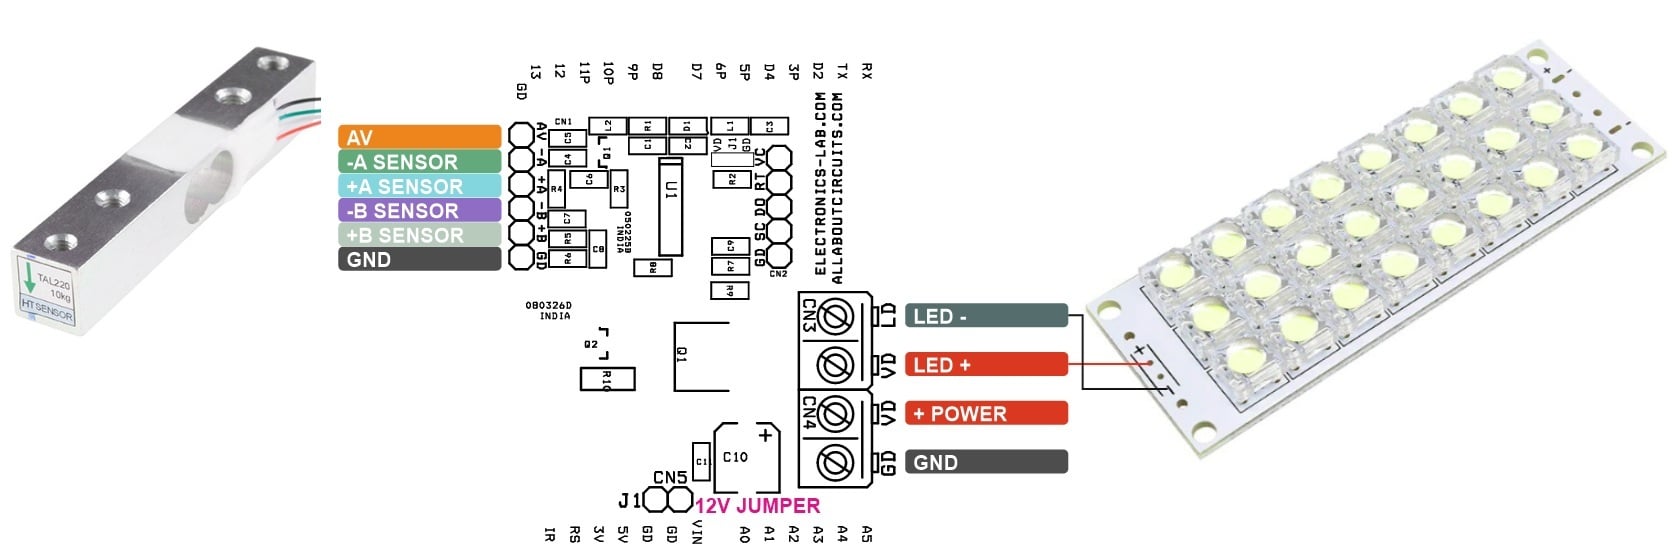
Figure 3. [click to enlarge] How to connect up the Kilo Lamp. Image of load cell (left) used courtesy of SparkFun Electronics; Image of LEDs (right) used courtesy of ThinkRobotics
Referring back to the schematic in Figure 2, the wiring connections are as follows:
- CN1
- Pin 1 = Load Cell Red Wire.
- Pin 2 = Load Cell Green Wire.
- Pin 3 = Load Cell White Wire.
- Pin 4 = No Use.
- Pin 5 = No Use.
- Pin 6 = GND.
- CN2: Do Not Install.
- CN5: Jumper for single supply operations.
- Arduino Uno Vin and Shield 12 V.
- CN3:
- Pin 1 = VDD 12 V.
- Pin 2 = LED Cathode.
- CN4:
- Pin 1 = GND.
- Pin 2 = 12 V DC Input.
- D1: Power LED.
PCB Files and Arduino Code
To download the Gerber files for the Kilo Lamp, click on the button below.
The Arduino code for the project is also available for download here:
Upload this code to the Arduino Uno and install the shield (Figure 4) to see the magic!
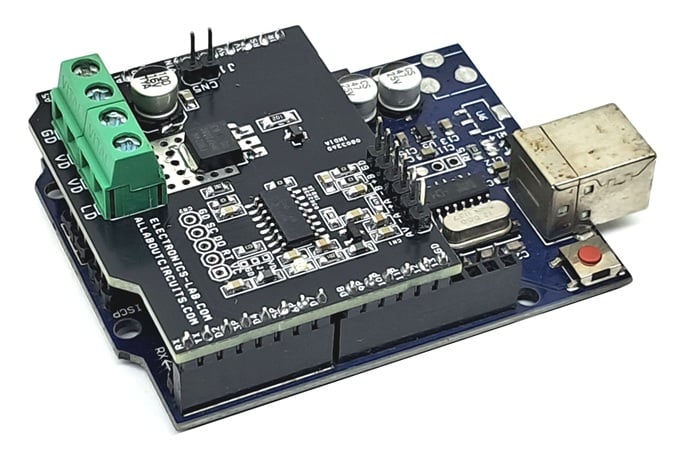
Figure 4. The completed Kilo Lamp project with the shield installed.
All images used courtesy of Rajkumar Sharma except where otherwise specified