 Facebook
 Google
 GitHub
 Linkedin
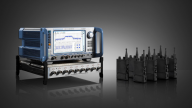
The Ideal SMT Assembly Guide
A guide on how to assemble SMT PCB with bench-top equipment. While a similar setup can be accomplished for much less, this is the dream setup.
Introduction
The vast majority of modern electronic components come in SMT--surface-mount technology-- packages. These require a very different set of tools and techniques for assembly than traditional through-hole components.
This tutorial presents the bill of materials ($300-$800) and the steps necessary for the ideal assembly.
Materials Needed
| Picture | Description | Brand | Part Number | Price | Notes |
|---|---|---|---|---|---|
| 1 |
Hot Air Station with Pre-heat plate |
Aoyue | $199 | Having a pre-heat plate is essential | |
| 2 |
Straight Tip Tweezers |
Excelta Cobaltima type 2-CO |
$109 |
Cobaltima tweezers are the absolute best of the best |
|
| 2 |
Straight Tip Tweezers |
Erem type TE3 |
TE3SA-ND | $37 | |
| 2 | Curved Tip Tweezers |
Techni-Tool type 7 |
$63 | ||
| 2 | Curved Tip Tweezers |
Wiha type 7abb |
431-1026-ND | $42 | |
| 3 | Solder Paste (Leaded) |
Kester R276 |
$31 |
AVOID: CHIPQUIK paste |
|
| 3 | 10cc syringe plunger |
Apex 10LL4 |
$1 |
AVOID: CHIPQUIK SMDSG10CCR syringe gun |
|
| 4 |
Dispensing needle tip, 22GA, plastic |
Apex KDS22TN25 |
$10 |
Good for 0805 and bigger pads |
|
| 4 |
Dispensing needle tip, 22GA, metal |
Loctite 98402 |
$12 |
Good for 0605, 0402 and most IC packages |
|
| 5 | Tack flux |
Chemtronics CW8500 |
$23 |
AVOID: CHIPQUIK tack flux |
|
| 5 | Flux pen |
Chemtronics CW8300 |
$14 | ||
| 6 | Flux remover |
3M Novec Flux Remover |
$22 |
Generally excellent |
|
| 6 | Flux remover |
Chemtronics ES835B |
$22 |
Occasionally complements the 3M Novec |
|
| 7 | Solder wick, 30ml |
Chemtronics 80-1-5 |
$5 | ||
| 8 | Kapton tape |
3M 5413 |
$19 |
Used to mask heat-sensitive components from hot-air jet |
|
| 9 | Lint-free wipes |
Kimtech Kimwipes |
$12 | ||
| 10 |
Cotton tipped applicators, Mini Tip |
Puritan 826-WC |
$14 |
Great for wiping off paste |
|
| 11 |
Acetone 99% |
$18 |
Used to clean PCB |
||
| 11 |
Isopropyl Alcohol 99% |
$12 |
Used to rinse-off acetone |
||
| 12 |
Thermometer, dual sensor |
Amprobe TMD-56 |
08783.W | $160 |
Used to monitor PCB and air jet temperatures |

STEP 1: Prepare PCB
- Wipe the PCB with Acetone.
- Rinse with Alcohol.
- The solder pads should all look shiny and flat and free of fingerprint marks.
- If the pads have excess solder, remove it with solder wick and repeat the Acetone + Alcohol wash.

STEP 2: Apply Paste
- Resist the urge to apply more paste on each pad than what’s shown below. A surprisingly small amount of paste is all that is needed.
- Aim for consistency in the amount dispensed. The more consistent, the more the board will look like it was manufactured on an automated process.
- For IC packages size SO, apply paste to each pad individually.
- For IC packages smaller than SO, apply a very thin continuous bead with the metal 22GA syringe tip.
If unsatisfied, wipe away paste with the fine cotton-tip applicators and start again. Careful not to wipe the pads you’ve already done. Make sure not to leave any paste on the solder mask – during reflow, it will pool together into very problematic solder balls which can cause shorts or intermittent behavior.

STEP 3: Place the parts
- Manually pick and place all the parts.
- Invest as much effort as possible to align the parts with the PCB. Part alignment will be the primary criteria by which one distinguishes a board assembled on the bench or on an automated process.
- During reflow, capillarity and surface tension properties of molten solder will help align the larger parts such as the ICs or the MOSFET.

Temperatures
For the Aoyue 866 station:
- Set preheat plate to 140-150 deg C (in the picture, the board is still warming up)
- Set hot-air jet to 230-250 deg C (in the picture, the hot-air jet stream is too hot)


STEP 4: Preheat
- Turn on the preheat plate on the Aoyue 866 station.
- After 2-4 mins you will notice a change in the paste consistency and lack of shininess. This indicated that the flux has activated.
- The board is now ready for solder reflow with the hot-air jet.

STEP 5: Reflow
- Turn on the Aoyue hot-air jet and verify that the output temperature is around 220-230 deg C.
- One by one, position the hot-air jet over each component for 5-10 sec.
- DO NOT EXCEED 15 sec per part.
- Turn the jet away, wait 20 sec and start again.
For most parts, I tend to use the smallest hot-air tip and a 10% air flow setting.
For the largest parts such as the power MOSFET, I also use the smallest tip and an air flow at 25%. If it is still not ‘taking’, I recommend switching to a larger tip rather than continuing to increase the airflow. This is because more than 25% air flow setting tends to blow the component off alignment.
If solder bridges form between IC pins, touch the pads with solder wick while under the hot-air jet. Be careful not to heat the part for longer than 15sec under the hot-air jet!
If you need to re-work a part while the board is hot:
- Don’t use paste, this will melt the flux and plug your syringe tip.
- Each pad should have a small bump of solder. If too much, remove with wick, if too little, touch the pad with some fine gauge solder wire, all this while under the hot-air jet.
- Apply a dab of tack flux and position the part. The tack flux will hold it in place. Reflow with hot-air jet.

STEP 6: Clean the flux residue
- Notice the pools of flux on the previous picture. All the flux will need to be cleaned off.
- First, spray the board with flux remover. Be generous here. Use an acid brush to speed up the process. My favorite is the 3M Novec Flux Remover (Chemtronics Flux-off works well for old-school rosin-based fluxes).
- Next, rinse the board with Alcohol in order to remove the white flux residue that the flux remover created. Be generous with the Alcohol.

All recommendations are exclusive to the author and represent an idealized version of an SMT setup.
Happy building!


Nice setup. I’m sure you know (but some readers might not) this is an opinion piece, and there are plenty of ways to do this, so some of the recommendations (or anti-recommendations) may not be so ideal if they have differing needs or resources (already have some tools, or have more or less money to spend). I have some hot air setups, and these are much simpler; no preheat (I use the pen with nozzle off to dry the flux gently if doing a whole board), and don’t bother with pre-cleaning unless necessary, while I have a preferred type of tweezers that are rare to find they are not expensive and I much prefer vacuum direct-pick-from-tape if it can at all be arranged. I rarely wash off flux (only if there’s a need, no-clean flux is very hard to wash off anyway).
Paste choice is critical just like with production, but there are many good and many not so good brands, I’ve remixed even 10 year old paste with new flux and hitting an array of mixes on cardboard with the hot air very quickly sorts the good from the bad (least spatter, not too much hot slump, and best coalescence which usually means good wetting). My theory is a good stir revives old solder paste by removing oxides from the solder balls, much better than persisting with a new paste that isn’t working well.
I used to work for a large electronics company that preferred to build their prototypes using a heat gun (paint stripper type) - that’s despite having I think 12 full-on SMT lines through the door. The setup and programming time, staff down time etc was just not worth it.
For small volume production though, I prefer a fan-type toaster oven which can sort of replicate a recommended temperature profile - even manually. It does the job all at once, even though there’s less control on a per-part basis. I have always assumed once the flux is dry that it has partly activated and there is limited time to solder all the joints (but I don’t know). Pre-cleaning optional (maybe a dry wipe), but I’ve found pre-baking of PCBs (pre-paste, about 120 deg C for a few mins) to be a complete solution to parts popping off or tombstoning (and nothing to do with old paste or flux containing moisture despite the warnings people give).
At the opposite end of the scale I’ll hand solder or drag solder (with solder wire - never use paste, it does create shorts) and used to build all my prototypes that way. The beauty of these “open” methods is you can see what’s going on, and identify exactly where something has gone wrong once you have a feel for how solder should perform. Articles like this are good for showing people what to expect, what works well, and what matters.
I’ve learned a lot of new things here. Enjoyed reading this.
http://smtinsight.com/the-best-soldering-iron-in-2018/