 Facebook
 Google
 GitHub
 Linkedin
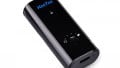
Teardown Tuesday: Portable Power Bank and Solar Charger
In this teardown, we look at the Hiluckey solar charger with an inbuilt lithium-ion battery.
In this Teardown Tuesday, we will look at what's inside the Hiluckey solar charger with an inbuilt lithium-ion battery.
Warning! (Achtung!)
Opening devices with lithium-ion batteries can be dangerous (as I found out the hard way). Be very careful not to short such batteries or pierce them with screwdrivers when prying them out! Also, bending is very bad…so is crushing…and throwing them onto the ground…oh, and don’t put them into the bin!
The Charger
Portable power banks are designed to make charging on-the-go easier. Combine that with solar charging capabilities and you get portable charging made for the outdoors.
The solar charger includes an integrated solar panel for charging an internal lithium-ion battery. Because the charger is designed for outdoor use, it is rain-proof, dust-proof, and shock-proof.
Also integrated into the charger is a very bright LED light source. The side of the unit has a button for turning on and off the light while the top side of the unit has two USB A ports and a micro USB connector for charging from an external power source.
The front of the charger has LEDs indicating current solar levels and whether the battery is charging.

The solar charger

The LED on/off button
The back of the solar charger has technical information regarding electrical characteristics and company information. According to this, the unit can deliver 5V @ 2.1A and has a 10000mAh capacity which roughly allows the unit to spit out 2.1A for 4.76 hours. That's pretty darn good for mobile devices.
However, assuming the 5V / 1A relates to the input current for charging, the battery (from empty) would take 10 hours to charge. Considering that the solar cell shown here is unlikely to supply 1A of charging capacity, this could take two sunny days to fully charge!

The back of the solar charger

Close-up of the technical specifications
The unit is held together with four screws (one in each corner) which are protected with small plastic stoppers that are snugly fitted into the screw holes.
The water-proof and dust-proof capabilities are thanks to the orange rubber membrane that is sandwiched between the two halves of the case. Removing the screws allows for the two halves to be separated, exposing the internal components.

One of four screw holes
The Innards!
The inside of the charger reveals a PCB with circuitry, a large lithium-ion battery, and a solar cell.
The battery is rated at 3.7A (with a 10000mAh capacity) and the solar cell has the designation RESUN-SOLAR 107-61 V5. A quick search on Google reveals that this solar cell is a 6V @ 1W (170mA) which would require a minimum of 49 hours of daylight (assuming that the light is enough to fully saturate the solar cell) to charge the battery from dead.
To that end, this solar cell is more of a “topper-offer” when not in use so that, when you do need to use the battery, the solar charge has provided some additional run time. (Trust me, you won’t complain about getting an extra two minutes on your phone when all other power sources are diminished.)

The top cover removed from the charger

The solar cell

The battery
The lithium-ion battery shown here is stuck down to the bottom of the case with sticky foam.
Removing the battery was difficult and, despite writing an entire article on lithium-ion battery safety, I use a sharp-ended screwdriver to pry the battery out. There was a spark, a bang, and a puff of smoke which had me throwing the battery out of the workshop in case it decided to catch on fire (remember, this is a 10000mAh battery so it packs a wallop). Luckily, the battery was fine and my dramatic reaction was seen by no one else, which helped to preserve my dignity for another day.
The lithium-ion battery has the designation LL 126090P 3.7V and a quick search on Google suggests that this battery is instead an 8000mAh battery instead of the stated 10000mAh capacity.
The Main PCB
The main PCB is a double-sided, FR4 PCB with many thick traces, copper pours, and components.
The top side of the PCB shows two USB A female connectors and a micro USB charging port. The top side also has numerous components including inductors, capacitors, diodes, transistors, and resistors.

The top side of the PCB
One of the two ICs that stands out is the TC4606 which is a power driver that consists of an N- and P-type MOSFET. Fitted into an 8-pin SOP package, the two MOSFETs can be used in power circuits suitable for low-power designs including laptops, notebooks, and mobile devices.

The TC4606 IC
The second IC on the top side of the PCB is a 14-SOP package that is unmarked. This IC is most likely a microcontroller based on the complexity of lithium-ion charging cycles, the fact that the LED button needs to be held down for a while to activate, and the fancy LED display that indicates charging. There's a decent chance that the producers of this charger got a microcontroller supplier to supply unmarked ICs so as to hinder reverse engineers.

The unmarked IC
The underside of the PCB reveals that the LED light consists of multiple white LEDs in a matrix. Despite being at a low voltage, the high currents involved (2.1A for example) require thick traces and the designers of this PCB have used solder on traces to increase current capacity. The lower resistance of such traces reduces overall resistance, which in turn reduces the heating effect caused by the current flow and also reduces voltage drop.

The LED matrix

The left side of the PCB, showing the exposed traces to allow solder to carry current

The right side of the PCB showing more thick traces
Summary
This solar charger shows that even something as simple as a battery charger can be complex with many design considerations that must be taken into account.
Overseeing correct charging cycles require the use of a microcontroller. Dust-proofing requires the use of rubber sealants and even screws need to be kept away from moisture with the use of a rubber insert.
This charger is a well-built piece and, even if the battery is rated for only 8000mAh, that is still a lot of juice for a mobile device set to power saving mode!
Next Teardown: Sound-Activated LED Party Lighting


Robin,
You exposed the tip of the iceberg in regard to the actual power rating of some of these battery packs sold on ebay. The vendors advertise 10,000 to as high as 100,000 mAH storage capacty. After purchasing a no name 10,000 mAH unit and measuring its output with a 400 mA load the unit shut down after 4 hours giving an actual storage capacity of 1600 mAH. Bottom line you get what you pay for on ebay.
RoyZ
Why no external photos of the ports and flashlight?