 Facebook
 Google
 GitHub
 Linkedin
How to Build a Robot - Design and Schematic
Part one of a series of articles on building a robot that can follow lines or walls and avoid obstacles!
Start building a robot that can follow lines or walls and avoid obstacles!
Related Articles
How to Build a Robot:
Part 2: PCB Design
Part 3: Testing Hardware
Part 4: Line Follower
Part 5: Avoiding Obstacles
Part 6: Wall-Following Robot
Overview
This is part 1 of a series of articles on my experiences building a robot that can do various things. I thought it would be neat to create a robot that was easy to put together with a single soldering iron and was also affordable. I made up the following requirements for my robot:
- Many kits are expensive, so it must be relatively inexpensive.
- It must be easily put together without special equipment.
- It must be easily programmable without a complicated IDE or programmer.
- It must be powerful enough for expandability.
- It should run off a simple power source.
- It should be able to follow a line or a wall, and avoid obstacles.
In this article I'll talk about how I decided to meet these requirements.
Choosing the components
The first step in any project is figuring out what pieces are required. A robot needs a few key things to be useful: a way to move, think, and interact with its surroundings. To keep costs down, I need to get by with two wheels. This means to steer I need two separate motors that can be operated independently. I also need a ball caster that the robot can lean on to glide along. This has the unfortunate downside that the robot really can't go on any surfaces other than smooth floors. I want the brains to be some sort of well-known microcontroller platform. This way it won' need a programmer or guide to use the development tools. The robot needs to have sensors that allow it to be aware of lines, walls, and obstacles. I also want to minimize the amount of different places that I buy things to keep shipping costs low. Lastly, the components need to be small because I want to design the board for low cost PCB manufacturing and stay within the limits of the free version of Eagle CAD.
Mechanical: Motors, Gears, Wheels
I found a couple websites that offer various hobby motors and robot parts, but I settled on Pololu because their prices were decent and they had everything I needed. The products from Tamiya looked pretty good. The 70168 Double Gearbox Kit comes with gears, motors, and shafts, which greatly simplifies the mechanical. It's also very cheap! The motors run on 3V normally, but could run higher at the expense of reduced operational life. Several gear ratios are supported, so I can fine tune the speed of the robot when I get it. I decided on the cheapest wheels that would fit the shaft of this kit, the Tamiya 70101 Truck Tire Set. This set comes with four wheels and I only need two, but it's cheap and spares never hurt! The front wheel is just a ball caster or plastic screw so that the robot can slide along the floor.

Brains: Microcontroller
There are several different microcontroller platforms that are fairly popular. The obvious choice is some sort of Arduino based on polarity. Other options are Teensy, Launchpad, and Raspberry Pi. The Pi is way too big and power hungry and the Launchpad is too big. I've used Teensy in the past and had good success. The Teensy is slightly more expensive than the Arduino Mini but offers a much more powerful platform. The latest Teensy has a Cortex M4 which is plenty of power for a simple robot. A bonus is that the Teensy has an onboard 500mA regulator which can be used for all of the sensors.
Interaction: Sensors
Different sensors are needed for following lines and following walls. The line following sensors are usually reflectometers that vary a voltage depending on how much light is reflected from the ground. This is done using an LED and photodiode or light detector. The wall and obstacle detectors are usually some sort of distance sensor. Both of these types were available in a convenient DIP breakout form from the same store as the motors which allows me to save on shipping and be easily soldered! For the line sensor, I found one that has 3 sensors which allows the line to be centered on the robot at all times. For the distance sensor, I decided on the high brightness IR sensor, since I'm operating on a lower voltage than what is expected.
Power: Motor Driver, Battery
The motor driver needs to be able to drive the 3V motors above. I also wanted it to be scalable in case I wanted to upgrade the motors in the future. I found one from the same store as above here. It can operate on 0-11V and supply plenty of current for any motor I'd want to add in the future. For the battery, I'd prefer that the robot runs on almost anything. The input to the Teensy accepts up to 5.5V, which means a lithium cell could be used. Lithium's require a battery charger though, and I don't want to add that to the expenses. Using two normal AA batteries offers quite a bit of power without this need. The downside is they only supply ~3V and are large. An input voltage of 3V is below the Teensy's 3.3V linear regulator. The robot will still operate, because all of the components chosen for the Teensy can operate on a lower voltage. However, the onboard regulator on the Teensy will ;be running unregulated.
Optional Items
I want a way to control the board through my smart phone at some point, so I included a BLE device in the schematic. This isn't necessary to follow lines and walls, but I thought it would be a cool addition. I also want a way to easily remove items, so I'm going to use female headers to connect everything to the board.
Complete Bill of Materials
Necessary Materials
| Part Type | Part Number | Cost |
|---|---|---|
| Microcontroller | Teensy 3.2 | 19.80 |
| Motor | Tamiya 70168 | 9.25 |
| Motor Driver | DRV8835 | 4.49 |
| Ball Caster | Tamiya 70144 | 5.99 |
| Reflector Sensor | QTR-3RC | 4.95 |
| Tires | Tamiya 70101 | 4.10 |
| Distance sensor | Pololu 38kHz | 5.95 |
| PCB | Elecro 10x10cm | 14.00 |
| Battery Case | 2-AA Battery Holder | 0.79 |
| Total w/o shipping: | $49.52 |
Optional Materials
| Part Type | Part Number | Cost |
|---|---|---|
| Wireless | nRF51 Dongle | 52.39 |
| Connectors | Various female 100mil headers | 5.00 |
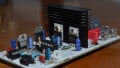
Schematic
I am using the freeware version of Eagle CAD to draw the schematic and layout. I have created custom symbols/footprints for all of the items except for the Teensy device, available for download in Part 2 of this series. The Teensy has libraries for Eagle here. You might notice the schematic is lacking any simple devices like resistors or capacitors. This is because every one of these boards is a break-out board to make assembly as easy as possible. Any recent chip will likely be surface mount which is difficult to do for a hobbyist. The schematics for each of these boards are available from their respective sellers. Here are some key points for this schematic:
- I put a jumper between the battery and the rest of the circuitry. This is useful to disconnect the power without removing any batteries, to measure current, or to protect the circuit from reverse polarity with a diode.
- All interfaces are digital except two. There is a UART connection between the nRF51 and the Teensy through pins 9/10. The motor controller requires PWM, which is through pin 6 and 4 of the Teensy.
- There is no LED on the schematic. The LED that is on the Teensy can be used for debugging or indication.
- There is no button. I considered putting a button on the reset line of the Teensy but didn't to keep costs lower.
- When programming the Teensy through USB, you must either cut the small trace connecting Vin/Vusb or make sure the batteries are not connected while the USB is plugged in.

Schematic File
Conclusion
In this article I outlined the requirements for the robot and my design choices to meet those requirements. These choices led to a schematic and bill of materials (BOM) to add up the costs for the project. In part 2 of this series, I'll draw the circuit board so it can be manufactured!
Next Article in Series: How to Build a Robot - PCB Design
Related Content


I get $69.32 for a one-wheeled robot.
Sorry, no code, no Chance.
Very nice presentation and references. Thanks.