Facebook
 Google
 GitHub
 Linkedin
Using a C# Application to Communicate with an Arduino
In this article, we are going to connect an Arduino Pro Mini to a PC and communicate with it using a C# Windows application.
In this article, we are going to connect an Arduino Pro Mini to a PC and communicate with it using a C# Windows application.
Connecting your hardware to a PC can be very beneficial, not least because you can send commands and monitor status. You can also debug your code in real-time. Checking the variables is particularly beneficial when you are struggling with a module and you want to know the module responses and track your state machine.
A Note on the Arduino Pro Mini and C#
First of all, I want to describe my reasons for choosing the Arduino Pro Mini. In my opinion, the small form factor is an advantage in today’s designs. Nowadays, with the increasing popularity of portable IoT devices, the need to be small is getting more important—and Arduino Pro Mini is nothing if not very small.
The Arduino Pro Mini is optimized for small spaces (when you need your circuit as small as possible), but it's surprisingly robust when it comes to building projects. Another benefit is it doesn’t have soldered headers, which take up a lot of vertical space. You can simply access the desired pin by soldering the wire to the pin. Because of its small size, it doesn’t have built-in USB components, so you'll need to use an extra component for that functionality. There are many serial-to-USB converters on the market but, personally, I prefer to choose a converter that gives me all the handshake pins, not just Rx and a Tx.
That’s why I designed a simple interface board based on the FT232R. I used all of the serial signals available on the chip. You can see the circuit that I took from the datasheet in Figure 1.
Secondly, I'd like to address why I chose C#. There are numerous programming languages and many visual programs that make programming a visual application for Windows much simpler. Every one of them has advantages and disadvantages. But, for me, using visual studio can do a lot of my work for me. It gives access to many pre-compiled libraries and tools that help us build our application efficiently. It also allows us to work in the C# language, which is very powerful. So we are using C# in this article because it's convenient and I'm familiar with it.

Figure 1. FT232R datasheet. Image courtesy of FTDI Chip (PDF)
BOM
Hardware
- Arduino Pro Mini 5V
- FT232R USB-to-serial module
- A breadboard for LED
- Wire for connecting the headers to the FT232R board and pin 3 to an LED
Software
Setup
I used my own FT232R board for programming and communicating with the Arduino Pro Mini 5V. Arduino PM has six pin headers for programming labeled “BLK”, “GND”, “VCC”, “RXI”, “TXO”, and “GRN” as can be seen in Figure 2.
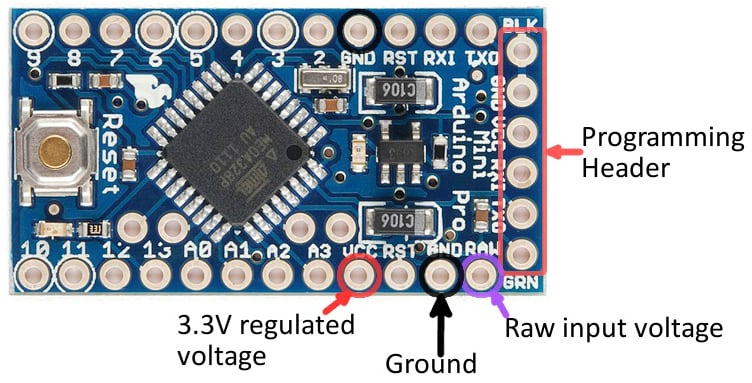
Figure 2. The pins for the Arduino Pro Mini. Image courtesy of SparkFun.

Figure 3. The Arduino Pro Mini schematic. Image courtesy of Arduino. Click to enlarge.
In the six pin headers for programming shown in Figure 3, the first pin, BLK, is grounded. GND and VCC obviously need to get connected to VCC and GND of the FT232R board. In this way, the Arduino will be supplied with USB power and won't need an extra supply.
The thing that we should consider is the current limitation of a USB port. If our circuit draws more than 500mA, we should add an external power supply. RXI should get connected to TX of FT232, TXO to RX of FT232, and GRN to the DTR of FT232—which will give the FT232 the power to reset the board whenever it wants.
After wiring, your circuit should look like Figure 4. Now we're ready to program the Arduino Pro Mini.
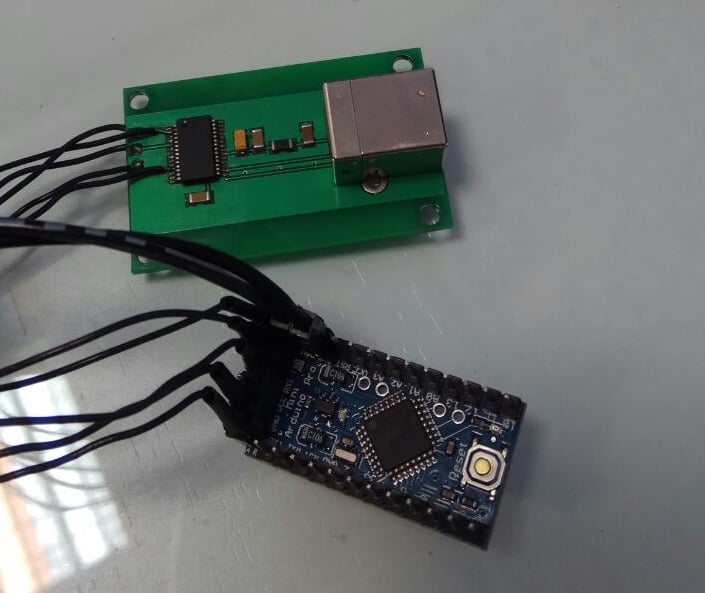
Figure 4. Setup
Uploading a Sketch
For test purposes, we'll write a simple code to read serial inputs and set the pin 3 status accordingly:
const int led = 3;

 int state=0;

void setup()

{

    Serial.begin(115200); //Starts the serial connection with 115200 Buad Rate

    pinMode(led, OUTPUT); //Sets led pin as an output

    Serial.write("ALL ABOUT CIRCUITS!");//Send "ALL ABOUT CIRCUITS!" to the PC

}

void loop()

{

    String data = Serial.readString();//Read the serial buffer as a string

        if(data.indexOf("ON")!=-1)//checks if it is "ON"

        {

            digitalWrite(led, HIGH); // Sets the led ON

            state=0;// Sets the state value to 0

        }

        else if(data.indexOf("OFF")!=-1)//checks if it is "OFF"

        {

            digitalWrite(led, LOW); //Sets the led OFF

            state=0;// Sets the state value to 1

        }

        else if(data.indexOf("STATE")!=-1)//checks if it is "STATE"

        {

            Serial.write("state=");//Sends the state

            Serial.println(state);

        }

}
All we need to do is set our board to Arduino Pro or Pro Mini (see Figure 5) and then upload our sketch.

Figure 5. Arduino IDE
Writing the C# Application
For writing the C# application we should create a simple windows form in Visual Studio. Next, from the toolbox section, we need to drag and drop the “Serial port” tool. All the settings can be configured in the properties section of the tool. Set the port name to the port name of your FT232. And set the Baud Rate to 115200. The handshake setting is "None." We also need to add a button to toggle LED status and a textbox to show received data. We can simply add these from the toolbox. The settings should be as shown in Figure 6.

Figure 6. The main form and the serial port configurations
After doing the visual work, we are ready to do some coding. First of all, for using the serial port we need to open it, and then we can write or read from the serial buffer. We have access to serial interrupts in the code. Interrupts in serial communication provide better response because we handle data as it becomes available. The C# serial port also has an event that will be triggered when data comes to the buffer. We can use this event by going to the events tab in the properties section and double-clicking on DataReceived (see Figure 7). Visual studio will create the event automatically.

Figure 7. We will use the DataReceived interrupt
Before we send or receive data, we need to open the serial port:
 private void Form1_Load(object sender, EventArgs e)

{

 serialPort1.Open();

}
And then we can read or write data.
The code will look like this:
public delegate void AddDataDelegate(String myString);// Delegate for richtextbox
public AddDataDelegate myDelegate;// An instance of AddDataDelegate
public delegate void AddDataDelegate_button(String myString);// Delegate for button
public AddDataDelegate_button myDelegate_button;// An instance of AddDataDelegate_button
bool status=false;// LED status
public Form1()
{
    InitializeComponent();
}

private void Form1_Load(object sender, EventArgs e)
{
    serialPort1.Open();//Opening the serial port
    this.myDelegate = new AddDataDelegate(AddDataMethod);//Assigning "the function that changes richtextbox text" to the delegate
    this.myDelegate_button = new AddDataDelegate_button(AddDataMethod_button);//Assigning "the function that changes button text" to the delegate
    serialPort1.WriteLine("STATE");

}
public void AddDataMethod_button(String myString)
{
    button1.Text = myString;//changes button text
}
public void AddDataMethod(String myString)
{
    richTextBox1.Text = myString + Environment.NewLine;//changes richtextbox text
}
private void serialPort1_DataReceived(object sender, System.IO.Ports.SerialDataReceivedEventArgs e)
{
    string s = serialPort1.ReadExisting();//reads the serialport buffer
    if (s.Contains("state="))//checks if it is status
    {
        s=s.Trim();
        string new_s = s.Replace("state=", "");
        if (new_s.Contains("0"))
        {
            status = false;
            button1.Invoke(this.myDelegate_button, new Object[] { "ON" });//sets button text to on
        }
        else
        {
            status = true;
            button1.Invoke(this.myDelegate_button, new Object[] { "OFF" });//sets button text to off
        }
    }
    else
    {
        richTextBox1.Invoke(this.myDelegate, new Object[] { s });//adds the recieved bytes to the richtextbox
    }
}

private void button1_Click(object sender, EventArgs e)
{
    if(button1.Text.Contains("ON"))
    {
        serialPort1.WriteLine("OFF");//sends off command when the previous state was on
        button1.Text = "OFF";
        status = false;
    }
    else
    {
        serialPort1.WriteLine("ON");//sends on command when the previous state was off
        button1.Text = "ON";
        status = true;
    }
}
Code description
The sample code communicates via ASCII characters. This approach is convenient and extensible.
In the C# code, we need to read the status of the pin from the Arduino Pro Mini so that we send the “STATE” command to the Arduino board. The Arduino will answer us through the serial port with the answer of “state=0” or “state=1”. After the Arduino sends us the state, we will update the button text accordingly.
Events run in separate threads from the main form thread, so they have different speeds. For example, in our case, when we receive a text from the serial port, we may want to show it in the text box. However, the main Windows thread controller which created all control handlers from the beginning, may have some undone job with the desired controller, which can be a richtextbox or a button; under these conditions, if we call a text box from another thread separated from the main handler, the program will crash because of a multiple-thread situation. The textbox controller can have two different properties at a time, so we should wait until its job is done.
That’s why we can’t change textbox text from another thread, such as the serial receive thread. To avoid that, we can use an Invoke method. Each controller has an Invoke method that gives us the ability to change its properties from another thread; an Invoke method can execute a certain delegate from another thread. Delegates are like method pointers in C++, which means that they refer to a certain method and execute it safely. Therefore, at first, we need to define a delegate that changes the controller properties, which in the code is named “myDelegate,” and then refer it to the Invoke method. As can be seen in the code, with the use of an Invoke function, we can make thread-safe calls.
The rest of the code is straightforward. We simply write the “ON” or “OFF” command to the serial port whenever the user pushes the button.
Conclusion
In this article, we learned how to write a C# program that interacts with an Arduino Pro Mini. We used a simple ASCII command/response protocol that can be easily adapted for use in a wide variety of applications.
Related Content