 Facebook
 Google
 GitHub
 Linkedin
Finite State Machines & Microcontrollers
Using Finite State Machines (FSM) is a common industrial practice in coding but their use extends beyond everyday software. They can easily be used in projects, help prevent bugs, stop infinite loops hogging the processor, and ease debugging.
Finite State Machines: The better way to code!
Using Finite State Machines (FSM) is a common industrial practice in coding, but their use extends beyond everyday software. They can easily be used in projects, to help prevent bugs, to stop infinite loops hogging the processor, and to ease debugging.
The Problem
One issue that most (if not all) hobbyists and engineers alike will fall into is the dreaded infinite loop. This error is commonly found in systems where a micro is reading from I2C memory, checking for interrupts or determining to see if a condition is met. Many users wonder how it is possible to prevent such errors. One solution is the use of timers and watchdogs to reset the system, but this is poor practice as data can be lost, bus lines can become locked up (I2C is notably bad for this), and unexpected system behaviors can result.
The real answer to such problems is the use of finite state machines which I discovered two months ago when programming the ZBM IO controller. Finite state machines look very complicated and their explanations are equally daunting, but surprisingly they're one of the easiest programming methods to integrate.
Note: This article will be considering finite state machines in C but they're possible in any language (including assembly).
What are Finite State Machines?
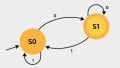
Firstly, what is a finite state machine? The simple answer (and the only one you need to know) is that a finite state machine is a system where only a set number of real, defined states can exist. Personally, I find it easier to say that a finite state, no matter WHERE it is, will ALWAYS end up back at the beginning. This means that no matter where you are in the code, you will end up at the beginning and therefore can NEVER get stuck in an infinite loop.
To understand how to code a finite state machine, it is best to see a simple example.
STATE = “START”;

Void main(void)
{
	do{
		if(STATE == “START”){
			startCode();
		}
		else if(STATE == “MIDDLE”){
			middleCode();
		}
		else if(STATE == “END”){
			endCode();
		}
		else{
			STATE = “START”;
		}

	}while(1);
}


void startCode()
{
	// Some code here
	STATE = “MIDDLE”;
}

void middleCode()
{
	// Some code here
	STATE = “END”;
}

void endCode()
{
	// Some code here
	STATE = “START”;
}
When the code is initialized, the state of the system is set to “start”. This ensures that we have an entry point that will get the system going. Then when the code in startCode() has been executed, the state will be changed to “middle”. This means that upon the next iteration of the do-while loop in main the middleCode() function will be executed. When this function is done, the state will now be set to “end”. Upon another iteration of the main loop, the endCode() function will be called. Once this has been executed, the state is changed to “start”. This repeats on forever with each function being called in the order shown in the code.
This is only as useful as the code that sits inside the state functions (startCode, middleCode, and endCode). If the code inside these functions is NOT FSM-compatible, infinite loops can still be encountered and thus make all this code pointless. The real trick is making “finite state-compatible code”. So how do we do this? Let's start by taking a look at the old infinite loop code.
sendI2CStartBit();
while(I2CSTARTWAIT);
This function will wait until the start bit has been sent by the I2C module onboard the PIC. But what would happen if the start bit could not be initiated?
The PIC has a habit in some scenarios where the I2C bus can lock up and control cannot be restored. This means that your code will forever sit in that while loop. What's worse is that, even if you attempt to re-initiate the start bit, there is no chance that the bus will unlock itself. This is where the finite state machine really rocks!
Let's take a look at a graphical layout of an I2C finite state machine that is to be included in our main program.
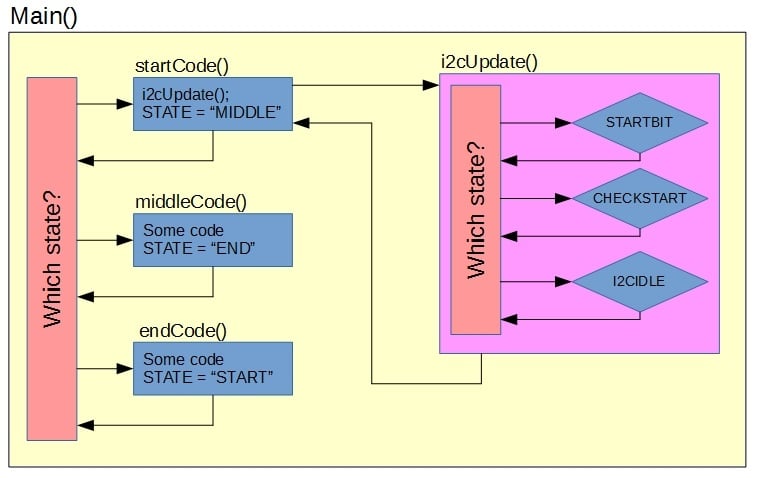
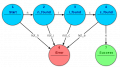
Program as an FSM
Firstly, there are two finite state machines! The first FSM is the main code that loops around, calling the three main functions. The second finite state machine is the I2C handler that can be in a number of possible states, the most important state being the idle state.
The idle state is important because it will tell us that the I2C system is not doing anything—it is at that point we can ask it to send start bits, send a byte, receive a byte, or any other I2C related operation. So let's see the innards of the I2C handler in its simplest form!
Void I2cupdate()
{
	if(i2cState == “STARTBIT”)
	{
		sendI2CStartBit();
		i2cState = “CHECKSTART”;
	}
	if(i2cState == “CHECKSTART”)
	{
		if(I2CSTARTWAIT == 0)
		{
			i2cState = “I2CIDLE”
		}
	}
	if(i2cState == “I2CIDLE”)
	{
	}
}
So how do we get the I2C handler to send a start bit? Simple. If a piece of code needs to use I2C, you first check that the I2C is idle then you set the i2cState to “startbit”.
SomeFunction()
{
	if(i2cState == “I2cIDLE”)
	{
		i2cState = “STARTBIT”;
	}
}
Then as the main program loops continuously, the I2C handler will update upon every iteration. And if the I2C bus locks up the I2C handler will be stuck in one state but the rest of the program will continue. How do we know when the I2C handler is done? Probe the i2cState value but DO NOT execute a while loop:
// This is OK:

SomeFunction()
{
	if(i2cState == “I2CIDLE”)
	{
		next state for this function;
	}
}


// This is NOT ok:

SomeFunction()
{
	while(i2cState != “I2CIDLE”);
}
So now let’s address the I2C lock up issue which has prevented the I2C handler from working correctly. The good news is that the I2C handler will still run through its internal state checks and it will still pass through the “checkstart” state. This means that we can include a timer or loop counter that will increment upon a pass. Then if this loop counter reaches a predetermined value (TIMEOUT), we can conclude that something bad has happened and thus reset the I2C state to be idle. At the same time, we can also set a flag so that all other functions can be warned about the error.
So let's take a look at the modified I2C code:
SomeFunction()
{
	if(internalState == “STATE1”)
	{
		if(i2cState == “I2cIDLE”)
		{
			i2cState = “STARTBIT”;
			internalState = “STATE2”;
		}
	}
	else if(internalState == “STATE2”)
	{
		if(i2cState == “I2cIDLE”)
		{
			if(i2cError == 1)
			{
				// Error handling code here
			}
			else
			{
				// Send data, read data or any old code
				internalState = “STATE1”;
			}
		}
	}

}
So now that we can express our infinite loop functions as finite state machines, our program begins to look like the following (graphical form):
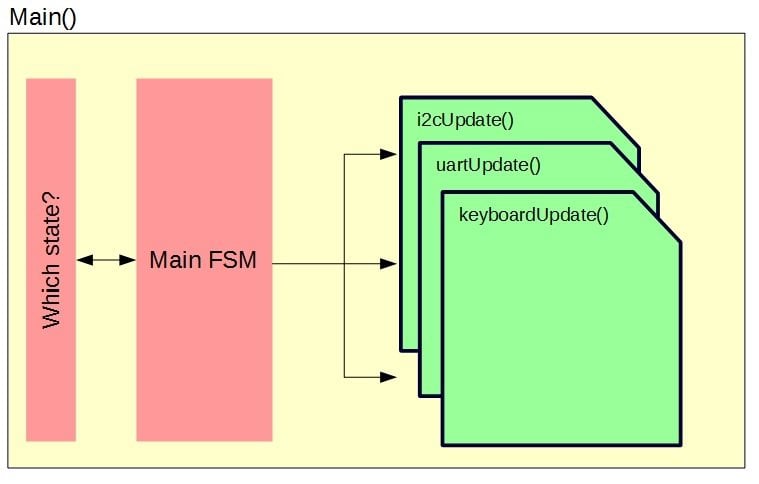
FSM design with mini-FSM functions
The main function is a finite state machine that calls each of the sub-state machines. When these sub-state machines are called, they perform their own checks and internal state changes. Each of these sub-state machines can probe the states of other sub-state machines so that they can communicate with and control one another. Typically the arrangement you will get is a few layers of state machines with the upmost layer being the main function followed by the second program layer that will request I2C data, send UART bytes, and request user input. The final layers (right at the bottom that typically DON'T communicate with anything except themselves) handle IO and devices such as I2C, SPI, and IO access.
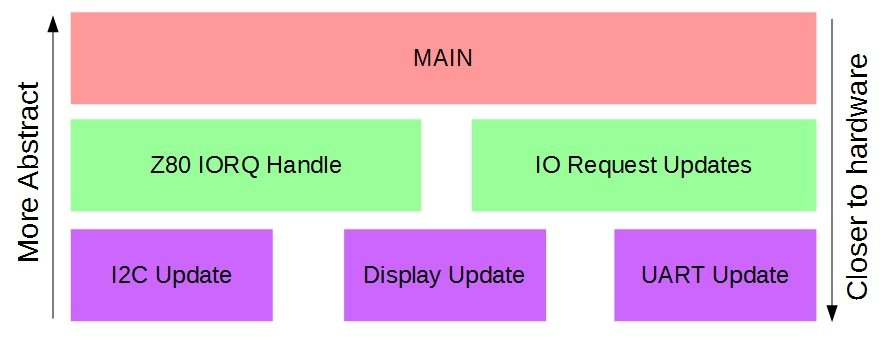
Layered view
Now that you have read this article, go ahead and experiment! Start with a simple function that turns an LED on and off depending on its internal state. Then, when you've done that, get a secondary finite state machine to control the LED finite state machine so that it turns on and off depending on some other external condition totally unrelated to the LED.
Just remember: Never, ever use a while loop unless you KNOW it will exit (e.g. after 5 iterations). Now for your reward: a complete I2C finite state machine! All this needs is I2C_INIT() called at the start and then just call i2c_update() inside your main loop.


Nice article, I recently had to create state machines with Arduino and discovered the switch case method, or switch(state).
So if state == 1 it would read the code under state1 in the switch case, then write the next state eg state = 2.
I found the advantage with this method is it doesn’t get stuck in while loops, it can still perform important functions outside of the state machine loops, such as stop (state = 0) if a sensor == high.