 Facebook
 Google
 GitHub
 Linkedin
Build a Raspberry Pi Pushbutton Switch
Learn how to build a variety of electronic controllers using the Raspberry Pi. In part one, you will learn how to wire a basic pushbutton switch and read the status of its electrical contacts using the Python programming language.
Want to build a Raspberry Pi Controller? You got it:
The Raspberry Pi (RPi) is a powerful single board Linux computer that allows a variety of programming projects and electronic devices to be created. This is a part one in a series of Raspberry Pi projects. With an accessible GPIO (General Purpose Input Output) dual inline female header connector, a variety of electrical, electronic, and electromechanical components and devices can be wired to the Raspberry Pi. In addition, the RPi has support features like audio, HDMI, composite video, camera, USB, and LCD devices using standard elecrical connectors, audio, and RCA phono jacks. Connecting to the web is easily accomplished by way of a standard Ethernet connector. To bring your maker devices to life, the RPi uses the Python programming language, which comes standard with the Debian Linux distro operating system installed on the SD card. In this introductory project to building RPi electronic controllers, you'll learn how to wire a programmable tactile based pushbutton switch to the RPi and read its status using a basic Python script
The programmable switch doesn't require a lot of electronic components and is quite easy to build. The Parts Lists for the programmable switch is shown below.
Supplies Needed
- (1) tactile pushbutton switch
- (1) Raspberry Pi
- (1) solderless breadboard
- several jumper wires
Installing the RPi.GPIO Library
In order to read the tactile pushbutton switch status, the RPi.GPIO library needs to be installed on the Raspberry Pi. The RPi.GPIO is a software module that conveniently allows the Raspberry Pi GPIO pins to be manipulated for electronic controls applications. To install the RPi.GPIO library onto the Raspberry Pi, open the LXTerminal and type the following Linux installation command after the prompt:
pi@raspberrypi ~ $ sudo apt-get install python-dev python~rpi.gpio
After the Linux installation command is entered, you will see a series of RPi.GPIO build-installation file sequences being displayed on the monitor as shown below.

Once the build is complete, the RPi is ready for reading the status of a tactile pushbutton switch.
Wiring the Tactile Pushbutton Switch to the RPi
Attaching a tactile pushbutton switch to the RPi is quite easy to do. An important item to remember is the RPi's GPIO pins are +3.3VDC compliant. Applying voltages greater than +3.3VDC will damage the RPi. The electrical wiring diagram for attaching the tactile pushbutton switch is shown next.
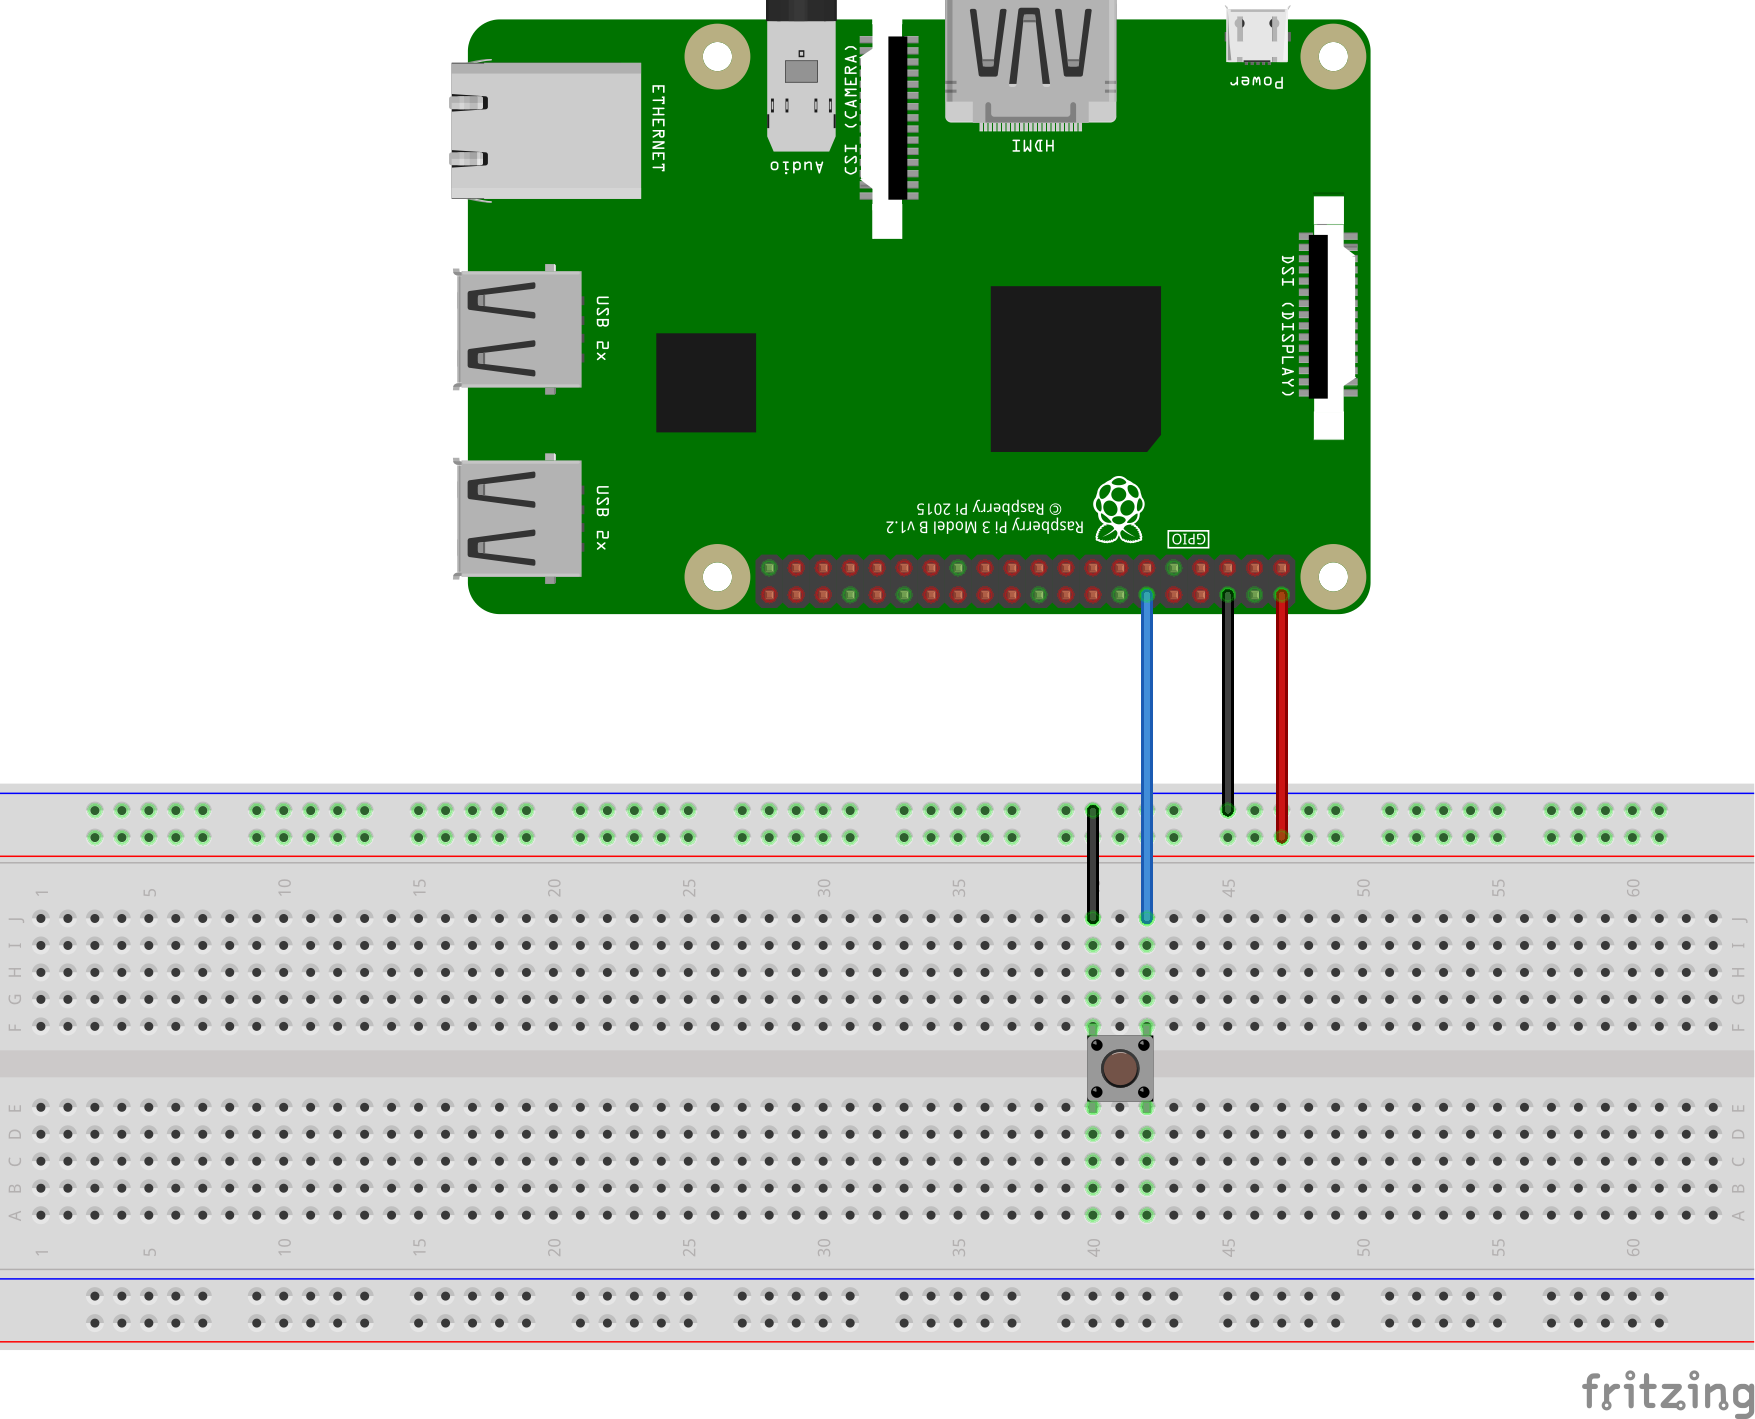
As an additional project build material, I included an equivalent circuit schematic diagram for reference below.

Although, the circuit wiring to the RPi is quite simple, recheck the wiring before programming the RPi. This important verification step will assure you project execution success when the python code is installed and running on the RPi.
The Programmable Switch Python Script
The next phase of the project build is to provide a python script for reading a tactile pushbutton switch wired to an RPi GPIO pin. The python script for reading a tactile pushbutton switch is shown next.
import RPi.GPIO as GPIO import timeGPIO.setmode(GPIO.BCM) GPIO.setup(18, GPIO.IN,pull_up_down=GPIO.PUD_UP)while True: inputValue = GPIO.input(18) if (inputValue == False): print("Button press ") time.sleep(0.3)
You can enter this script using either the LXTerminal's nano editor or with the Python's IDLE (Integrated Development Environment). Save the script as pbbutton.py in the home/pi directory of the RPi. Next, type the following Linux command to run the script on the RPi into the LXTerminal as shown next.
pi@raspberrypi ~ $ sudo python pbbutton.py
Next, press the tactile pushbutton switch. If the script was typed correctly, you will see the message "button press" displayed on the monitor's screen. Congratulations on building a programmable pushbutton switch!

For additional build reference, check out the video clip below.
The tactile pushbutton switch can easily be programmed to provide a variety of output messages and switching responses. Try changing the "Button Press" message to display your name or a whimsical word when activating the switch. Record your results in a laboratory notebook. In the next project article, you will learn how to code the RPi to toggle a LED on and off using your programmable pushbutton switch.
Next Article in Series: Build Raspberry Pi Controllers: LED Flasher
Give this project a try for yourself! Get the BOM.


Don, thank you for the project works great for a panic Button for texting and emailing! Was wondering if I could use this to connect a wireless doorbell system to a pi and have the bell button fire off an email instead of making a sound? Using this 1byone Easy Chime Wireless Doorbell
Hello,
Im currently making a project where i use my RPi as an image generator with a HDMI and VGA (gert’s vga666) output. HDMI (+audio) and vga are working perfectly. My problem is i want to have an analog audio while i’m viewing my image via vga. I want to be able to switch audio (maybe if possible composite video too) output between hdmi and analog without rebooting my pi.
Is it possible to do this using your’e project? So if like if i push on a button that i could switch between hdmi and analog output.Im not so good at python programming or programming in general .
thnx john