Facebook
 Google
 GitHub
 Linkedin
Incorporating Bias Nodes Into Your Neural Network
This article shows you how to add bias values to a multilayer Perceptron implemented in a high-level programming language such as Python.
Welcome to the All About Circuits series on neural networks, created by Director of Engineering Robert Keim. Before you continue on to this lesson on bias nodes, please consider catching up on the rest of the series below:
- How to Perform Classification Using a Neural Network: What Is the Perceptron?
- How to Use a Simple Perceptron Neural Network Example to Classify Data
- How to Train a Basic Perceptron Neural Network
- Understanding Simple Neural Network Training
- An Introduction to Training Theory for Neural Networks
- Understanding Learning Rate in Neural Networks
- Advanced Machine Learning with the Multilayer Perceptron
- The Sigmoid Activation Function: Activation in Multilayer Perceptron Neural Networks
- How to Train a Multilayer Perceptron Neural Network
- Understanding Training Formulas and Backpropagation for Multilayer Perceptrons
- Neural Network Architecture for a Python Implementation
- How to Create a Multilayer Perceptron Neural Network in Python
- Signal Processing Using Neural Networks: Validation in Neural Network Design
- Training Datasets for Neural Networks: How to Train and Validate a Python Neural Network
- How Many Hidden Layers and Hidden Nodes Does a Neural Network Need?
- How to Increase the Accuracy of a Hidden Layer Neural Network
- Incorporating Bias Nodes into Your Neural Network
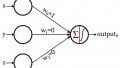
Bias nodes, which can be added to a Perceptron’s input layer or hidden layer, produce a constant value that is chosen by the designer.
We discussed bias values back in Part 11, and I encourage you to read (or reread) the relevant portion of that article if you’re not clear on what bias nodes are or how they modify and potentially enhance the functionality of a neural network.
In this article, I will first explain two methods of incorporating bias values into your network architecture, and then we will conduct an experiment to see whether bias values can improve the accuracy performance that we obtained in the previous article (Part 16).
Incorporating Bias via the Spreadsheet
The following diagram depicts a network that has a bias node in the input layer but not in the hidden layer.
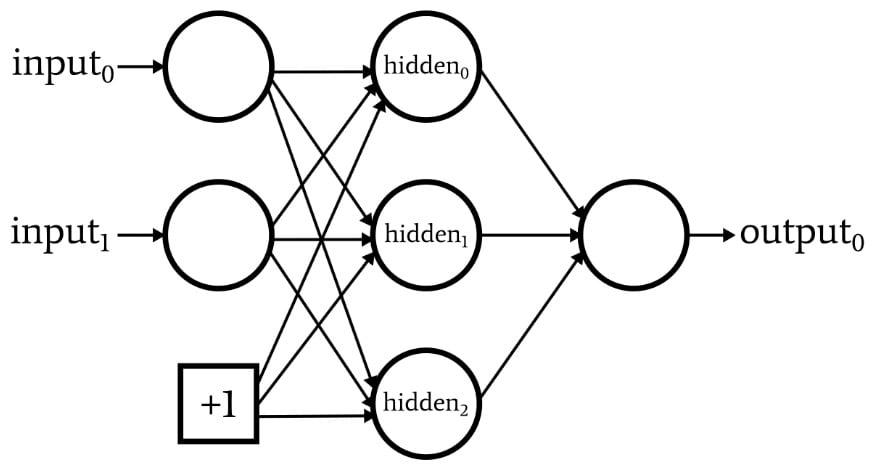
If this is the configuration that you’re looking for, you can add a bias value using the spreadsheet that contains your training or validation data.
The advantage of this method is simply that no substantial code modifications are required. The first step is to insert a column in your spreadsheet and fill it with your bias value:

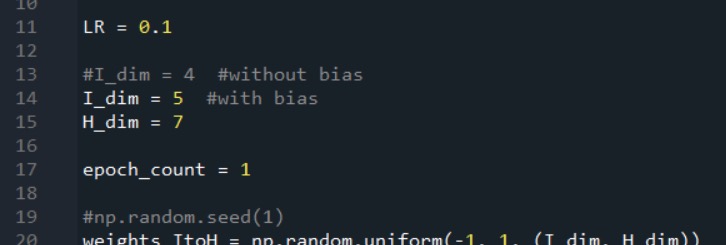
Now, all you need to do is increase your input-layer dimensionality by one:
Integrating Bias into the Code
If you want a bias node in the hidden layer, or if you dislike working with spreadsheets, you’ll need a different solution.
Let’s assume that we want to add a bias node to both the input layer and the hidden layer. First, we’ll need to increase I_dim and H_dim, since our goal is to integrate the bias nodes such that they function like normal nodes but with a pre-weighted value that is chosen by the designer and that never changes.
I’ll accomplish this as follows:

Creating the Input-Layer Bias Node
As you may recall, we use the following code to assemble the training data set, separate the target output values, and extract the number of training samples.

After these statements, the number of columns in the two-dimensional array training_data will equal the number of input columns in the spreadsheet. We need to increase the number of columns by one to account for the bias node in the input layer, and while we’re at it we can fill this additional column with the desired bias value.
The following code shows how this can be done.
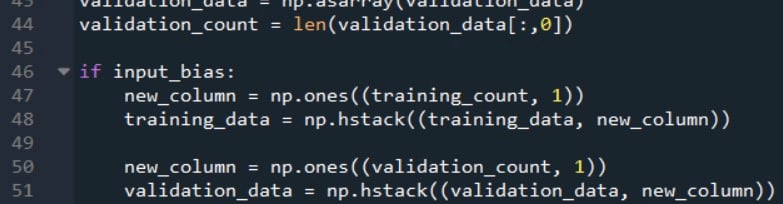
The np.ones() function creates a one-column array whose number of rows is equal to training_count, and it assigns a value of +1 to each element in this array. Then we use the np.hstack() function to add the one-column array to the right side of the original training_data array.
Note that I have performed this procedure for both the training data and the validation data. It’s important to remember that the goal is not actually to modify the training or validation data; rather, we’re modifying the data as a means of implementing the desired network configuration.
When we look at a block diagram of the Perceptron, the bias nodes appear as elements of the network itself; thus, any samples that are processed by the network must undergo this modification.
Creating the Hidden-Layer Bias Node
We can add a bias into the feedforward processing by modifying the for loop that calculates the hidden-layer postactivation values and then manually inserting the bias value for the last hidden node (which is actually a bias node).
The first modification is shown below:

If the network is configured to have no hidden-layer bias node, hidden_bias equals 0 and the for loop’s execution is unchanged.
If, on the other hand, we have decided to include a hidden-layer bias node, the for loop will not calculate a postactivation value for the final node in the layer (i.e., the bias node).
The next step is to increment the node variable so that it will access the bias node in the postActivation_H array, and then assign the bias value.

Note that these modifications must be applied to the validation portion of the code as well.
Bias Values Other Than +1
In my experience, +1 is the standard bias value, and I don’t know if there is any solid justification for using other numbers. The bias is modified by weights, so choosing +1 doesn’t place firm restrictions on how the bias interacts with the overall functionality of the network.
However, if you want to experiment with other bias values, you can easily do so. For the hidden bias, you just change the number assigned to postActivation_H[node]. For the input bias, you can multiply the new_column array (which initially has +1 for every element) by the desired bias value.
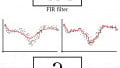
Testing the Effect of Bias
If you have read Part 16, you know that my Perceptron had some difficulty classifying the samples in Experiment 3, which was the “high-complexity” problem.
Let’s see if the addition of one or more bias nodes offers a consistent and significant improvement.
My assumption was that differences in classification accuracy would be fairly subtle, so for this experiment, I averaged ten runs instead of five. The training and validation data sets were generated using the same high-complexity relationship between input and output, and the hidden-layer dimensionality was 7.
Here are the results:
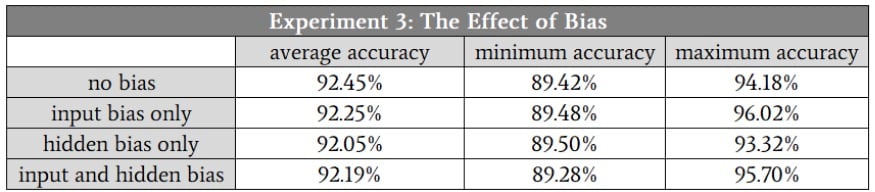
Conclusion
As you can see, the bias nodes didn’t lead to any significant change in classification performance.
This actually doesn’t surprise me—I think that bias nodes are sometimes a bit overemphasized, and given the nature of the input data that I used in this experiment, I see no reason why bias nodes would help.
Nonetheless, biasing is an important technique in some applications; it’s a good idea to write code that supports bias-node functionality so that it’s there when you need it.