Facebook
 Google
 GitHub
 Linkedin
Basic Electricity
Simple Circuits
41 questions By Tony R. Kuphaldt
-
Question 25 of 41
In the simplest terms you can think of, define what an electrical circuit is.
Reveal answerAn electrical circuit is any continuous path for electrons to flow away from a source of electrical potential (voltage) and back again.
Notes:Although definitions are easy enough to research and repeat, it is important that students learn to cast these concepts into their own words. Asking students to give practical examples of “circuits” and “non-circuits” is one way to ensure deeper investigation of the concepts than mere term memorization.
The word “circuit,” in vernacular usage, often refers to anything electrical. Of course, this is not true in the technical sense of the term. Students will come to realize that many terms they learn and use in an electricity or electronics course are actually mis-used in common speech. The word “short” is another example: technically it refers to a specific type of circuit fault. Commonly, though, people use it to refer to any type of electrical problem.
-
Question 26 of 41
Given a battery and a light bulb, show how you would connect these two devices together with wire so as to energize the light bulb:

Reveal answerThis is the simplest option, but not the only one.

Notes:This question gives students a good opportunity to discuss the basic concept of a circuit. It is very easy to build, safe, and should be assembled by each student individually in class. Also, emphasize how simple circuits like this may be assembled at home as part of the “research” portion of the worksheet. To research answers for worksheet questions does not necessarily mean the information has to come from a book! Encourage experimentation when the conditions are known to be safe.
Have students brainstorm all the important concepts learned in making this simple circuit. What general principles may be derived from this particular exercise?
-
Question 27 of 41
Build a simple electric circuit using a battery as the electrical energy source, and a small light bulb as the electrical load (I suggest using a 6-volt “lantern” battery and a miniature incandescent light bulb rated for either 6 or 12 volts). Use “jumper” wires with metal clips at the ends to join these two electrical devices together:

After connecting the components together properly so the light bulb lights up, answer the following questions:
- • What conditions must be met for the light bulb to light up?
- • What happens if the circuit is “broken”?
- • Does it matter where the circuit is “broken”?
Then, add a third jumper wire to the circuit so you have a ready “break” to experiment with:
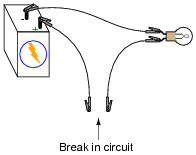
Try bridging this “break” with various materials, and note whether or not the light bulb lights up:
- •
- Paper
- •
- Steel paper clip
- •
- Gold ring
- •
- Rubber eraser
- •
- Pencil lead (graphite)
Also, try touching the jumper wire ends together along their plastic exteriors, rather than at the metal “clip” ends. Does the light bulb light up when you do this?
Explain what this experiment demonstrates about the electrical conductivity of the various substances listed as well as the plastic coating of the jumper wires. Also explain why electrical wires are provided with that plastic coating, instead of being bare metal. Finally, explain what this experiment has taught you about electric circuits in general.
Reveal answerLet the electrons show you the answers to these questions!
Notes:I find that 6-volt “lantern” batteries work well for an experiment such as this, along with either 6 or 12 volt miniature light bulbs. Sometimes the over-rated light bulbs (12 volt rated lamp powered by a 6 volt battery) work better for showing students the glowing filament. The filament of an incandescent light bulb at full brightness is difficult to distinguish.
Please avoid using LED’s or any polarity-sensitive devices until your students are ready to explore polarity!