To complete this project, we add backlight control and temperature-sensing functionality to the clock we built in the previous installments.
To complete this project, we add backlight control and temperature-sensing functionality to the clock we built in the previous installments.

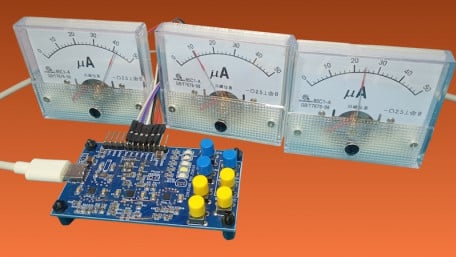
We continue our design of a clock that uses analog ammeters to display time and temperature. In this installment, we…
We continue our design of a clock that uses analog ammeters to display time and temperature. In this installment, we examine the second of the two circuits that enable the timekeeping function.
This project turns old-school analog ammeters into a working clock that can also display the ambient temperature.
This project turns old-school analog ammeters into a working clock that can also display the ambient temperature.

Learn how to implement finite-state machines in VHDL by creating a 4-bit binary counter. After compiling, it will run on…
Learn how to implement finite-state machines in VHDL by creating a 4-bit binary counter. After compiling, it will run on an Altera CPLD development board connected to a custom PCB with input switches and an LED display.

In this project, we’ll use a Raspberry Pi Pico to build an adjustable clock with an LED display. We’ll then integrate…
In this project, we’ll use a Raspberry Pi Pico to build an adjustable clock with an LED display. We’ll then integrate the clock with a Radio Shack Science Fair Microcomputer Trainer programmed to function as a 7-bit binary counter.

In this project we create an 8-bit arithmetic logic unit (ALU) in the VHDL language and run it on an Altera CPLD…
In this project we create an 8-bit arithmetic logic unit (ALU) in the VHDL language and run it on an Altera CPLD development board connected to a custom PCB with input switches and LED display.

In this project, we will demonstrate the simplicity of RIOT by creating a data logger that will plot levels of light onto…
In this project, we will demonstrate the simplicity of RIOT by creating a data logger that will plot levels of light onto a graph on a PC server application.

Learn how to listen to frequencies on the air with nothing more than a USB dongle: first FM radio, then voice signals.
Learn how to listen to frequencies on the air with nothing more than a USB dongle: first FM radio, then voice signals.

Part Three in this three-article series shows you how to generate values for a discrete sinusoid and continuously convert…
Part Three in this three-article series shows you how to generate values for a discrete sinusoid and continuously convert this data into an analog signal without overburdening the CPU.

Part Two in this three-article series explores the SAM4S DAC. We’ll look at hardware configuration, electrical…
Part Two in this three-article series explores the SAM4S DAC. We’ll look at hardware configuration, electrical characteristics, and the application programming interface.

Part One in this three-article series focuses on using the SAM4S timer/counter peripheral to precisely control the…
Part One in this three-article series focuses on using the SAM4S timer/counter peripheral to precisely control the DAC’s sampling rate.

This article covers everything you need to know to generate pulse-width-modulated signals with Atmel’s SAM4S Xplained…
This article covers everything you need to know to generate pulse-width-modulated signals with Atmel’s SAM4S Xplained Pro development board.

Learn about basic procedures and techniques for creating your own projects with Atmel’s SAM4S Xplained Pro development platform.
Learn about basic procedures and techniques for creating your own projects with Atmel’s SAM4S Xplained Pro development platform.

This article explains how to install PyVisa and MatPlotlib for Python. PyVisa connects a computer to the measurement…
This article explains how to install PyVisa and MatPlotlib for Python. PyVisa connects a computer to the measurement instruments and matplotlib helps to visualize the data collected from these instruments.

Learn how to design characters using an image editor and display them on an LCD controlled by an EFM8 microcontroller.
Learn how to design characters using an image editor and display them on an LCD controlled by an EFM8 microcontroller.
 Facebook
 Google
 GitHub
 Linkedin