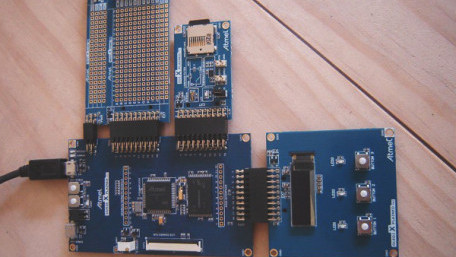
Learn about basic procedures and techniques for creating your own projects with Atmel’s SAM4S Xplained Pro development platform.
Learn about basic procedures and techniques for creating your own projects with Atmel’s SAM4S Xplained Pro development platform.

No I2C interface with that sensor? No problem. Program a PIC chip as an I2C slave device for custom sensor and I/O…
No I2C interface with that sensor? No problem. Program a PIC chip as an I2C slave device for custom sensor and I/O interfacing. Here, we use three DHT22 sensors on a single I2C interface.

We will explore how P, I, and D gain influences system performance, and in the process we will find a gain configuration…
We will explore how P, I, and D gain influences system performance, and in the process we will find a gain configuration that works well for our temperature controller.

SIMCOM's SIM 900A in Europe? Read on to learn how.
SIMCOM's SIM 900A in Europe? Read on to learn how.

With USB communications and a Scilab graphical user interface, we can really see what the PID controller is doing.
With USB communications and a Scilab graphical user interface, we can really see what the PID controller is doing.

We will implement a basic PID (proportional–integral–derivative) controller in firmware and observe the results using…
We will implement a basic PID (proportional–integral–derivative) controller in firmware and observe the results using an oscope and LEDs.

Learn how to read electrical signals and data from an analog device using the Step Response technique in Part 5 of the…
Learn how to read electrical signals and data from an analog device using the Step Response technique in Part 5 of the Building Raspberry Pi Controllers series.
We'll learn Arduino library implementation and establish the firmware framework for the 7-part project series. We'll use…
We'll learn Arduino library implementation and establish the firmware framework for the 7-part project series. We'll use Microsoft Visual Studio Express for library editing.

This article covers the firmware that allows the EFM8 microcontroller to communicate with the DAC and the MAX31855.
This article covers the firmware that allows the EFM8 microcontroller to communicate with the DAC and the MAX31855.

In this article I'll show you one way to use a PIC microcontroller to get the time and date from a GPS module.
In this article I'll show you one way to use a PIC microcontroller to get the time and date from a GPS module.

Gather data via USB from a BH1745NUC optical sensor and then display color characteristics and illuminance values.
Gather data via USB from a BH1745NUC optical sensor and then display color characteristics and illuminance values.

In part 4 of this Build Raspberry Pi Controllers series, the reader will learn how to build an IR Remote Event counter…
In part 4 of this Build Raspberry Pi Controllers series, the reader will learn how to build an IR Remote Event counter using littleBits.

Tips and techniques for incorporating EFM8 microcontrollers into your custom hardware.
Tips and techniques for incorporating EFM8 microcontrollers into your custom hardware.

The Particle Photon is a powerful little board with the ability to easily connect objects to the internet. This series of…
The Particle Photon is a powerful little board with the ability to easily connect objects to the internet. This series of articles will be enough to get you up and running with the Particle Photon.

The FRDM-K64F is a development platform which utilises the MK64FN1M0VLL12 microcontroller. This tutorial includes how to…
The FRDM-K64F is a development platform which utilises the MK64FN1M0VLL12 microcontroller. This tutorial includes how to download a simple blinky example onto the FRDM-K64F using the ARM mbed online IDE and KEIL MDK. Details of the GPIO module configuration are included.

A PCB for a Wi-Fi communicator using a PICAXE 08M2 and an ESP-01 module driven by interactive code makes a handy setup…
A PCB for a Wi-Fi communicator using a PICAXE 08M2 and an ESP-01 module driven by interactive code makes a handy setup for data collection and IoT reporting.

In this project, you'll learn how to wire an LED and flash it using the Raspberry Pi. Also, to isolate the Raspberry Pi's…
In this project, you'll learn how to wire an LED and flash it using the Raspberry Pi. Also, to isolate the Raspberry Pi's + 3.3VDC compliant output pins from supply voltages greater than this power source, an opto-isolator will be introduced as well.

Getting more familiar with a PIC MCU is a matter of working more often with it. Learn how to make a wireless thermometer…
Getting more familiar with a PIC MCU is a matter of working more often with it. Learn how to make a wireless thermometer with a PIC microcontroller.

In the last installment, we built the hardware to control an AC waveform with a TRIAC as the first step in a DIY solder…
In the last installment, we built the hardware to control an AC waveform with a TRIAC as the first step in a DIY solder reflow oven. This tutorial continues the project by showing you how to set up the low-level hardware to measure temperature, read the zero-cross detector, drive the TRIAC, and print to the serial terminal using a USART.

Connecting a PICAXE to the IoT through an ESP8266 module is easy once you know the process. Here are the details you need!
Connecting a PICAXE to the IoT through an ESP8266 module is easy once you know the process. Here are the details you need!
 Facebook
 Google
 GitHub
 Linkedin