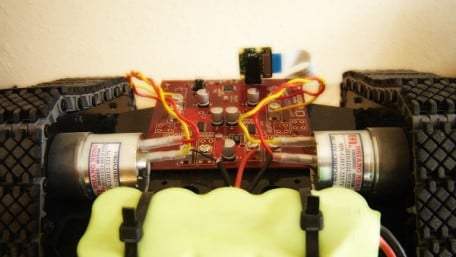
Finally, we have everything we need for a functional robot. Let’s put the pieces together and see what the C-BISCUIT demo bot can do.
Finally, we have everything we need for a functional robot. Let’s put the pieces together and see what the C-BISCUIT demo bot can do.

Freeze moments in time to easily produce extraordinary close-up pictures with your digital camera, an Arduino, and these…
Freeze moments in time to easily produce extraordinary close-up pictures with your digital camera, an Arduino, and these simple circuits.

Create a tracking device with an HC-12 transceiver, a GPS module, an Arduino, and Google Maps.
Create a tracking device with an HC-12 transceiver, a GPS module, an Arduino, and Google Maps.


In part 3, we compile the firmware and build the controller at the heart of the Saber, then do initial testing and diagnostics.
In part 3, we compile the firmware and build the controller at the heart of the Saber, then do initial testing and diagnostics.

In part 2 of the LED saber project, we'll assemble the power and audio systems.
In part 2 of the LED saber project, we'll assemble the power and audio systems.

In this article we’ll take a close look at two sections of the custom-designed control board for the C-BISCUIT demo bot.
In this article we’ll take a close look at two sections of the custom-designed control board for the C-BISCUIT demo bot.

Use an Arduino/Genuino 101 with iAQ-Core air quality and HIH-6131 temperature/humidity sensors to make an Indoor Air…
Use an Arduino/Genuino 101 with iAQ-Core air quality and HIH-6131 temperature/humidity sensors to make an Indoor Air Quality Monitor with Bluetooth low energy (BLE) connectivity.

The C-BISCUIT saga continues as we combine the various system components into a demo bot.
The C-BISCUIT saga continues as we combine the various system components into a demo bot.

Here's a rain gauge that empties itself and that you can read from your easy chair. Best of all, you can build it, yourself.
Here's a rain gauge that empties itself and that you can read from your easy chair. Best of all, you can build it, yourself.

In part 8 of the "Building Raspberry Pi Controller" series, readers will learn how to attach a camera board to a…
In part 8 of the "Building Raspberry Pi Controller" series, readers will learn how to attach a camera board to a Raspberry Pi and write Python code for photo imaging projects.

Learn how to build a system that can turn DC loads on and off using a mobile application. You'll also learn how to…
Learn how to build a system that can turn DC loads on and off using a mobile application. You'll also learn how to perform this task via immediate actions or via timers set in advance.

Learn how to use a Raspberry Pi and an Arduino to develop a system for monitoring and controlling your home.
Learn how to use a Raspberry Pi and an Arduino to develop a system for monitoring and controlling your home.

The PICAXE 40X2 features 32 I/O ports and speeds up to 64MHz; a development platform simplifies project design using this…
The PICAXE 40X2 features 32 I/O ports and speeds up to 64MHz; a development platform simplifies project design using this workhorse.

Counters using 7-segment LEDs are fun and useful projects for scoreboards and other numerical displays; here's one you can build.
Counters using 7-segment LEDs are fun and useful projects for scoreboards and other numerical displays; here's one you can build.

Learn about the NES Controller's data protocol, then use this knowledge to easily integrate into an Arduino Uno.
Learn about the NES Controller's data protocol, then use this knowledge to easily integrate into an Arduino Uno.

In this article, we teach C-BISCUIT how to do important life things, such as booting into our OS of choice, and…
In this article, we teach C-BISCUIT how to do important life things, such as booting into our OS of choice, and connecting to the Wi-Fi it'll come to know as the gateway to knowledge.

Use DS3231M RTC alarm functions to make programmable, time-based, switches to power devices on and off at precise times.
Use DS3231M RTC alarm functions to make programmable, time-based, switches to power devices on and off at precise times.

In this article I'll show you one way of sending an SMS using a PIC 16F628A and a SIMCOM SIM900A module.
In this article I'll show you one way of sending an SMS using a PIC 16F628A and a SIMCOM SIM900A module.

SIMCOM's SIM 900A in Europe? Read on to learn how.
SIMCOM's SIM 900A in Europe? Read on to learn how.
 Facebook
 Google
 GitHub
 Linkedin